🌿 Trim like a pro with the precision only Echo OEM can deliver!
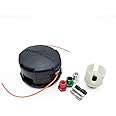
The Echo Genuine OEM Trimmer Head #99944200907 is a precision-engineered replacement part designed specifically for Echo trimmers. It guarantees perfect fit, durability, and efficient cutting performance, ensuring your equipment runs smoothly and lasts longer.
P**I
Ryobi owners - look no further
TLDR: This head works great on my Ryobi trimmer and fixed my line-jamming issues. Use the included red adapter, and remove the adapter that is pre-installed on your drive shaft.My Ryobi 4-cycle straight shaft trimmer has been a headache for years. The line would constantly jam, and this would require stopping what I was doing, pulling apart the line, and reinstalling the head from scratch. I tried tougher line, which increased the time between jams, but only because the line would break less often; it would still stick to itself and not feed. I could not figure out why the line would not feed when I tap the head, and why it would always seem to stick to itself. I tried WD-40 and other lubricants on the line, oil changes and fuel additives to give the motor more power, fresh gas, different line wrapping methods, everything I could think of.Finally it occurred to me to replace the entire head, and VOILA! problem fixed. Turns out the head included with the Ryobi is junk and is prone to jamming, simple as that. As soon as you hold this replacement head in your hands, you'll realize the difference in quality. It has a much more effective line-advancing mechanism, and feels overall sturdier and more well-made.The included instructions are rather poor. They attempt to cover all scenarios, but I found them very confusing. There's a chart telling you which parts to use for your trimmer, but Ryobi models are bafflingly absent from the instructions, even though the head is compatible. For Ryobi owners, here's what you need to know.1) Determine if you have an LH or RH threading model. LH is REVERSE threaded, meaning you have to turn the head clockwise to UNscrew it. RH is standard threading. My understanding is that most straight-shaft trimmers are LH and curved is usually RH. Ryobi models with a factory-installed head have a red screw thingey that needs to be removed to replace line. Take note of how this unscrews to determine your threading.2) The replacement head has a gold adapter pre-installed into it. You'll need to take the head completely apart to remove it and replace it with the included red adapter. Be careful and observant when doing so, as the instructions do not include re-assembly steps. (I told you the instructions suck) The gold adapter is in there very tightly, you'll need a screwdriver and hammer to tap it out. Once swapped, reassemble the head including loading the line.3) You'll notice as you reassemble the head that the string spool can go in two different ways. One side is labelled LH and the other side is labelled RH. Be sure to put the spool in so that your thread type is visible to ensure proper orientation. Remember, the head is universal so it fits both types depending on which way you install it.4) It's almost impossible to tell, but there's an adapter already screwed onto the drive shaft of the Ryobi trimmer. This needs to come off and it's a pain. You'll need two pairs of pliers or wrenches to hold the shaft and turn the nut. Mine was really stuck in place from years of use. Remember, the threads with either be LH or RH depending on what you determined in step 1, so unscrew accordingly.5) Screw the replacement head directly onto the threaded shaft. The red adapter should line up with the factory shaft threads. You'll need a needle-nose pliers to hold the drive shaft in place so that you can screw the new head on tightly.It was amazing what an immediate improvement I saw. Not only did the line cease jamming, but I felt that the trimmer suddenly had more power and was less prone to stalling or power dips. I still strongly recommend staying away from 4-stroke engines on yard equipment; they're just too weak to get the job done. However, this simple replacement head brought this crappy trimmer back to life and I was able to complete my yard work with no frustration for the first time in years.Can't recommend this enough. High quality product and seems to fit just about any model trimmer imaginable!
P**
Fits perfectly on my Makita 36V string trimmer
Fits & works perfectly in my 36V Makita string trimmer.
S**K
Fits Greenworks 21142 trimmer
This fit my Greenworks 21142 trimmer perfectly with the red included bushing and works better than the OEM head.
S**G
Does not fit GT-225
I’m not going to give this a bad review because I should have done more research. But I swear that I saw in more than one place that it did fit. Apparently you need the Echo part number ending in 08, which is available on Amazon. Of course a little more info on this page would helped, such as listing the other part number. Or find where it is sold in the Echo blister pack that includes an adapter. Or buy a cheap knock off that includes adapters, which I didn’t want to do. Hope this helps someone.
M**N
Durable and Inexpensive
Fits my 58V Echo Trimmer. Bought one 4 years ago and it has taken some serious abuse for 4 years and I am buying another one. Good piece for sure and it only costs about $1 more than 4 years ago!
G**R
Nice upgrade for my John Deere S1400 (homelite) string trimmer
TLDR - With S1400 use the red aluminum part, you must fully disassembled the speed head and the L should be facing up during reassembly. The S1400 uses the speedfeed in it's left hand configuration (as delivered) and you won't need the white adapter (red aluminum part goes into the black adapter)This review is primarily for installation tips, however in the course of learning more about the Echo speedfeed 400 head I'm expecting it to be a huge upgrade.My trimmer is a 30cc gas powered John Deere S1400 (apparently it's a rebadged Homelite trimmer) that's from around 2015 or so (not really sure)To fit the speedfeed to the S1400 I needed to fully disassemble the speedfeed and also remove the short (2") female to female adaptor from the S1400.Taking the speedfeed apart started with pressing two tabs and wiggling the larger side (with center spring) off.My S1400 is similar to many trimmers in that it is a left hand device (LH). With the speedfeed disassembled I needed to push out the already installed black aluminum fitting and replace with the red fitting.Was important to make sure the hex head of the red fitting was fully seated, should sit about 1/8-1/4" out of the speedfeed.During reassembly it was important to install the line reel with the L facing up (on the reel point clockwise). The two tabs on the larger side of the clamshell slip INSIDE of the other piece. They at first glance appear to go outside with pressure but that's wrong.On the S1400 I reused the metal flange with the female splines, and the hard plastic ring fit nicely into it.Hope this helps - hard to figure this out just by thinking, especially because left hand and right hand threads are reversed depending on whether looking from top or bottom.
Trustpilot
4 days ago
5 days ago