🌟 Illuminate Your Growth Journey!
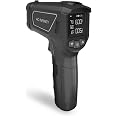
The Quantum PAR Meter is a high-precision tool designed for measuring Photosynthetic Photon Flux Density (PPFD) in the 400-700nm range, essential for optimizing light conditions in indoor gardening and horticulture. With features like dynamic measurements, a large display, and the ability to store up to 100 values, this meter empowers growers to ensure their plants receive the ideal light intensity for vigorous growth.


M**N
Improved User Manual Below
I purchased APM092 PAR meter from GainExpress.com because they sell it a little cheaper than other vendors carrying this product, but the product is the same regardless of who is selling it.The product is very well made. Solid construction. It feels good in your hand, and it is easy to operate, ONCE YOU UNDERSTAND HOW TO USE IT. It appears to be very accurate judging by how well the PPFD readings matched readings provided by the manufacturer of my hydroponics lighting.There’s a handy 1/4” tripod socket that enables you to attach a selfie stick so that you can reach back and take measurements in far corners of your greenhouse. However, you can’t leave the unit on a tripod to record average light during a period, because the unit automatically shuts off after 3 minutes when no buttons are pressed.If there is any weakness it is the user guide, obviously written by someone in China, which fails to explain a some important concepts. To help other purchasers I’ll provide an improved Users Guide below:APM092 PAR USERS GUIDEON/OFF: Pressing the POWER button turns the unit on. Pressing and holding the POWER button for 3 or more seconds turns the unit off. Turning the unit off, clears the dynamic measurement buffer.4 MODES:1) AVE: Measures PPFD every second and reports the average measurement.2) REC: Measures PPFD every second and reports the last index of data logged. When REC is blinking and HOLD is pressed, you can cycle through measurements stored in the data log.3) CAL: Zero-point calibration.4) RES: Reset the unit and clear the data log.When you first turn the unit on, it starts in AVE mode where the meter takes a PFFD measurement every second. This enables you to immediately move the meter over an area to determine the average PPFD.Press the MODE button to cycle through the other modes: AVE > REC > CAL > RES. When moving to REC, CAL, or RES these modes will begin to blink after a brief pause When REC, CAL or RES are blinking you can activate these modes by pressing HOLD. AVE does not blink but indicates that you have returned to taking dynamic measurements, once a second.3 TYPES OF MEASUREMENTS:1) DYNAMIC MEASUREMENTS: As you move the meter over an area, dynamic measurements are taken every second. Dynamic measurements continue to be made until you either press HOLD or turn the unit off. Dynamic measurements are stored in an internal buffer and used to report AVE (average), MAX (maximum), and MIN (minimum) dynamic measurements. AVE, MAX, and MIN do NOT include measurements stored in the data log. Turning the unit off clears the dynamic buffer and resets AVE, MAX and MIN values. (see GETTING AVE, MAX, MIN below).2) A HOLD MEASUREMENT: this is the last dynamic measurement at the time the HOLD button was pressed. When HOLD is pressed, the word “HOLD” is displayed, and additional dynamic measurements are no longer made. To return to dynamic measurements taken every second, press the HOLD button a second time.3) LOGGED MEASUREMENTS: Up to 100 measurements may be stored in a data log at indexes 001 through 100. To log any dynamic measurement, simply press the UP/LOG button.While in REC mode, the index of the last measurement logged is shown at the top center of the display to the right of REC. Until you log your first measurement, this shows 000. After logging your first dynamic measurement, this changes to 001, meaning that your last logged measurement was stored at index 001. When you press UP/LOG again to store a second measurement, you’ll see 002 displayed and so on. This makes it easy to see how many measurements you’ve previously logged.There is no way to transfer these measurements to your phone or a computer, but you can cycle back through the data log and enter these measurements in a spreadsheet by hand. (see VIEWING LOGGED MEASUREMENTS below).GETTING AVE, MAX, MINWhen you first turn the unit on, it enters AVE (average) mode. It immediately begins taking dynamic measurements, once every second, and storing these measurements in a dynamic buffer (NOT to be confused with the data log storing 100 readings).This makes it easy to measure the average PPFD. Simply turn the unit on and move it over a particular area, allowing the meter to take measurements once a second. You will see a large number in the center of the screen showing the current measurement, and a smaller number at the top center of the display to the right of the word “AVE” showing the average of the measurements in the dynamic buffer.To see the MAX and MIN measurements in the dynamic buffer, press the Down button to cycle between AVE > MAX > MIN > REC. For AVE, MAX, and MIN these values will be shown as smaller numbers at the top center of the display to the right of AVE, MAX, or MIN, respectively.When REC is shown, the number at the top center of the display is the index of the last measurement stored in the data log.In every case, the large number at the center of the display is the last current dynamic measurement or the last measurement at the time the HOLD button was pressed.IMPORTANT: the AVE, MAX, and MIN values ONLY reflect the measurements stored in the dynamic buffer and do NOT include measurements stored in the data log.Every time you turn the meter off (by holding the POWER button for 3 or more seconds) the dynamic buffer is cleared, and the AVE, MAX, and MIN values are reset.Turning the unit off does NOT erase the measurements stored in the data log.You can use the HOLD button to control when dynamic measurements are recorded. For example, suppose you are a hydroponics farmer and want to measure the average PPFD for microgreen trays in different parts of your green house. You can turn the unit on and move the meter over the first tray to capture multiple measurements, and then press HOLD to stop taking measurements. Then you walk to the second tray and press HOLD again to reactivate dynamic measurements. Then you would move your PAR meter over the second tray for several seconds to capture several measurements. Next press HOLD to again stop taking dynamic measurements. Walk to the third tray and press HOLD again to reactivate dynamic measurements and so on. Since no measurements are taken while HOLD is displayed, when you walk between trays, no measurements are taken. As a result, the AVE, MAX, and MIN values only apply to the light over the trays you measured.LOGGING MEASUREMENTSTo store the current measurement in the data log, simply press the UP/LOG button. This works no matter what mode you are in.The only time pressing the UP/LOG button doesn’t store a measurement is when you activate CAL (Zero-point calibration) or RES (reset) modes by pressing HOLD when CAL or RES are blinking. In this case, both the DOWN and UP/LOG buttons toggle the word displayed from “no” to “YES” to allow you to calibrate the meter or reset the data log, respectively.Unlike measurements in the dynamic buffer, measurements stored in the data log are not cleared when you turn the unit off. To clear the data log, you press the MODE button until the RES (reset) mode is displayed. After a brief pause, RES will start blinking and you press HOLD to display “no”. Then you can use either the DOWN or UP/LOG buttons to toggle between “no” and “YES”. If you press HOLD a second time while “no” is displayed, nothing happens, and you simply return to whatever mode you were in prior to pressing the MODE button. If you press HOLD a second time while “YES” is displayed, your PAR meter will be reset, and the data log will be immediately cleared.VIEWING LOGGED MEASUREMENTSThe data log can store up to 100 measurements at indexes 1 through 100. The last 4 logged measurements stored in the data log are shown in a vertical column on the left of the display.To see additional logged measurements, press the MODE button until REC is displayed. After a brief delay the word REC will blink. Next, press the HOLD. This results in index 001 blinking at the top center of the display to the right of REC and the measurement stored at index 001 to be shown in the center of the display.You can then use the DOWN and UP/LOG buttons to cycle through the data log with the index blinking and the measurement at that index shown in the center of the display. If no measurement has been stored at the current blinking index, horizontal dashes will be shown.The measurements stored in the data log cannot be transferred to your mobile device or to a computer. However, as you cycle through the data log you can record these measurements manually in a spreadsheet.ZERO POINT CALIBRATIONPress the MODE button until CAL is shown. After a brief pause CAL will start blinking. Pressing HOLD will display the word “no”. Use either the DOWN or UP/LOG buttons to toggle between “no” and “YES”. While “YES” is displayed, cover the light sensor to block all light and press HOLD a second time. If the device is properly calibrated the word “PASS” will be displayed.CLEARING LOGGED MEASUREMENTSTo clear the data log, press the MODE button until RES (reset) is display. After a brief pause, RES will begin blinking. Now, press HOLD. This will display the word “no” in the display. Pressing either the DOWN or UP/LOG buttons will toggle the word “no” to “YES”. Pressing HOLD a second time while “YES” is displayed will reset your meter and clear the data log. Pressing HOLD a second time while “no” is displayed will do nothing and cancel the reset.
S**T
Grow it right the first time
Love it, use it all the time. Plants appreciate it too.
W**S
Seems to be accurate
Far more accurate than my eyes for my tent garden project build, and extremely useful in doing so.No question now in whether my lights needed height adjustability as I can measure light intensity at different distances and this meter seems to correlate with some reviews on the lights I purchased.
B**.
Works just the same as my pulse labs pro sensor !
Got this to check my ppfd and then recently purchased a pulse labs pro sensor and it matches right up to that, very happy with this tool
J**S
Easy to use
Easy to use. If course I don't own an Apogee to compare with.
J**.
Tough built meter that works
I like how this is built and it is as accurate as I need.
B**E
Nice meter
Nice little pocket, tent, or bang around meter. Seems to be durable and feels good in your hand. I compared it against some other meters I had and it’s right there with them. Thinking about two more.
R**B
Works as expected
Does it's job well
Trustpilot
2 days ago
1 month ago