🚐 Drive with Confidence—See Everything, Miss Nothing!
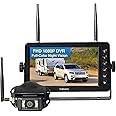
The Haloview BT7 RV Backup Camera is a cutting-edge wireless system featuring a 7" LCD monitor and 1080P FHD recording capabilities. Designed for a variety of vehicles, it offers seamless real-time recording, a wide viewing angle, and exceptional night vision performance, ensuring safety and convenience on the road.


| Optical Sensor Technology | CMOS |
| Effective Still Resolution | 2.1 MP |
| Lens | wide viewing angle |
| Connector Type Used on Cable | DC |
| Real Angle of View | 120 Degrees |
| Video Capture Format | avi,format.a |
| Display Technology | LCD |
| Video Capture Resolution | 1080p |
| Voltage | 32 Volts |
| Screen Size | 7 Inches |
| Lux rating | 0.1 Lux |
| Compatible Devices | Haloview |
| Installation Method | Surface Mount |
| Item Dimensions L x W x H | 11.02"L x 9.06"W x 4.33"H |
R**L
Installion was a chore, otherwise once set it, it just works!
We had a blow out on our tow dolly a couple of years ago, and didn't even feel it until a lot of damage had been done. I decided we needed a camera so we could see what was going on, and so I selected the Halo camera as an option. When I got it, I was a bit put off by the plastic feel and build quality. Not unexpected for the head unit, but the camera is all plastic.Installation; In the cab, the setup was reasonably easy. I mounted the camera with Scotch 'Extreme' double-sided tape to the inside of the windshield, above the existing but useless rear-view mirror. I wanted it there because that's where you already look instinctively for a rear view mirror. I ran the wire along the inside and down the A pillar to the fuse box and tapped it in there with a fuse-tap kit meant for a dash-cam. Worked great.The rear camera took a bit of thought. I had no way to power the rear camera and didn't want to run wire all the way from the front fuse box or ignition, up the inside of the wall, and to the camera. So, I looked around inside and realized there were lights under my top cabinets above my bed that have a hot wire to them when the coach batteries are on. Once I selected that as the power feed, the rest was relatively easy. I drilled a hole through the fiberglass, mounted the camera, and ran the wire inside the cabinet and tapped it into the existing wire for the lights. I also added a switch so it can shut off the camera when I'm parked. Even though the camera only drew about 120 ma, I'd rather not have it on if I'm boon-docking and want to save battery power. It's a bit annoying to go turn that switch on every time I want to drive, but I then I remind myself how much harder it would have been to run power from the fuse box, along the frame, into the coach, and through the inside of the wall. So yeah, I'm okay with a switch in the cabinet.Setting it up was easy, the camera and receiver connected immediately. I reversed the image to match what you would see in a rear-view mirror, and it was pretty much done. I did add a memory card to record whatever it see's when it's on, but realize it only works if the receiver is on (mine is off if the ignition is off). You could wire yours to be on and recording all the time if you wish. I was worried the image wouldn't be bright of enough, but it works fine day or night. In fact, it dims automatically at night, which is perfect. It has a lot of settings you can change or shut off, like the night auto-dim feature mentioned above, but I did not need to change anything else.My only minor complaints are as follows;1) The frame rate sometimes drops from what would be nearly TV-quality to something that appears just slightly choppy. Interference maybe, I don't know. But overall unless you are watching this thing like a TV you don't really notice it, and it does not bother me.2) The outside camera is all plastic. Will the sun do damage to it, or it's rubber antenna, over time? Will it make the lens crazed or cloudy? Works great now, but how about in the future. Time will tell.3) It does have some LED's in it that are supposed to be used as a 'flood' light when you turn it on from the head unit. Sometimes this feature works, sometimes it doesn't, and sometimes they just randomly turn on minutes later. Unless you use the camera to hitch up trailers at night frequently, I can't really see a use for this feature anyway. The LED's aren't crazy bright anyway (but surprisingly do add enough light to see what's going on in the video at night).4) Finally, I mounted mine up high on the motor home so I could take advantage of the wiring in the cabinet. The vertical height of the video image is such that if I have it tilted up enough to see distant traffic behind me, I can't see the extreme front of the car on the tow dolly (nor can I use it to back the ball up into a trailer hitch). If I tilt it down to see all of the car and the hitch, I can't see distant traffic. In my use case, the camera would have benefited me by having more of a fish-eye type lens. Mounting it LOWER would have also helped with this, so if you are considering location, I would suggest about 6' off the ground rather than closer to the top of the motor home where mine is. I guess one benefit is that if I pull a small to medium sized box trailer, I can see over it.As an aside, you can also buy side cameras, which are similar to the ear-facing one except they have a third wire that connects to the turn signal so that when activate it, the video changes from the rear-face to the side you activated the turn signal on. I don't have this feature, nor would I find it easy to run wiring from the turn signal to the camera, but the camera is capable of it.In summary, the hardest part was finding power to tap into for the rear camera. My particular solution was pretty easy, with the caveat that the coach batteries have to be on for it to work. If your motor home is already wired for a camera, you are so much the better. The display looks good day and night both, and I don't have to touch it. I start the motor, and seconds later the display is working. Other than the light feature in the camera, it hasn't had any glitches or weirdness, and it was reliable for our three week cross country trip.Overall, the peace of mind of being able to see what is going on better with whatever I'm towing makes it worth it. Unless it dies in the next few years, I will be happy with my purchase.
R**R
Best camera for the money!
I couldn't be happier with my purchase of the Haloview BT7 RV Backup Camera. The installation process was straightforward, I had the camera up and running in no time. The project took about 30-45 minutes. The instructions provided were clear and easy to follow. The provided connecting pieces allowed me to connect to the system without splicing wires. The camera securely mounted on the back of my RV. I didn't need any special tools to get everything working. The bracket provided did not completely cover up the hole for the Furrion camera. There was a 1/16th of an inch on the bottom of the hole. Nothing the caulk job could not cover. Setting up the wireless connection with the display monitor inside the vehicle was a breeze. I will say I skipped the step about pairing beforehand and had no issues. My Trailer is 35’ from tongue to rear. Haloview really designed this product to be user-friendly. I mounted my camera to my review mirror.Once the camera was in place, I found the clarity and quality of the video feed was good. The HD camera provided a clear view of everything behind my RV. One thing to note is the default view is flipped from left to right. I had to switch that because driving down the road flipped really bothered me. I never lost connection to the camera while driving down the road. The wireless signal has been rock-solid even at two bars! I was really concerned about this because the other cameras said they needed line of site for the antennas. I was concerned about potential interference and/or dropouts, but the system has been incredibly reliable. The video transmission is smooth, with little noticeable lag between the camera and the monitor, which is crucial for safe and efficient driving. Backing up and parking was much easier than before. Would like to try the side cameras to see how they perform! I highly recommend the Haloview BT7 without any reservations.I will upload photos soon.
M**Y
Great Camera
Our Coachman was prewired for a Furion which I had for 3 years. The camera became foggy so I switched to the Halowview. It was well worth it super easy to install and plugged into the existing wiring with no need to cut or splice. The display is so much cleaner single strength is awesome. I will be also adding the side cameras next.
L**L
Good quality camera and clear monitor screen
First off, the camera mounted to easily. That’s because my trailer came pre wired for the Furrion system. I removed the Furrion housing, cleaned up the old silicone, attached the adapter cable to the existing Furrion cable connector, it new silicone on the gasket and installed the new camera. Easy peasy. When I plugged the monitor in to the power outlet ( what my generation calls a cigarette lighter, yes, I’m old), the camera immediately paired with the monitor. Done. Simple.The camera quality is really clear (only checked in daylight) and you can adjust the camera down to an angle that suits you.The downside, and it’s a small one, is the software for the menu in the monitor is not intuitive nor are the buttons on the side of the monitor. But, once I figured it out, I was able to navigate my way around without too much trouble.Am I happy I got the system? Yes! This will help me backup the trailer by myself and with the side marker cameras, I’ll be able to tow more comfortably and confidently. As far how it holds up under use, I’ll have to wait and see on our next trip.
Trustpilot
3 days ago
5 days ago