🚀 Elevate Your 3D Printing Experience!
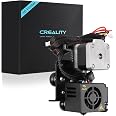
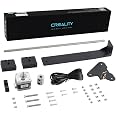
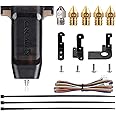
The Creality Original Ender 3 Direct Drive Upgrade Kit is a comprehensive solution designed for Ender 3, Ender 3 V2, and Ender 3 Pro 3D printers. This kit enhances your printing capabilities by allowing the use of flexible filaments like TPU and PLA, featuring an all-metal hotend for durability and a smooth feed-in mechanism to reduce nozzle blockages. With easy assembly and robust after-sales support, this upgrade is perfect for both novice and experienced users looking to elevate their 3D printing game.


T**E
Works great when you configure it correctly.
The media could not be loaded. So I’ve waited to review this product until I had a good amount of time to test and determine its reliability and performance. I’ve had it installed and running for a week now and run through about 6-8 prints.The Sprite SE kit is actually pretty good for a budget inspired upgrade.Remember this is NOT the Sprite PRO.Note: This was installed and running on an Ender 3 V2.I wanted to upgrade to a direct drive extruder because I wanted to print more TPU 95A. As you know pushing TPU through a Bowden tube is like pushing wet spaghetti in a straight line. Even though I have had some success with TPU in a Bowden tube before, it caused some issues I’d really like to avoid in the future, hence the upgrade to direct drive.Installation: The instructions, as limited as they are, give sufficient enough information to be able to install the Sprite SE within 30 minutes or so (may take longer if you are not very experienced with the machine).I did run into a small hiccup while installing where the bottom roller on the extruder frame got lop-sided and became loose and wiggly causing all sorts of problems off the get go. I went through the set up again and finally discovered that somehow, the offset spacer on the bottom roller was opposite of what it should be. After fixing the offset spacer, by rotating into its correct upright position, the roller frame finally sat snug and tight against the X-Axis rail.I continued the installation steps and got to the part where you have to “write and save” your own G-Code to recalibrate the firmware extrusion E-Steps. Default is 93 in the Extrusion e-step settings. The change needs to be made to Esteps/mm value to 424.9.**Newbies don’t get scared at this point!Just open a blank notepad on Windows or Mac and copy/type in the text exactly as they have it on the instructions. Then you insert your micro SD card into your printer and run the g-code as if you were going to print that file. Nothing happens, it just configures the esteps and temporary saves it in the firmware.Another issue I ran into was that the Ender 3 V2 firmware DOES NOT save the new estep setting if you turn off or disconnect power. You will need to run that file each time you start up the machine. That’s when I learned that if you flash the firmware and install Jyers firmware you can run that estep reconfig once and it saves it indefinitely. Nice, plus installing Jyers is easy and really awesome, wish I would have done that a year ago. It has great features that really should be in the default Creality firmware.Now after all that, the direct drive works great and does what I wanted it to do in the first place.It runs all sorts of filament types and makes changing filaments easy and fast.I have been using it to do color changes mid print as an alternative to buying a multi-color printer (for now). Filament color changing is easy enough to do and setup in Cura Slicer via change filament or pause at height script.I hope this long winded review helps some of you looking to upgrade. I wanted it to sound simple enough and intuitive, that new users wouldn’t be afraid to go for it. It was a minor pain to get running perfectly but after some time and tuning, it’s working great now.I do recommend this Sprite Extruder SE kit if you’re looking for a modest and budget friendly upgrade.Happy printing folks.
S**D
Great Upgrade for the Ender 3-Pro
Great product for the price. It was very easy to install on my Ender 3-Pro, and the product came with a motherboard guide for easy connectivity.Heats faster than the default factory hot end that comes with the Ender 3-Pro, and love having the extruder attached.
D**W
Bolt on direct drive for Ender 3-v2 for TPU printing ease.
I directly added this to my Ender 3-v2. Works well, I had to look up how to "retune" the firmware for this new setup, and all of it took many hours as I am not a very smart guy, but I enjoyed trying my hand at this conversation and happy I did. Nozzle/hotend is same as Ender 3 and ender 3-v2 just red anodized instead of silver look. Performance difference, zero, but allows a bolt on direct drive, that is the advantage of the Bowden tube factory setup with is also great, but DD is great for TPU filament
R**K
Ribbon cable
Works great, but the hot end ribbon cable is not long enough. Cable routing difficult to work with
T**T
Make sure to change your e-steps on your extruder in your printers settings after installing!
I put this part on my old Ender 3 as a part of my upgrade for it. Now printing is much easier and my prints look alot better with direct drive!!
G**F
The unit will clog shortly after you start a print job. Read my remarks.
There is a major problem with the engineering of this.Using standard settings the Boden tube between the Drive Unit and the Print head is too narrow causing the Filiment to stick to the Boden Tube which in turn stops causes the Printer to stop printing. The Filament retracts and is still melted and sticks to the boden tube. THIS IS WHY I GAVE IT SUCH A BAD RATING.This little Boden tube should be Brass with a PTFE inside coating. That would resolve this maddening problem.I am keeping the unit and making my own Bowden as I described.Otherwise I would have given it 1 star and returned it.
A**N
Good little upgrade
I need to repair my 3d printer and figured I would give this a try. Works great so far and has helped me as a beginner get my printer fixed pretty quick and easy. So far so good. I'm definitely happy with the purchase
J**E
If you like rebuilding your printer after every print, buy this. Otherwise, avoid like the plague.
I read the reviews, much like everyone else, and spent the time to weigh my options. I came to the conclusion before doing any research that this was worth the price. Let me say, I was right. I got what I paid for, Junk. Does it function as a direct drive extruder? Yes. I will not lie, it works like it says. However, it is terribly designed, and causes major issues of clogging, breaking filament, and the extruder not being strong enough. I am going to be plainly honest and say that I am still quite new to 3d printing, even though I have a few years under my belt. I will also caution you from purchasing this product for any other reason for entertainment or research. The instructions for installing it were straight forward, however, having to disassemble nearly the entire printer to install it, not so great. I should also mention that if you have a clog, you have to disassemble the entire gantry just to maintain it. I was using all Creality parts and filament for the time I was using this direct drive extruder, and I can say 100% it is not worth it. Stick with your Bowden tube, or go with another direct drive system because this is not worth the hassle. If you are still learning, and looking to figure out something new, go ahead and purchase this as it is low cost enough to use as a training example of what not to purchase, and how to fix a broken direct drive system. Outside of that, if you are looking for functional parts that will not fail, look elsewhere.
Trustpilot
2 months ago
4 days ago