🎉 Elevate Your Interiors with Effortless Style!
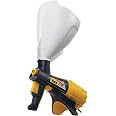
The Wagner Power Tex Electric Corded Texture Sprayer is a lightweight, user-friendly tool designed for applying textured finishes like popcorn, knockdown, and orange peel. With a 1-gallon hopper and built-in air turbine, it eliminates the need for an air compressor, making it perfect for both DIY enthusiasts and professionals looking to enhance their spaces quickly and efficiently.
Item Weight | 2.8 Pounds |
Tank Volume | 1 Gallons |
Material | Plastic, likely High Density Polyethylene (HDPE) or Polypropylene (PP) |
Style | Sprayer |
Color | Yellow |
Maximum Pressure | 2 Pound per Square Inch |
Power Source | Corded Electric |
P**A
Not professional texture equipment, 5 stars as not professional equipment, this review has some tips
If you don't want to hire a contractor, don't want to buy a compressor, hose, fittings and a really nice mud sprayer, and you have small to medium projects, then this is the item you want to buy.This allows 3 features where the professional equipment would allow at least 5.For instanceyou can dilute/thin the mudYou can use a different spray nozzleYou can lightly or heavily pull the triggerA pro setup would also allowA nut or screw that sets maximum trigger pullA change of air line pressureThe difference is that fine mist of mud that a pro can get to do a very fine orange peel or project mud spray further.Having done that part of the review, my wife and I are satisfied. The ergonomics are good. The hopper size while smaller than a pro size hopper is perfect for the homeowner. My first time using it (after watching a lot of video online) Both my wife and I judge the results "better than that of the person that flipped this house18 years ago". Cleanup is very reasonable.I've done a couple rooms, walls and ceilings in my home this year (2021) with the Wagner. One room 14 by 16, the other 11 by 9. (90 year old house, and the person that flipped it a couple owners before me was a hack, it needed mud joints sanded and redone as tape was showing and other mistakes )DON'T LOOSE THE O-RING ON THE HOPPER WHEN CLEANING IT. This O-Ring does come off the hopper as you disassemble. Keep track of it.There is some grease that comes with the Wagner, put some on the O rings and use a q tip to put some on the inside of the nozzle after cleanup.Second Tip, when done spraying immediately shut off the turbine. If you leave the turbine on the mud still in the nozzle will dry faster and lead to more clogging.Buy the drywall mud with the blue lid on the bucket. Drywall mud needs to be thinned, a lot. Nope, even more than that. Keep going. Not done yet. Finally, you think you are done thinning. Nope, add a little more water. Trust me on this one, it will keep the mud flowing while you use it.How much drywall mud will you use? It depends on how thick you put it on. I used about 4 gallons for one room and three for the other. But I needed to cover a lot of sins committed by the original drywaller. (see above) Some jobs would only use a gallon for the same size room. It depends on what texture you are spraying and why you are spraying it. If you are hiding a lot of mistakes you will use more mud. If you want a fine spray light texture you will use much less.If you are going to "knockdown" the texture (flatten with a wide soft putty knife type thing) don't let the mud dry to much.Sprayed on texture can be removed with a drywall knife if you get to it soon enough, but don't let it dry all the way.You will need a big drywall mixing paddle to mix the mud while adding water. The other thing a homeowner might need for the job is a much larger electric drill than they probably already own. Thinning a bucket of drywall mud is not an easy thing for a typical 3/8" drill. Mine started smoking in seconds, so I went and got a BIG professional name brand hammer drill. And even that could have been upsized another 80 bucks. These projects are not for wimps with tight wallets.With all the water that will by drying from the walls and ceiling the room will get humid quickly. Expect it.Oh, the Wagner comes with a little packet of grease. Use the grease on the two O rings and apply to the inside of the nozzle with a Q-tip. This will prevent dry rot of those parts.Don't trip over the power cord while holding a couple pounds of drywall mud in that hopper. No, I didn't, but it was close.Before spraying put up a lot of plastic over windows, doorways, walls, floors, electrical outlets and on and on. Blue tape and plastic sheets are your friends, use 'em. You can also use plastic sheet as a practice location. Another practice location could be on cardboard, a big piece.Your friends and family will admire the work you've done if you take your time, and do a consistent job. Mine have.If after looking at the price of the Wagner, the mud, the mixing paddle, the large electric drill, the blue tape and the plastic sheets and your own time, consider that a pro might charge 500 dollars just to texture one small room. I went with the new tools, I did two rooms and still have another to do.
S**E
perspective from a woman
As a non-construction-background woman whose only experience is with buying a fixer-upper (for the 3rd and final time!), I wanted to review this item from a woman's perspective. I wanted an electric texture gun as opposed to the pneumatic as I find an electric cord much less cumbersome than an air hose. Plus, it's hard sometimes to get "dibs" on our air compressor as my husband uses it for many, many things. So this was the only home-use unit of that nature that Amazon sells. The price is well worth it, however I have never used another one so cannot really compare, only say that I am very pleased despite the cost.I agree with everyone else that "pancake batter" is the right thickness, although I found that it was better to make it slightly runnier. ONLY slightly, any more and the stuff will drip on the walls, so it has to be at least a little bit thick. I practiced on my actual wall, but behind a door that is always open. It only takes a couple of squirts to get the idea of how it will work and if your stuff is thick enough or thin enough. We did all medium orange peel. So far we have done one whole bedroom plus the ceiling and two hallways not including the ceiling.Save yourself some trouble and DO NOT buy the Homex texture powder they also sell on Amazon unless you want a popcorn texture. That stuff really sucks. We used it in the office and used up two whole boxes and it was like a mixture of popcorn and orange peel. Luckily, the next day when it was dry I just went over it with a drywall trowel at an angle and knocked off the weird bits and it looks great now, no need for a do-over.I highly recommend that you just use pre-mixed/wet drywall mud and then thin it down with water. Also, spend the little extra to get a paint-mixer drill attachment. I got one at the hardware store for six bucks. Well worth it and it really saves your arm from hand mixing.I did pre-paint the walls with an inexpensive paint to prime the walls as per the directions, but I'm not 100 percent sure this is necessary. I do think it is necessary to paint the texture with a primer or regular paint before you use whatever expensive paint on top. It is drywall mud, so soaks up the paint very quickly. On raw drywall I would say it used almost twice the paint that you would expect from start to finish and on previously painted walls about half again as much. Paint is expensive so I went with some walmart paint to save money on the real paint that I finished with.This unit works as the directions state so I won't go over that again. I will recommend, especially if you are a low-upper-body-endurance person like me, that you only fill the hopper halfway to do the ceilings and 3/4 of the way to do the walls. It is very heavy with the mud in the hopper!Prep is the biggest issue. Make sure you cover everything you don't want sprayed. Don't think you can use drop cloths on the floor, you really need to use plastic and tape. The unit has a pretty powerful exhaust and when you are spraying near the bottom of the wall, it will blow away your drop cloth and you will spray the floor. Thankfully the mud comes off with water, but I wish I had taped down plastic and then put a drop cloth on top of that to stand on (it gets slippery on just the plastic). After you spray, wait until the next day to remove the plastic. All the bits will be dry then and fly off, but it is less mess this way than trying to do it when everything is wet and risking marring the new texture you just put on.Also, wear knee pads. You will be getting low to do the bottoms of the walls and it is much easier on the body to kneel than to bend over.Clean up of this model is slightly a pain, but easy enough with the flexible brush they give you. Pay close attention to the fact that where the hopper screws in and where the stuff comes out are not directly connected and need to be cleaned out separately. Where the hopper screws in there is a gap under the rubber where the mud will collect but this must be cleaned out! It is easy but time consuming. The interior is all black, so if you see any white, it ain't clean.I've done a ton of home remodel for my own homes and I wish I'd gotten something like this years ago. It is much cheaper in the long run and leaves a much nicer texture than the cans. We paid some guy to do this in one room at our old house and not only did he make a huge mess, but he charged us like three hundred bucks for just one room. So this pays for itself very quickly.So: your shopping list should include a paint mixer drill attachment, lots and lots of plastic and tape (2 mil or better), some pre-mixed/wet drywall mud, a large bucket with a lid, extra paint, drop cloths, knee pads, and eye protection (because it goes everywhere!). This is totally possible to use with only one person, but we ended up doing it with two and one held the cord so it didn't scrape the walls and the other did the spraying. It is actually a pretty fun and satisfying process despite the extensive prep work. I'm very pleased with this and would recommend it to anyone.
Trustpilot
1 month ago
4 days ago