💦 Elevate your aquarium game with effortless, powerful filtration!
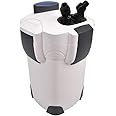
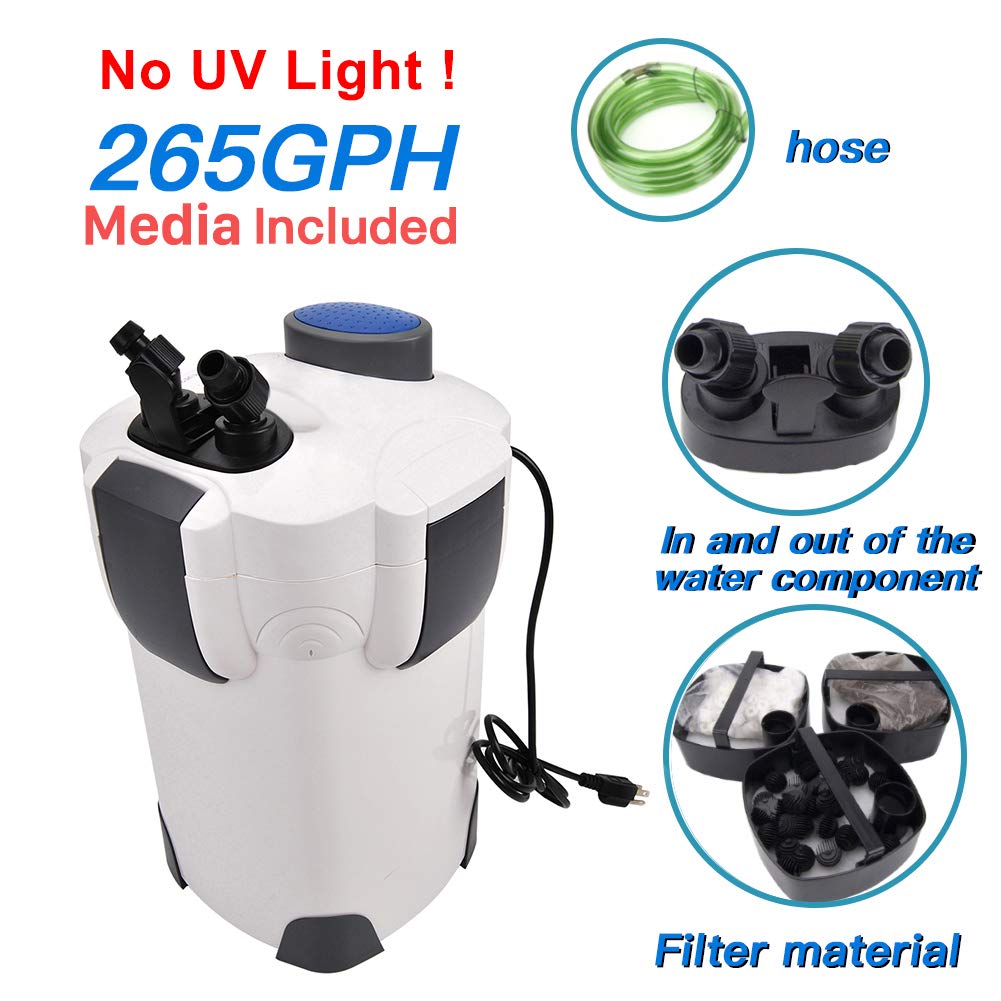
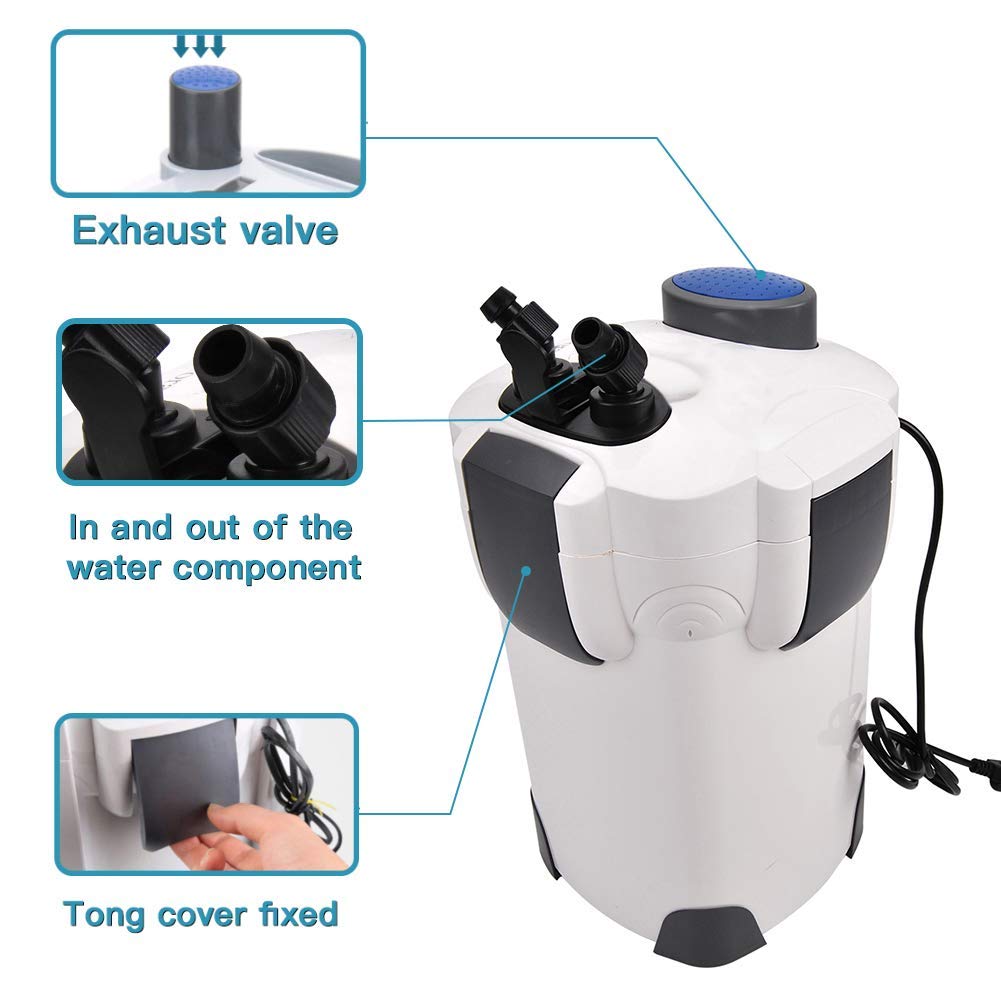
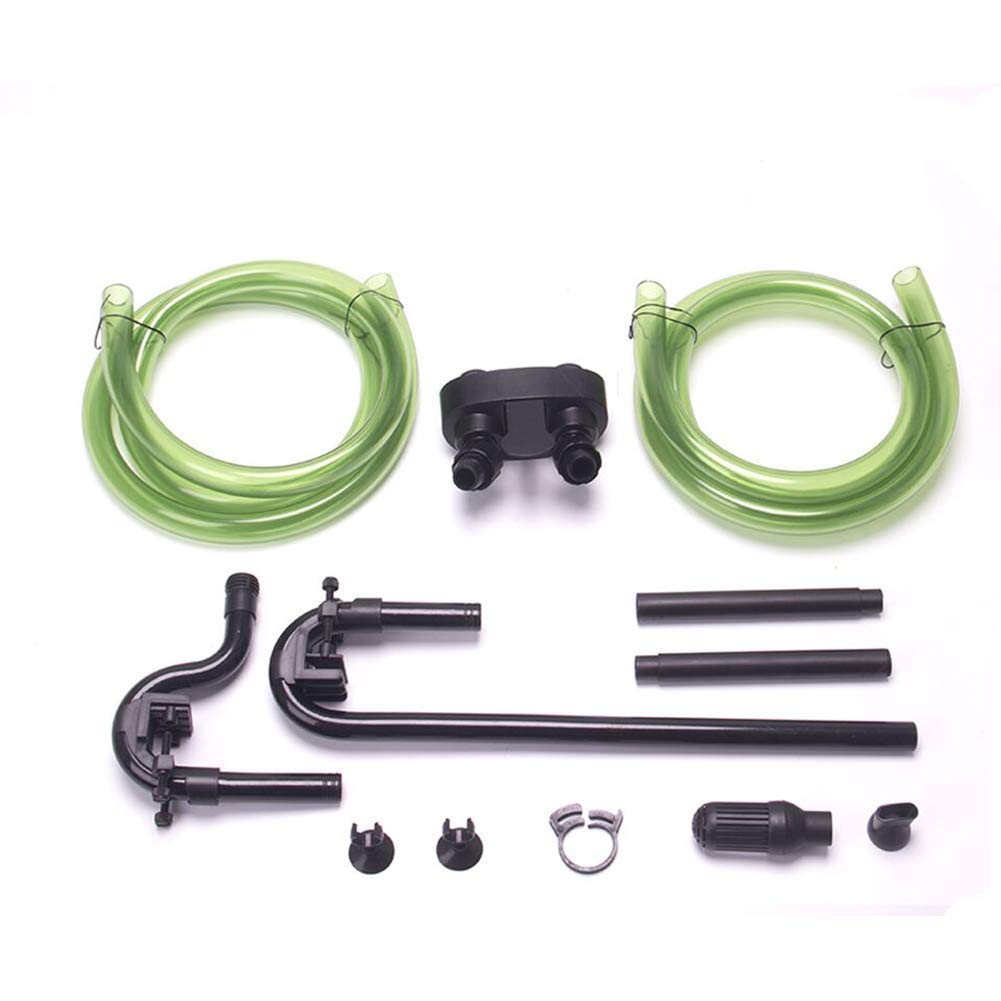
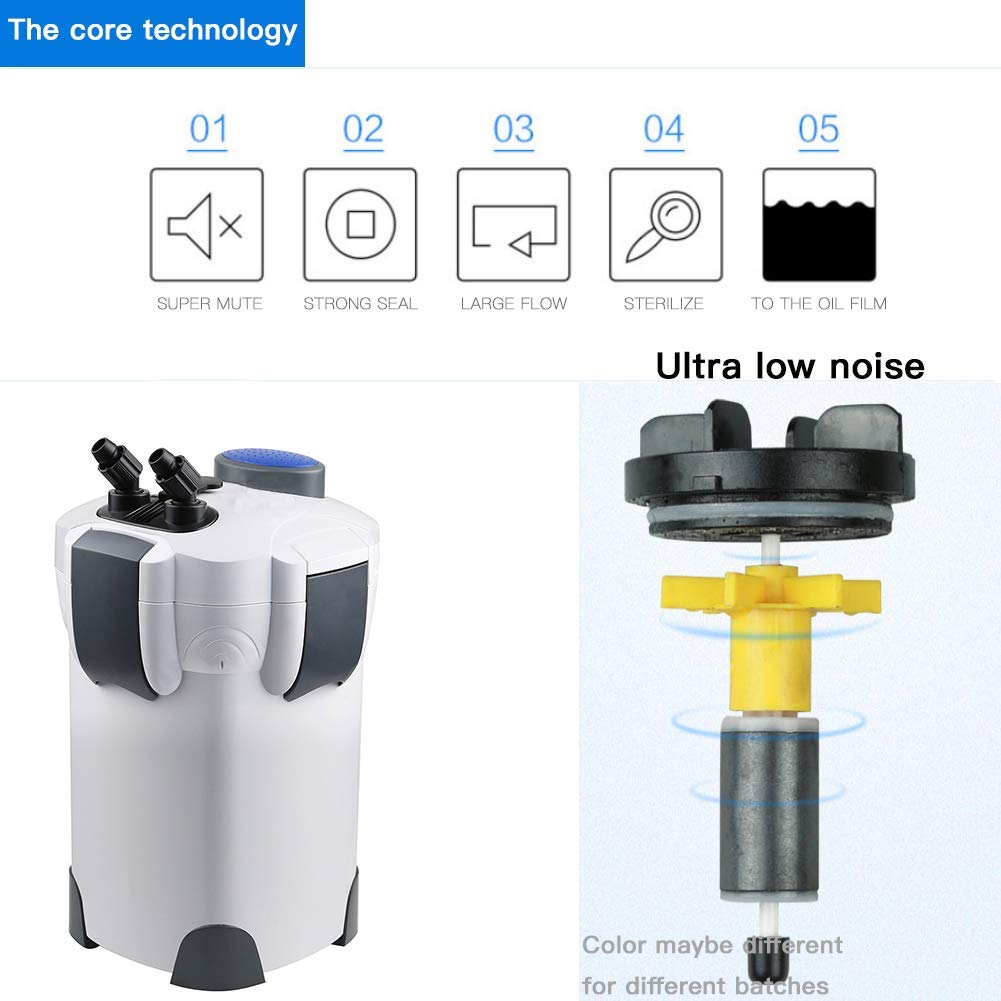
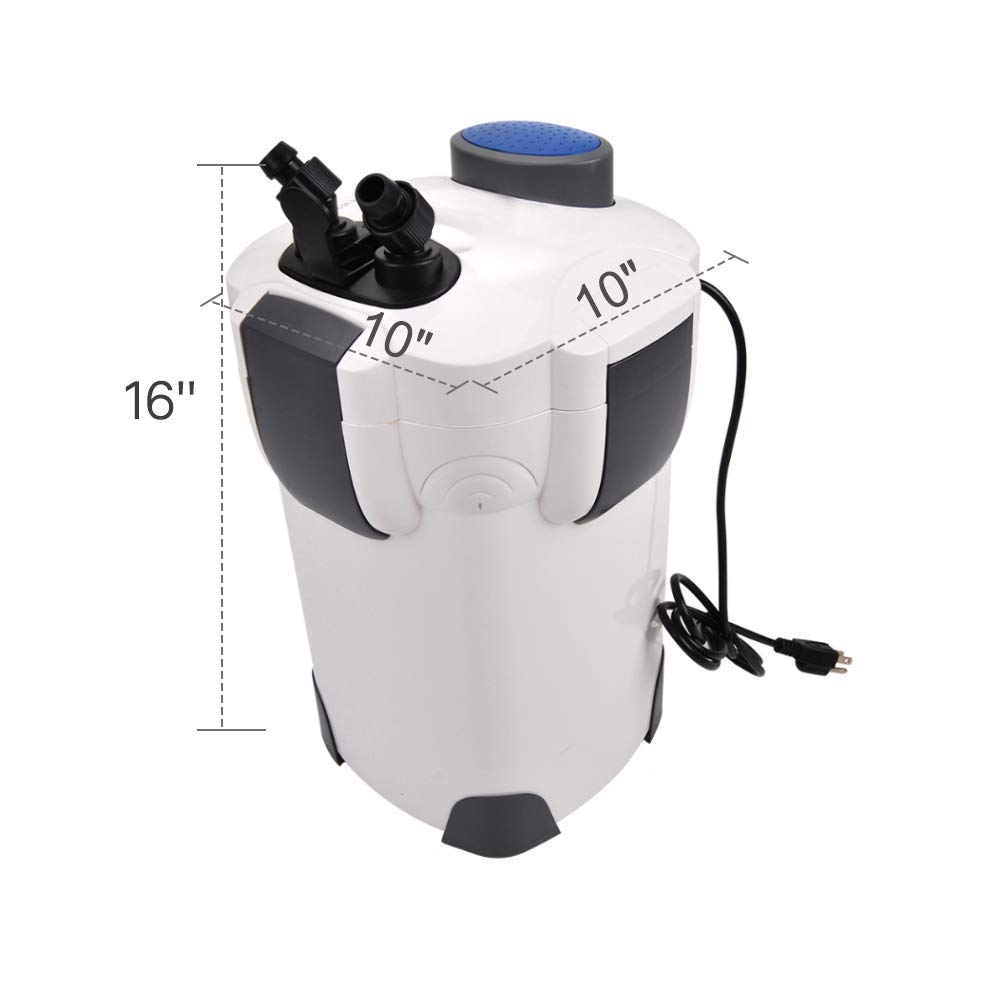
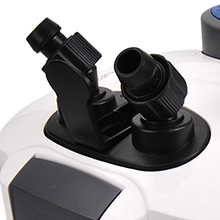
The Polar Aurora Free Media 265GPH External Aquarium Filter is designed for tanks up to 75 gallons, featuring a robust 18W pump that delivers 265 gallons per hour. Its three flexible media trays allow for customizable filtration options, while the self-priming pump and single valve disconnect simplify maintenance. Built for efficiency and ease, this canister filter ensures your aquatic environment stays pristine with minimal effort.


| Brand | Polar Aurora |
| Color | White |
| Material | Plastic |
| Power Source | Corded Electric |
| Item Weight | 5.64 Kilograms |
| Maximum Lifting Height | 4.6 Feet |
| Style | canister |
| Manufacturer | Polar Aurora |
| UPC | 740023332824 |
| Specific Uses For Product | Indoor |
| Part Number | 3332824 |
| Item Weight | 12.4 pounds |
| Package Dimensions | 15.2 x 13.03 x 9.72 inches |
| Item model number | HW-302 Pro XX |
| Is Discontinued By Manufacturer | No |
| Size | 265GPH |
| Item Package Quantity | 1 |
| Included Components | 1 |
| Batteries Included? | No |
| Batteries Required? | No |
| Warranty Description | 180-day warranty |
E**R
Outstanding Filter for the money!
Exactly three years ago, I've purchased this same model but labeled directly SunSun and is still working like new. Had a leak once, my fault for not greasing up the o-ring that seals the filter head from canister and not paying attention, lesson learned and, luckily it wasnt anything bad, leak was very slow.Anyway, I wanted to upgrade sponge filter on my 15Gallon Tall Aqueon since HOB is not an option as I need to have this as close to wall as possible. Tank is somewhat difficult to maintain with its original stand, the top rim is so so, but rather high for me. Searching for low water current tank filters only SunSun 602-B and 603-B became choice, but the price compared to this with UV included? Also the media capacity, pump is external of the canisters body on those and no priming pump. Ive been debating for a few days to decide if 603-B or this 303-B, still knowing the water flow will be too strong as my old unit still goes insane and nothing stops it. Well based on my experience, the filter is durable if youre handling it as if you would handle a more expensive filters. This has a ceramic impeller shaft as well which was the first thing I was checking for opening the unit and am very happy knowing the fact! Filter media trays are same desing but feel lighter yet sturdy, so does the InOut valve. Clamps and rubber tip feet are the same, fitting from the filter head seems tougher, possibly improved O-Ring or dimensional change in body of the filter, definitely a tighter fit when opening closing the canister filter. Accessories such as intake and outtake bars are not twistable so spray bars will go facing right across where the actual bar is hanged in a tank. This would be a problem with my primary tank, so there you need either SunSun Canister or just get SunSun set instead of PolarAurora. This however has clips that are attached to both InOut bars and attaches to tank ledge ensuring it wont go anywhere I like that feature as well as directional nozzle, could be useful if spray bar is not an option. I have hacked my SunSun a bit in years so I share with how my Canister is set up. Knowing the water enters the filter from the bottom and gets filtered by raising up until it hits the head and gets pushed back up and into the tank I have laid the filtration into 5 stage following in this order. Prior to doing this, you may want to let hoses soak in hot water for the time being for easier installation upon installing. Refer to pictures regards my media setup. Circular opening in each tray and cover must align with canisters bottom mark.1. Intake Strainer glued up from the very bottom with an epoxy quick drying glue to prevent sucking in potential fry, or sand, dirt particles when disturbed by fish. It will provide only water entering the canister filter once you put the most coarse sponge pre filter you can find onto it. Youll be grateful to see this serving as shrimp feeder and baby shrimp as well as fish eggs and fry saver not mentioning it does well as a in tank mechanical filtration.2. Very Bottom of the canister filter (not the bottom tray!!!) is layed out with ceramic media the filter came with and one bio ball by the water intake hole. Its all defined to disperse the water flow across the bottom and reduce future clogging, knowing those ceramic medias are the cheapest way to go and me not using them primarily it is better than tossing them out and leaving bottom of the canister being completely empty when it could serve with first tough to colonize biomedia getting the first and freshest shots of bacteria from tank. Could be used for cycling future tanks if anything.3. First tray - Bottom level: Three sponge mechanical filtration rule. Coarse Blue being on the very bottom, Medium Black sponge being in the middle and fine Green sponge sits on top right beneath the;4. Second tray - Middle level: This tray starts with biological filtration using 2 lbs. of BioHome Ultimate media mixed with starting bacteria balls they included with my order of Biohome, two fistfuls of porous tiny ceramic media I found in old aquaclear hob filter box, and bioBalls that were included with the canister filter. I would only keep the Biohome as I do in primary tanks filter however I ran out of it and have no intentions of spending lots of $ for this 15 Gallon tank. Sponges and biohome is the best to go with.5. Third tray - Top level: Running out of Biohome media I'm using an alternative: Natural Red Lava Rock. About 3 lbs. Looks and feels a lot like Biohome Albeit less effective, still good and never degrading. If youre going to use these, take time to go through the bag piece by piece and look for largest pieces that weight substantially less than others then focus on ones that have the most pores in smaller pieces, either selection will grand you best pieces. Lightest and most porous only (You can use the rest for decorative purposes in-tank if desired, they will work there as a biological media too!) Then to finish it off, put a Fine polishing pad on top, last plastic cover and;-Fill with water until it covers polishing pad, close and lock the filter head into the base. Connect the InOut hoses correspondingly to filter valve markings In Out and then press the priming pump few times until it'll suck the water from aquarium in and spits air out from the outtake.Thats all there is to it. Simple and effective, most importantly super quiet for YEARS to come. It'll take months to colonize the beneficial bacteria into the canister media, it can take as much as 6 months, but you should see the results sooner especially if upgrading filter from well estabilished or cycled tank. Mines already working and other than foul smell which is expected to go away on its own, happy with my fish adjusting and swimming with the "flow" within couple of hours. Bottom feeder seems to be distressed though. Or maybe became alive? I'll keep watching.Happy Fishkeeping with best media and minimal filter maintenance.PLEASE, DO NOT USE CHARCOAL MEDIA in case that you will need to treat your fish sicknesses in future. Many treatments require you to remove activated carbon media priorly, giving you extra work, especially when carbon needs replacement every 3 months it is absolutely useless to keep in canister filters.
A**R
Great for my turtle tank.
The below review with ******was on the 265 canister filter. It finally quit working after what 4yrs? Def got my money's worth. Never leaked though.This time I bought the 370 GPH with the UV light and while not even 24hrs later my water is crystal clear I have a SERIOUS BEEF with the design.Why on EARTH would this company make such super sharp edges down where the glass tube goes??????? Like WHY? This is my first canister with UV and as I was putting the lid on I heard the glass scratch. So I took it off and inspected it and sure enough, not only scratched but I couldn't tell if it actually punctured a hole. The crafter that I am took UV resin and cured a small bit over the scratch...simple fix but only because it wasn't an actual hole. So I then took a pair of flat pliers and crushed down and cut away all the sharp edges.So if you get the UV LIGHT ...BEWARE OF THE POTENTIAL SHARP EDGES down that tube...it WILL cause damage.Next. Yall. You need to read reviews. I've put a lot of helpful tips in my last one on my 265 model that will solve a lot of your issues that I'm seeing in current reviews.Want zero water noise because you need a tank with a lower water level like mine or your spray bar is too strong? Do what I did...pictures included. (you don't need any string that was just natural twine I used to cover the white pipe) use aquarium safe silicone and attach it to your input bar that goes over the tank and slightly sticks out straight...this is where you attach your elbow pvc piece (that fits 1/2in pvc pipe) with silicone inside and round outside edge. Make sure it does not leak. Then attach a small straight pvc tube, then another elbow at the end--- you dont need to silicone any other pieces just only to the output piece.). The bottom elbow can be turned in any direction you like. Take the length only halfway down the tank.Another simple fix? Why yall hollering about messes from leaked canisters? Never EVER leave a canister unprotected. Read tip below. Stick it in a plastic bin. I had mine sit in a 40 gal bin that was taller than the canister! I also didn't have my intake bar sitting ALL the way to the bottom of the tank.Hopefully by the time you realize your canister is leaking ot would all be mainly contained in that bin!Hope all this help!*******I went through 3 other filters and the results were awful. I didn't initially get this because in the description it stated not recommended for turtles. I love how it comes with some media as well but I also added my own to it.My turtle tank has been crystal clear since. The other filters I tried the water was murky and STUNK within just a few days.Because I have musk turtles the water level was much lower but the output bar was for much higher water levels. I created my own output bar out of PVC piping that I affixed to the end of the output piece that goes into the tank. I used an elbow peice to make a long pipe so its under the water and used another elbow piece to route the flow in the direction I wanted....so I have 0 water flow noise and 0 filter noise.I did have a bit of a problem getring it to start I initially...your supposed to "prime" it (pump the prime button)....but many YouTube's videos say to fill it first....and plug it in then gently tilt canister side to side front to back to remove air....worked like a charm.UPDATED 03/12/20. I am still happy with this canister. Still keeps my turtle tank water crystal clear.I recently answered some customer questions and thought I'd do an update.I've seen several bad comments about this filter when having a turtle tank. I can assure you this filtration is top notch and I have two in same tank. A 65 gallon only half full. The thing with turtles that people seem to NOT understand is you will STILL need to do netting daily or at least every other day for debris/uneaten food. You will still need to syphon the tank to clean weekly to no later than a week and a half and also conait this your water change.It is not a vacuum cleaner and also what people fail to realize is the more media you use, the less flow you get.Another helpful tip. If you are worried about the canister leaking just set the canister in a large capacity plastic bin. Mine sits inside a 50 gal bin which I cut out part of the lid to allow the tubing to go through and secure it with a lid. While my tank is half full I keep the intake a few inches away from the bottom of the tank.This will keep your water from being completely drained out.If your turtle tank gets murky or stinks at ANY time...chances are it is not filtering. I am trying to post a recent pic of my tank just taken a week ago. If I can get it to post it's the one with orange/red flowers in it and a fountain.
8**N
Great canister pump
Was looking at, these for a while then jumped on black Friday, deals on this 370gph. Just like the sunsun. Wanted something bigger, for our 19 yr old red eared slider. The submerged pump we had worked but got dirty super fast and wasn't big enough for our 40 gal tank. I, will, say instruction r meh. Quality is respectable for price. When I set it up I followed instructions after watching a bunch of diff YouTube videos. I lubed all the gaskets, got it all, set, and tried to prime. No, luck. Spent a couple hours check to make sure no, leaks, all, those things and no luck. Then found a forum, with a YouTube video and let, me tell, u, that, prime worked great! Once everything all, set up and intake is in water, canister empty, suck on outlet 1 time maybe 2, water will then flow and fill up canister and up into inlet pipe to same level as water. Turn on pump and bam. Then shake canister to get any, trapped air out. We changed water 2 days prior was starting to get a tiny merky, within 10 min of filter running was very clear! Pump is quiet. Ordered a diff outlet to have under water as do not like it above water level. Our turtle, Tucker, was very happy, he even waved at inlet right away lol. Should have got one of these sooner. Like that can, get rebuild kits and spare parts.
M**N
Simple and powerful
This was a great filter for 2 connected 75's. Only issue I had was hunting down replacement parts and making sure they fit. Great flow and easy maintenance.
Trustpilot
Hace 2 semanas
Hace 1 mes