

🔌 Power Up Your Battery Game!
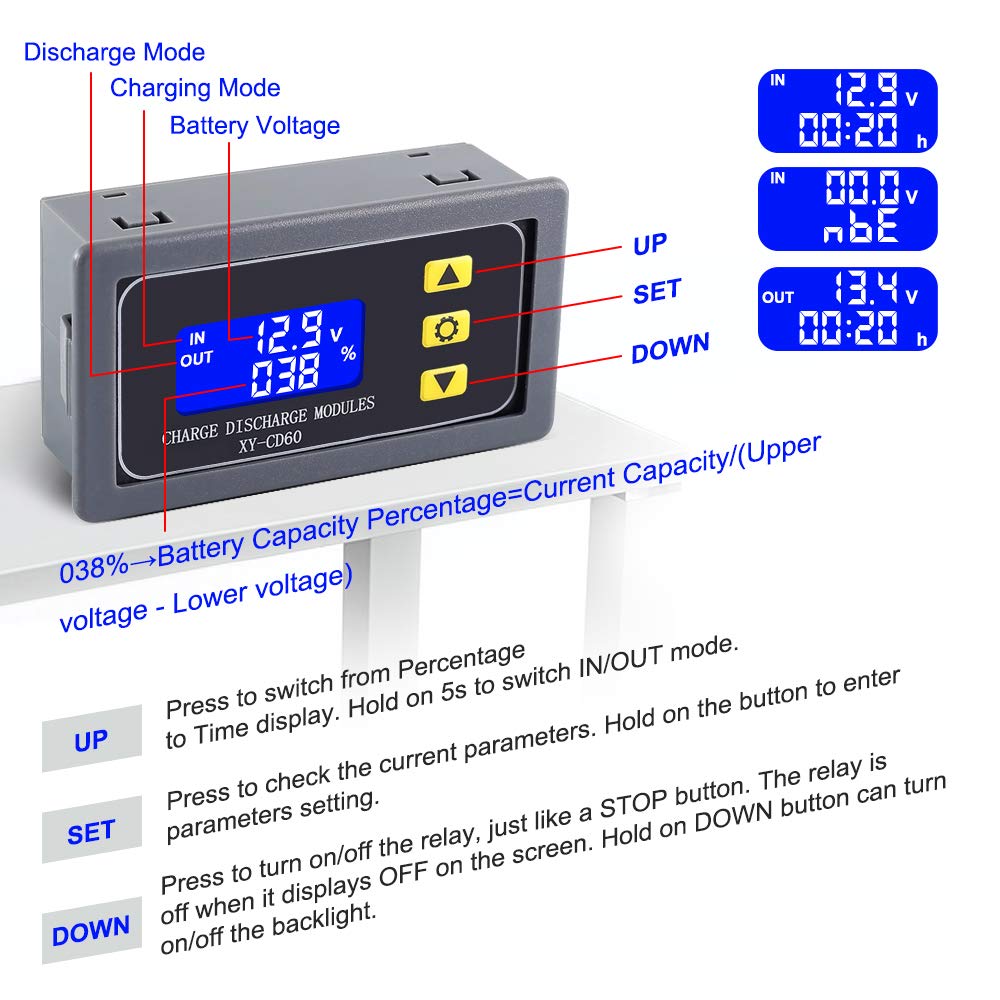
The ICSTATION Low Voltage Disconnect is a sophisticated charge and discharge controller designed for 6V-60V batteries. It features a high-definition LCD screen for real-time monitoring, a robust 20A relay for high current applications, and customizable settings to prevent over-discharging and overcharging, ensuring optimal battery performance and longevity.


A**N
Charge discharge controller timer with extras. Great value 👍
This Module is powered from the input port so if you only attach it to a battery it does not actually turn on untill the input is connected.I measured the modules power consumption from a 12.64VDC source the module uses 7.8mA from the input.This module draws 119.9 micro Amps from the battery when not charging.I used this to protect a lead acid scooter battery from overcharging. It works well and it's pretty accurate. The module can be programmed too cycle charge or discharge as well. This can help the voltage stabilize when you have multiple cells in the battery bank. The blue backlit LCD is nice and can be clearly read in the dark.Highly recommended
T**5
A little fiddly to configure, but it works
I have a solar panel with mppt built in, charging a lifpo battery, which runs a fountain water pump. This device sits between the battery and the pump. When the voltage drops below the set value, the current flow to the pump is stopped. After the battery is charged above a set value, the current flow to the pump resumes. Hopefully this device will extend the life of the battery by preventing full discharge of it over night. Working just as needed for 3 months now.UPDATE 2 Dec 2024... still working as desired... going to replicate this into a second set. :-)
G**O
Can control charging a Prius 7.2v 6-cell HV battery module @ 1.0A and discharging using 20W 12V bulb
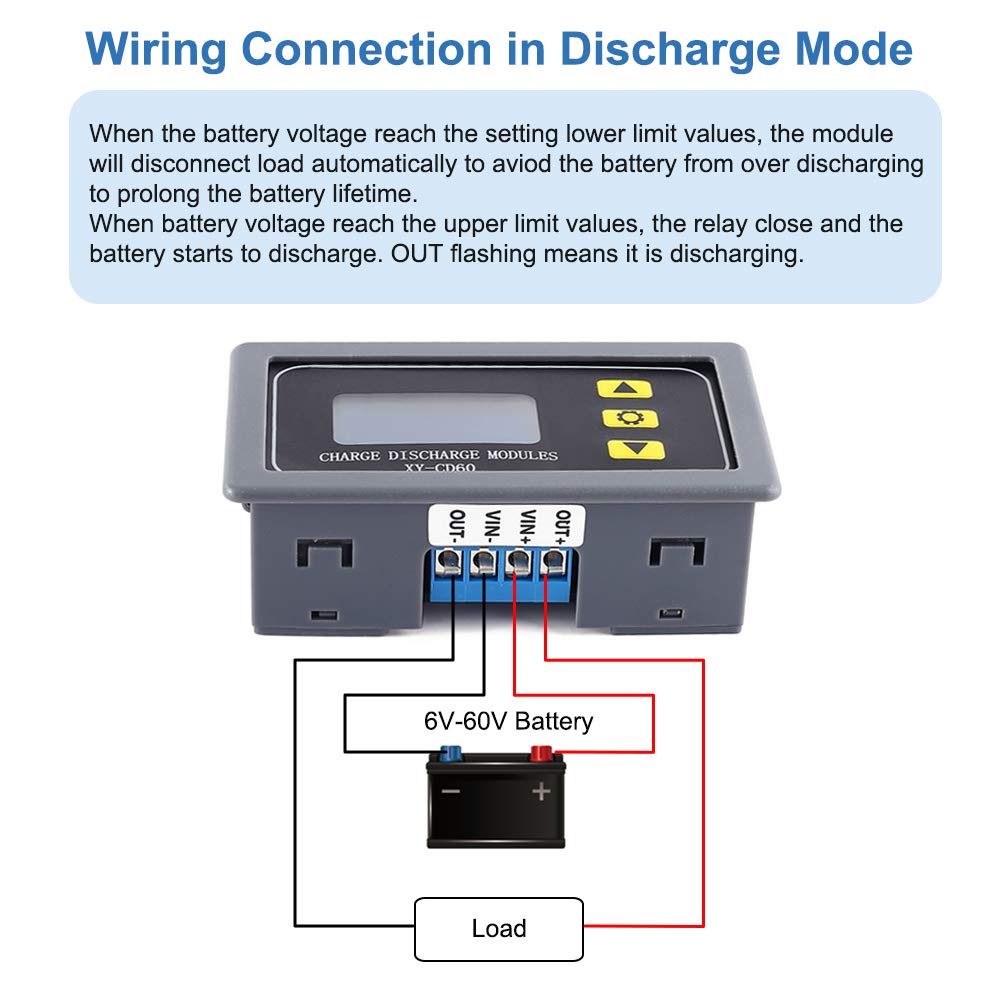
The instructions provide are hard to understand, which is why I am providing my own. Overall, the device is relatively accurate. When charging the voltage is 2 volts higher. When discharging the voltage is 2 volts lower. However, you can set the desired stopping voltage taking this into account. It works fairly well at 1.0 amps. Discharging is more accurate than charging. That is because when charging, the device is seeing the charging voltage, which may be 3 volts higher than the current voltage of the battery. It works!XY-CD60 CHARGE DISCHARGE MODULUE Instructionso The four wire connection screws on the device are very small. I cut four wires of 12-guage copper wire (used for indoor wiring), each about 2.5 inches long and screwed them to the device. I could then easily connect the batter and battery charger using wires with alligator clips.o To use the device, you first need to program it. To program the device, attach a battery to the two inner connections (VIN- and VIN+). When connected, the display will light up.o There are two main features of this module: Charging mode (P-1) and Discharging mode (P-2). If you press and hold the up-arrow button for at least 6 seconds, you can change to the Charge mode (P-1) or Discharge mode (P-2)o If you see “IN” on the display, you are in the Charge mode. If you see “OUT” on the display, you are in the Discharge mode. You can then set the parameters for the mode you are about to use.o To set parameters, press and hold the light-button (middle button) for 5 seconds. Once in setup mode, you can press the light-button to see and set each of the settings. When changing a setting, press the up-arrow button and down-arrow button to select the desired setting. When the desired setting is reached, press the light-button. You will then see the next setting, and so on. to save your settings, press and hold the light-button for 5 seconds.o When the Charge mode or Discharge mode is active, you can press the down-arrow to turn the mode on or off.o There is a power savings feature. When the device is active, if you press and hold the down-arrow button for 5 seconds, you can turn the power savings mode (L-P) on or off. When L-P is on, the display goes dark after 5-10 minutes. When L-P is off, the display stays on.o I have successfully used this module to control the charging of Prius NiMH battery modules from 6.0v to 8.4v @ 1.0A. When I charged at a higher rate of 1.5A or 2.0A, the device stopped with an error.o This device works okay when charging. However, this device only has access to the charging voltage being applied to charge the battery, which may be about 3 volts higher than the current battery voltage. Because of this, this device is not as precise as I’d like, and I ended up not using the charging feature. I believe I got higher milliamp charges if I connected the charger directly to the batter.o This device works really well to discharge batteries to a precise voltage using a load such as a 20W 12 V light.o I preferred to use my Imax B6AC v2 chargers to charge the Prius NiMH modules directly (from 6v to 8.29v) (without using this device) and to discharge them using this device along with a 20W 12V bulb.o “CHARGING” settings and connections: For the unit to function properly, you must first set the UP and dn parameters for “Charging”. To change and save settings, you need to connect a battery to the inner two connections (VIN- and VIN+). The “UP” parameter controls when the UNIT will stop the charging. When the applied voltage for charging reaches the “UP” value, the UNIT will stop charging. The “dn” setting controls when the UNIT allows charging to start. When the voltage of the battery is below the “dn” value, the UNIT will start charging. “OP” is charging time (hours and minutes). “dOP” is delay interval (in seconds) between charging cycles. When the “UP” value is reached, the unit will stop charging and will wait for the number of seconds specified in dOP before it starts charging again.It is important to set this to 60 seconds. Doing so will cause the charger to stop charging with the error “CONNECT ERROR”, which causes the device to be powered down, stopping the charging process. Charging settings: UP=8.3v, dn=8.2v, OP=0:00, dOP=60. Likely need to set voltage to 2 volts higher than desired cutoff. These are max values for a Prius module. When the voltage on my charger is higher than 8.28v, I usually stop the charging process, and the resting voltage is about 8.15v. The “UP” voltage is being compared to the voltage being applied to the battery to charge it higher. The “UP” setting needs to be a few volts higher than the final target resting voltage. Some batteries are not good enough to accept the charge being applied, and the charging process may not stop automatically. Once you have saved the settings, since you will be charging, disconnect the battery from the inner connections, and connect the battery to the outer connections (OUT+, OUT-). Connect the charger to the two inner connections (VIN+, VIN-). When you start charging, the module will turn on. When OUT is flashing, charging is taking place. When the display starts flashing, the UP voltage has been reached, and the charging will be stopped and delayed for the number of seconds specified by the dOP parameter.o Discharging settings. For the unit to function properly in the “Discharging” mode, you must first set the settings for “DisCharging”. To set or change a setting, connect the battery to the inner two connections (VIN- and VIN+). Once connected, the display should light up. If you see “IN” displayed instead of “OUT”, press the up-arrow button for 5 seconds until you see “P-2” displayed. After doing this, you should see “OUT” displayed. When “OUT” is displayed, the unit is in the discharging mode. Set the discharging parameters. The “UP” setting controls when the unit will start discharging. When the battery voltage is above the “UP” voltage, discharging will on. The “dn” setting controls when the UNIT will stop discharging the battery. “OP” is discharging time (hours and minutes). “FOP” is delayed start of discharging (seconds). The “dOP” setting is how many seconds to stay disconnected once the “dn” value is reached. If set to 1 second, the unit will stop charging for 1 second, and will reconnect. This will repeat indefinitely. Discharging settings: UP=7.2v, dn=7.3v, OP=2:0, dOP=60, FOP=0 (will take it down to about 7.2v) Discharging settings: UP=6.1v, dn=6.0v, OP=2:0, dOP=60, FOP=0. (will take it down to about 6.3v) Likely need to set voltage to 3 volts lower than desired cutoff. I tried to discharge two batteries with one unit. I connected two battteries in parallel (- to – and + to +), and I connected two 20 watt 12 volt bulbs in series. This turned out to be too much of a load, but I am not sure. When the cutoff is reached, the display will flash on and off. The instructions say this is because the input voltage is too high.o Discharging connections: Connect battery to inner connectors (VIN+, VIN-). Connect load/light bulb to outside connectors (OUT+, OUT-).
R**R
Light stays on!
I got this to shut off the outlet in the back of my SUV, into which I plug a cooler, so that the battery is not depleted. So, the input side is connected to un-switched battery power. The backlight in the display, which is very useful when programming the controller, stays on all the time, running down the battery that I’m trying to conserve! I felt that I had to add a switch to turn the whole circuit off.
P**L
Garbage
Had to get a replacement because the first package was shipped in an open zip lock bag and became wet.Second module is very difficult to set up with little instructions and after hours of research/trial, it will not send power out. Waste of time and money
A**R
Very good
Very good
T**L
Works great for my 12v fridge
I bought a small 12v fridge/freezer to use while camping. I also use it as a second freezer in my cabin, but my cabin has many power outages so I needed a back-up battery.My Engel freezer does not have a low voltage disconnect built-in. To ensure that my battery Voltage won’t run down too low and damage my battery or keep my Jeep from starting, I installed this disconnect. After startup, I had to change the setting to “output” for use with a backup battery.The display makes it easy to monitor the voltage. I like that you can easily set the cutoff Voltage. Even though I have not extensively tested it, I am very happy with my purchase.
J**Z
Great product!
Great product! Too bad that since last year (2022) Amazon is holding our orders for a minimum of two weeks to ship it. We have no idea why. We had switched from ordering on eBay and little by little had to switch back purchasing stuff that we cannot wait close to a month. Amazon used to ship right away and we used to get our stuff in less than a week, now it's three to four weeks.
Trustpilot
Hace 1 día
Hace 1 mes


