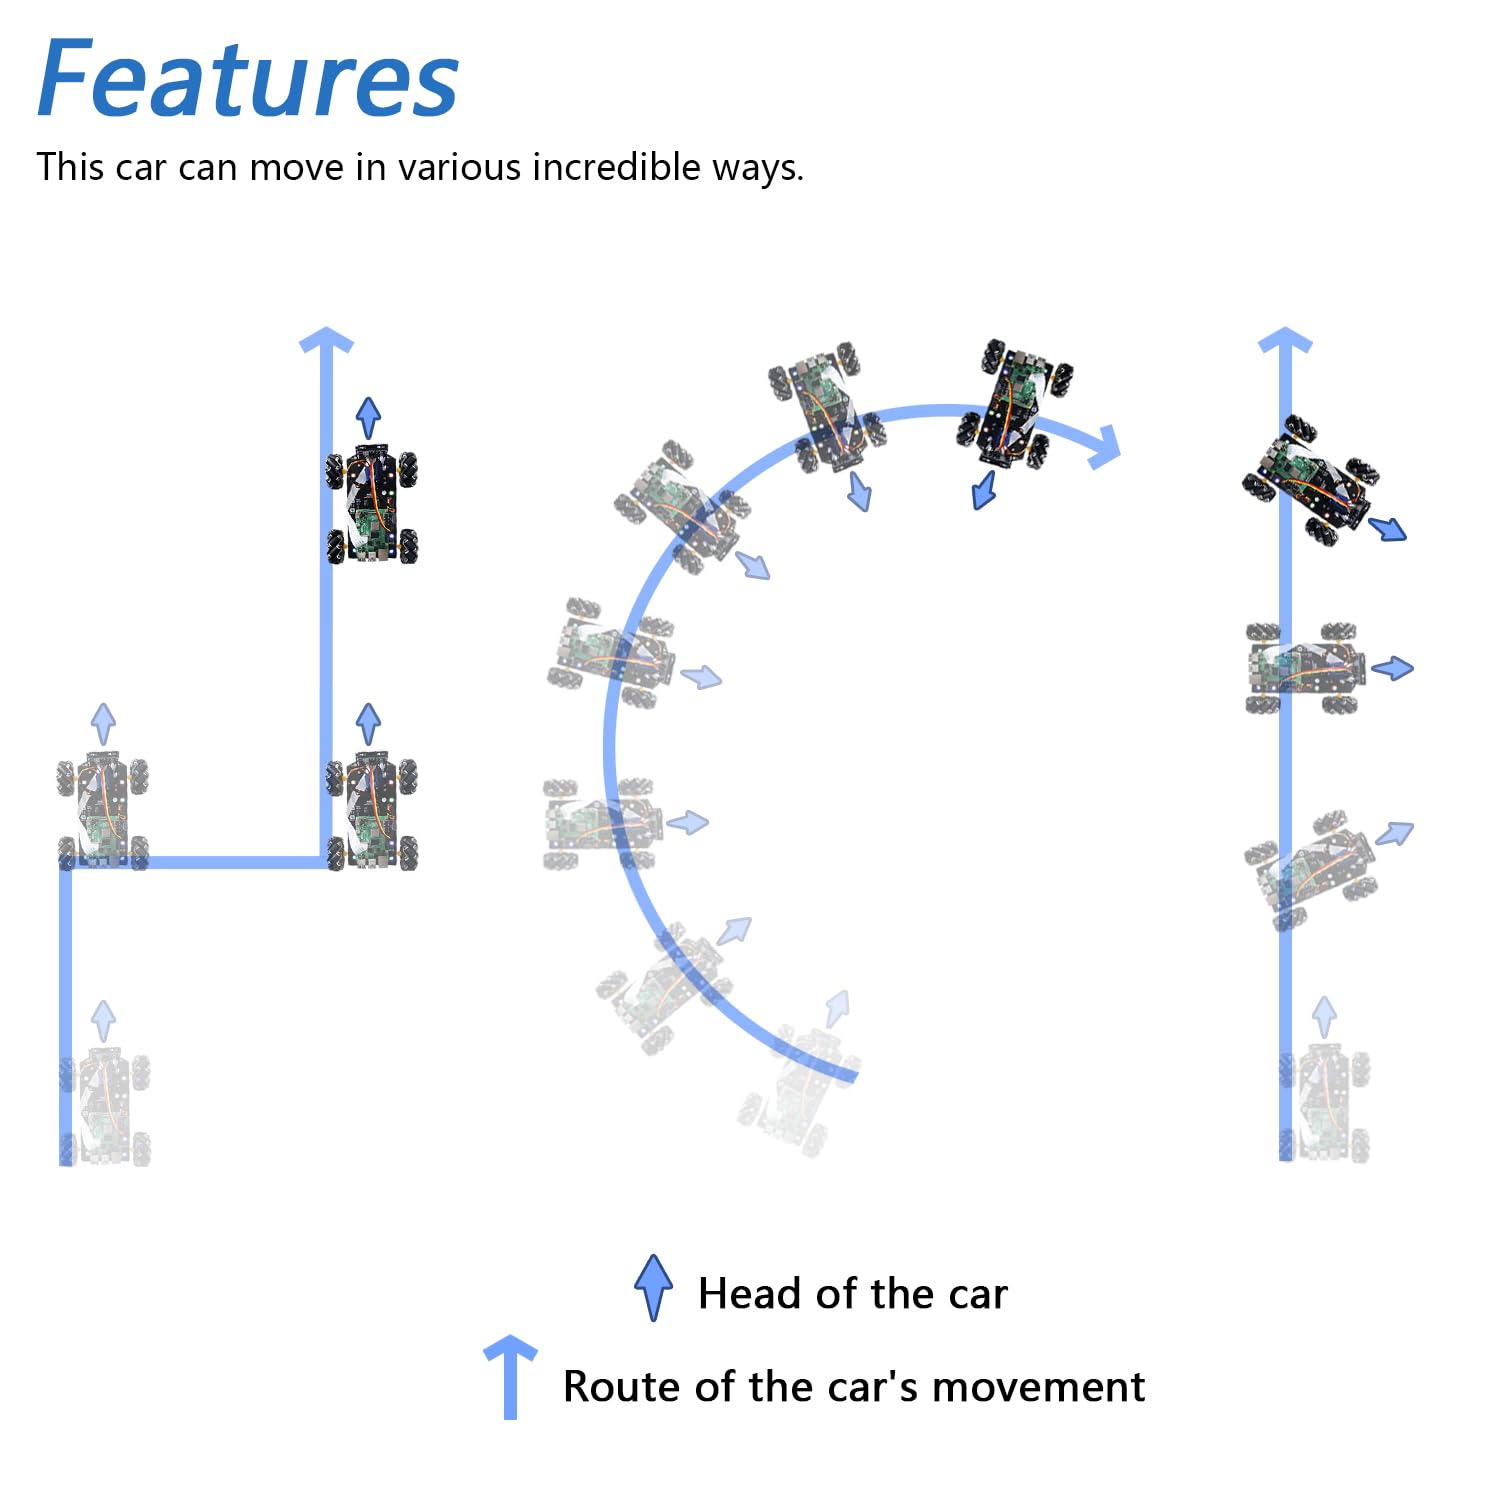


🚀 Drive into the Future with Freenove!
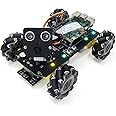
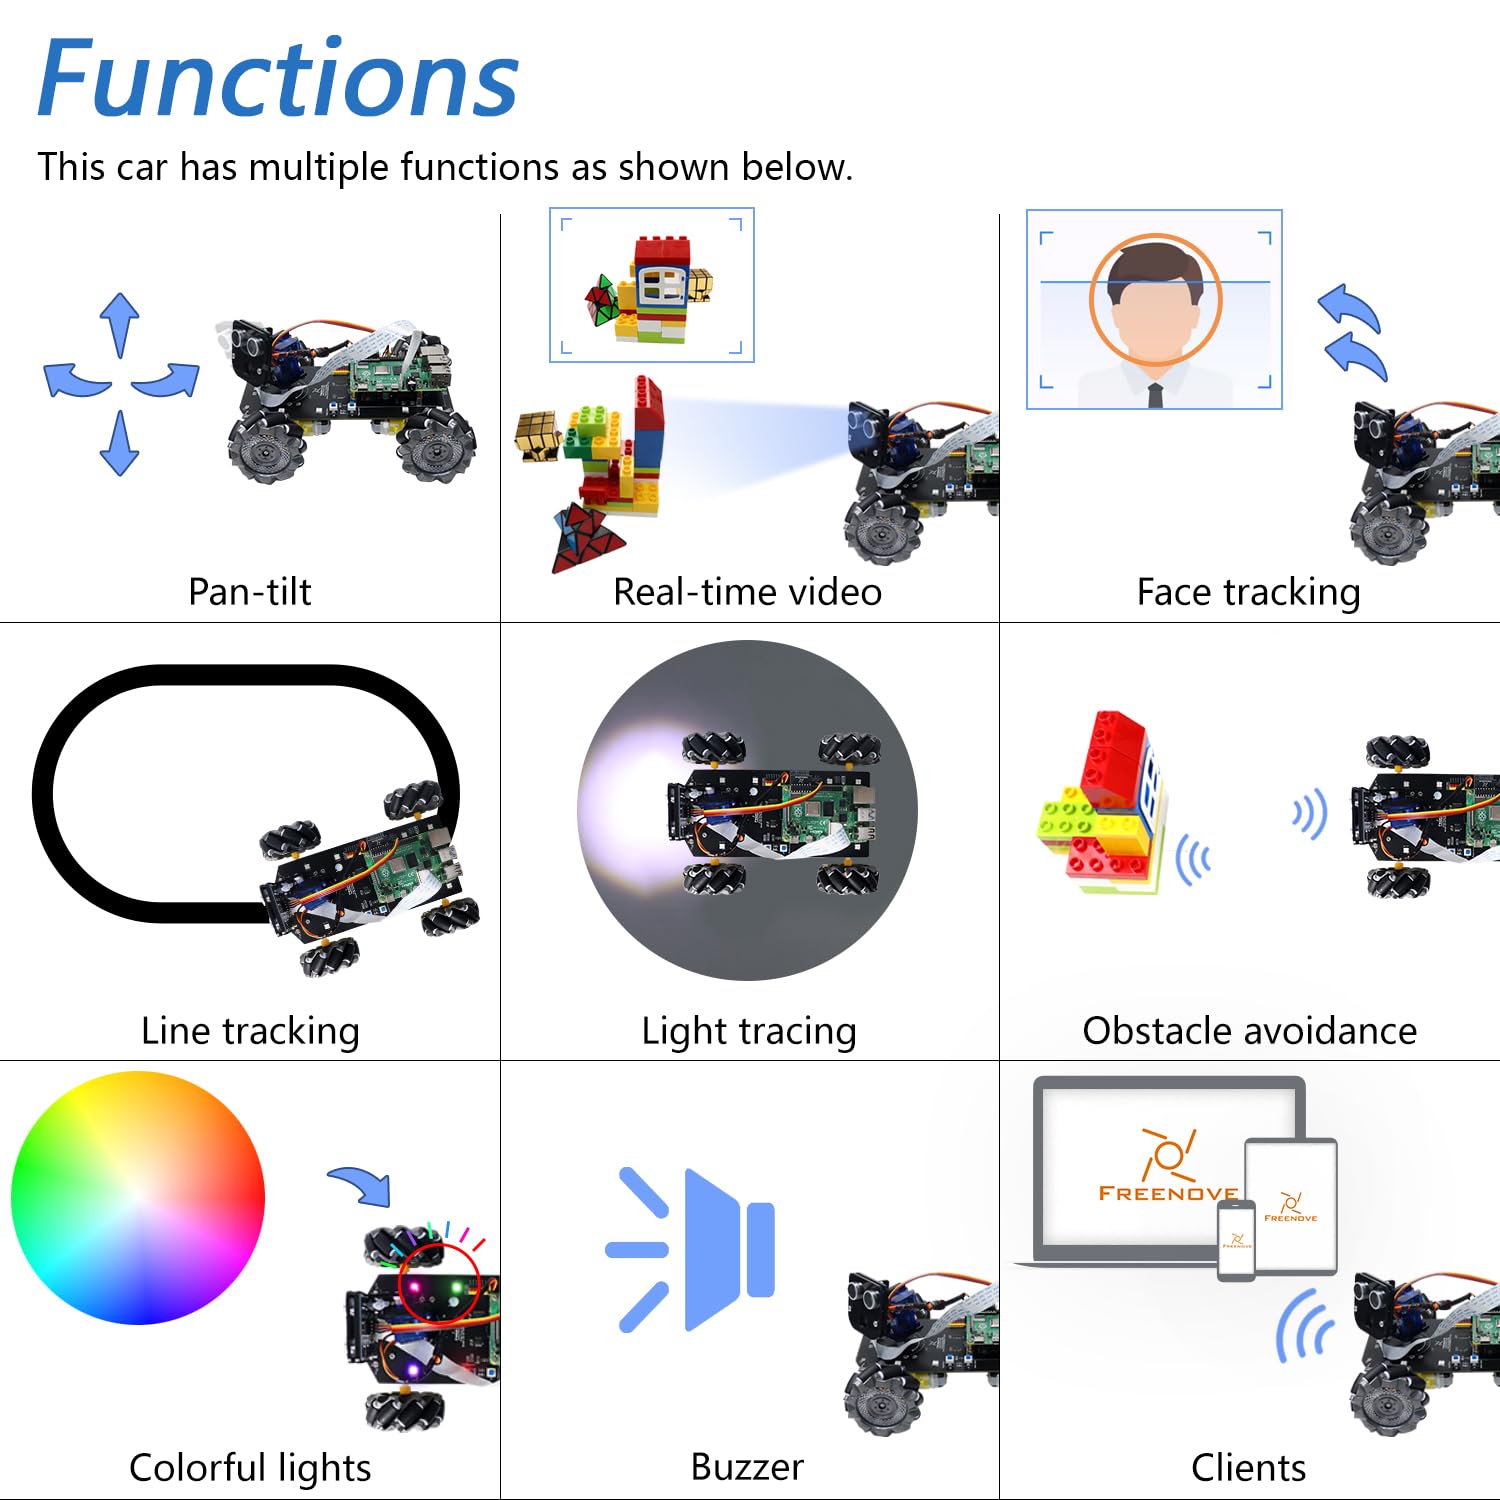
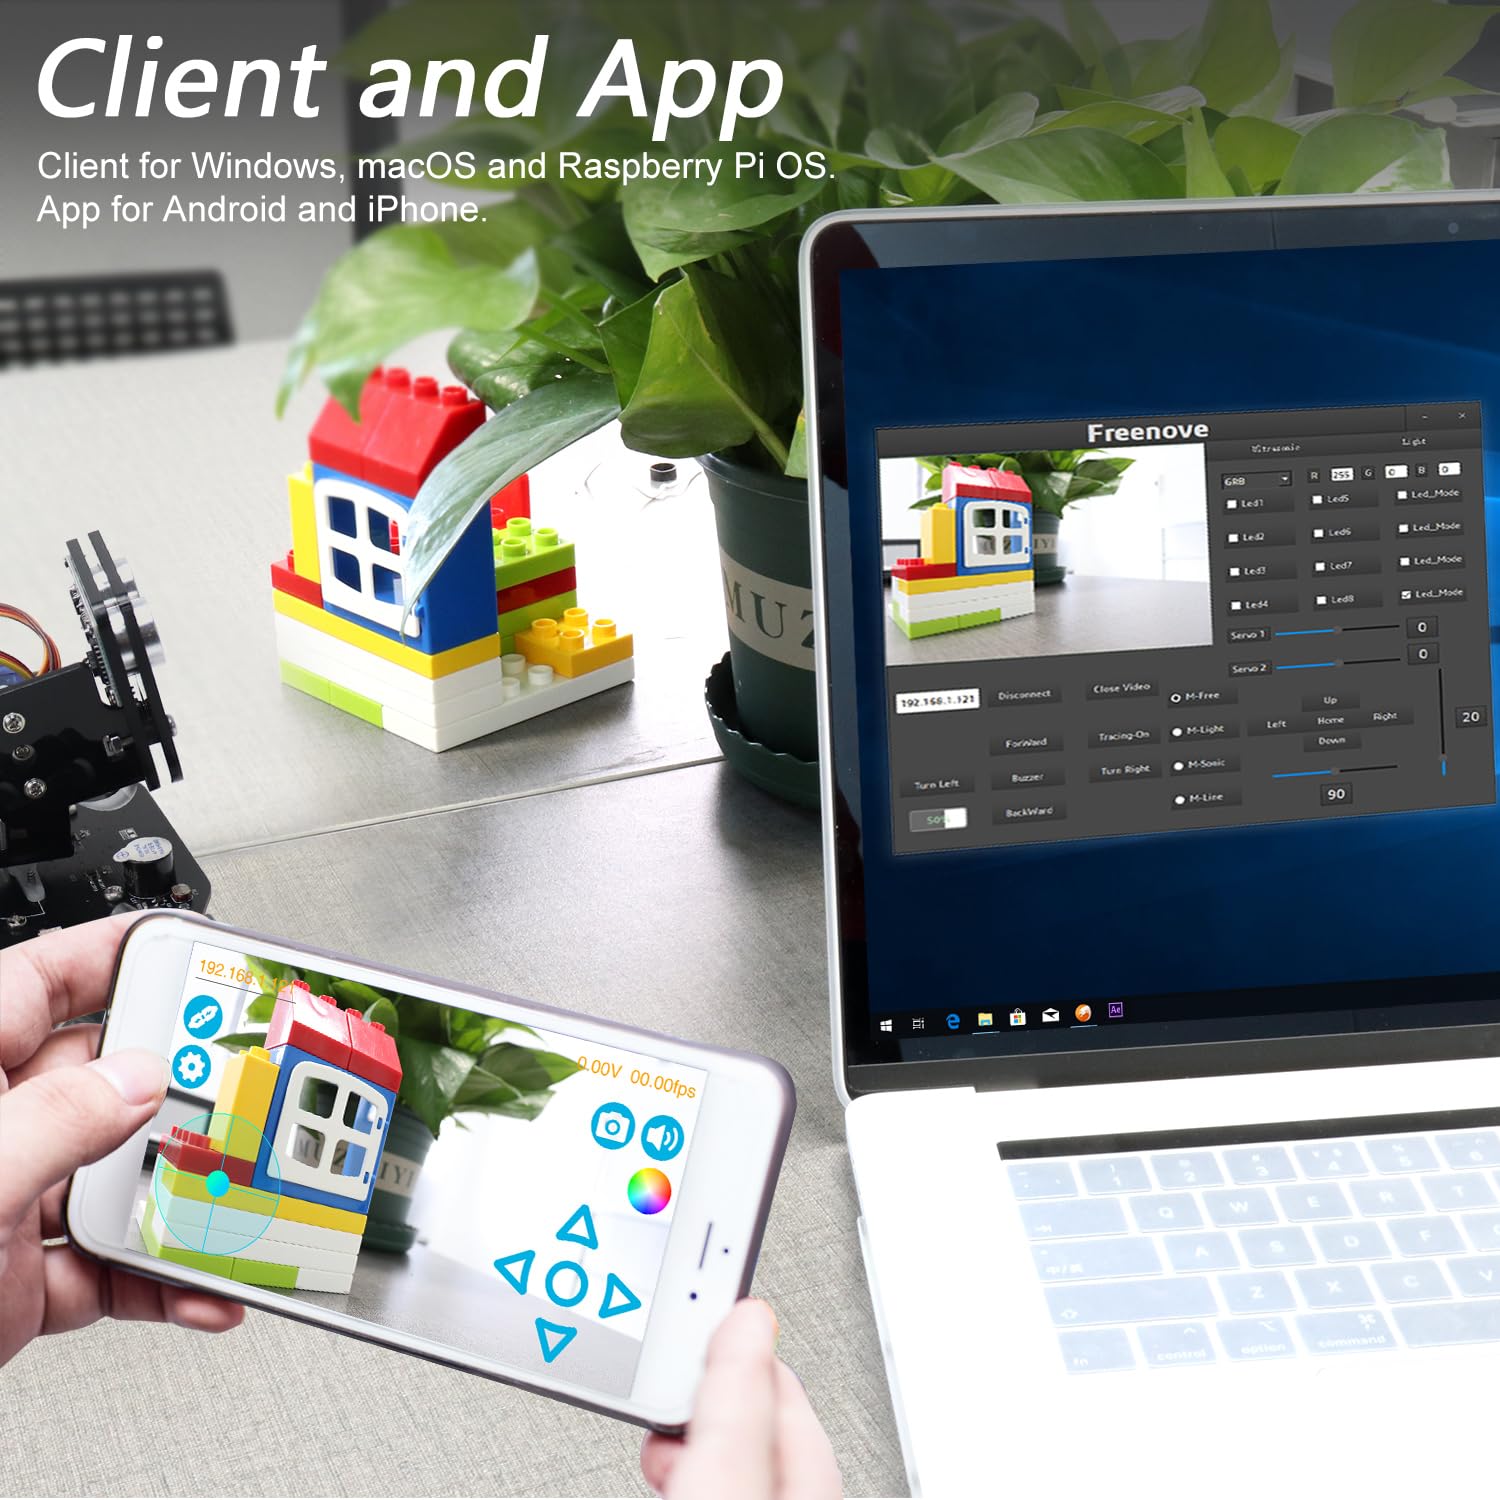
The Freenove Mecanum Wheel Car Kit is a cutting-edge robotics kit designed for Raspberry Pi enthusiasts. It features omnidirectional movement, advanced tracking capabilities, and wireless control through mobile devices. With a comprehensive assembly guide and compatibility with various Raspberry Pi models, this kit is perfect for tech-savvy individuals looking to explore the world of robotics.
| Total USB Ports | 4 |
| Wireless Compability | Bluetooth |
| Compatible Devices | Computers (running Windows, macOS, or Raspberry Pi OS), Android devices (running Android 4.4 or later with the Freenove App), iPhones (running iOS 10 or later with the Freenove App) |
| Processor Brand | Freenove |
| Processor Count | 1 |
| Processor Series | None |
| Operating Systems | Raspberry Pi OS |
| Memory Storage Capacity | 1 TB |
M**S
Good value, good support
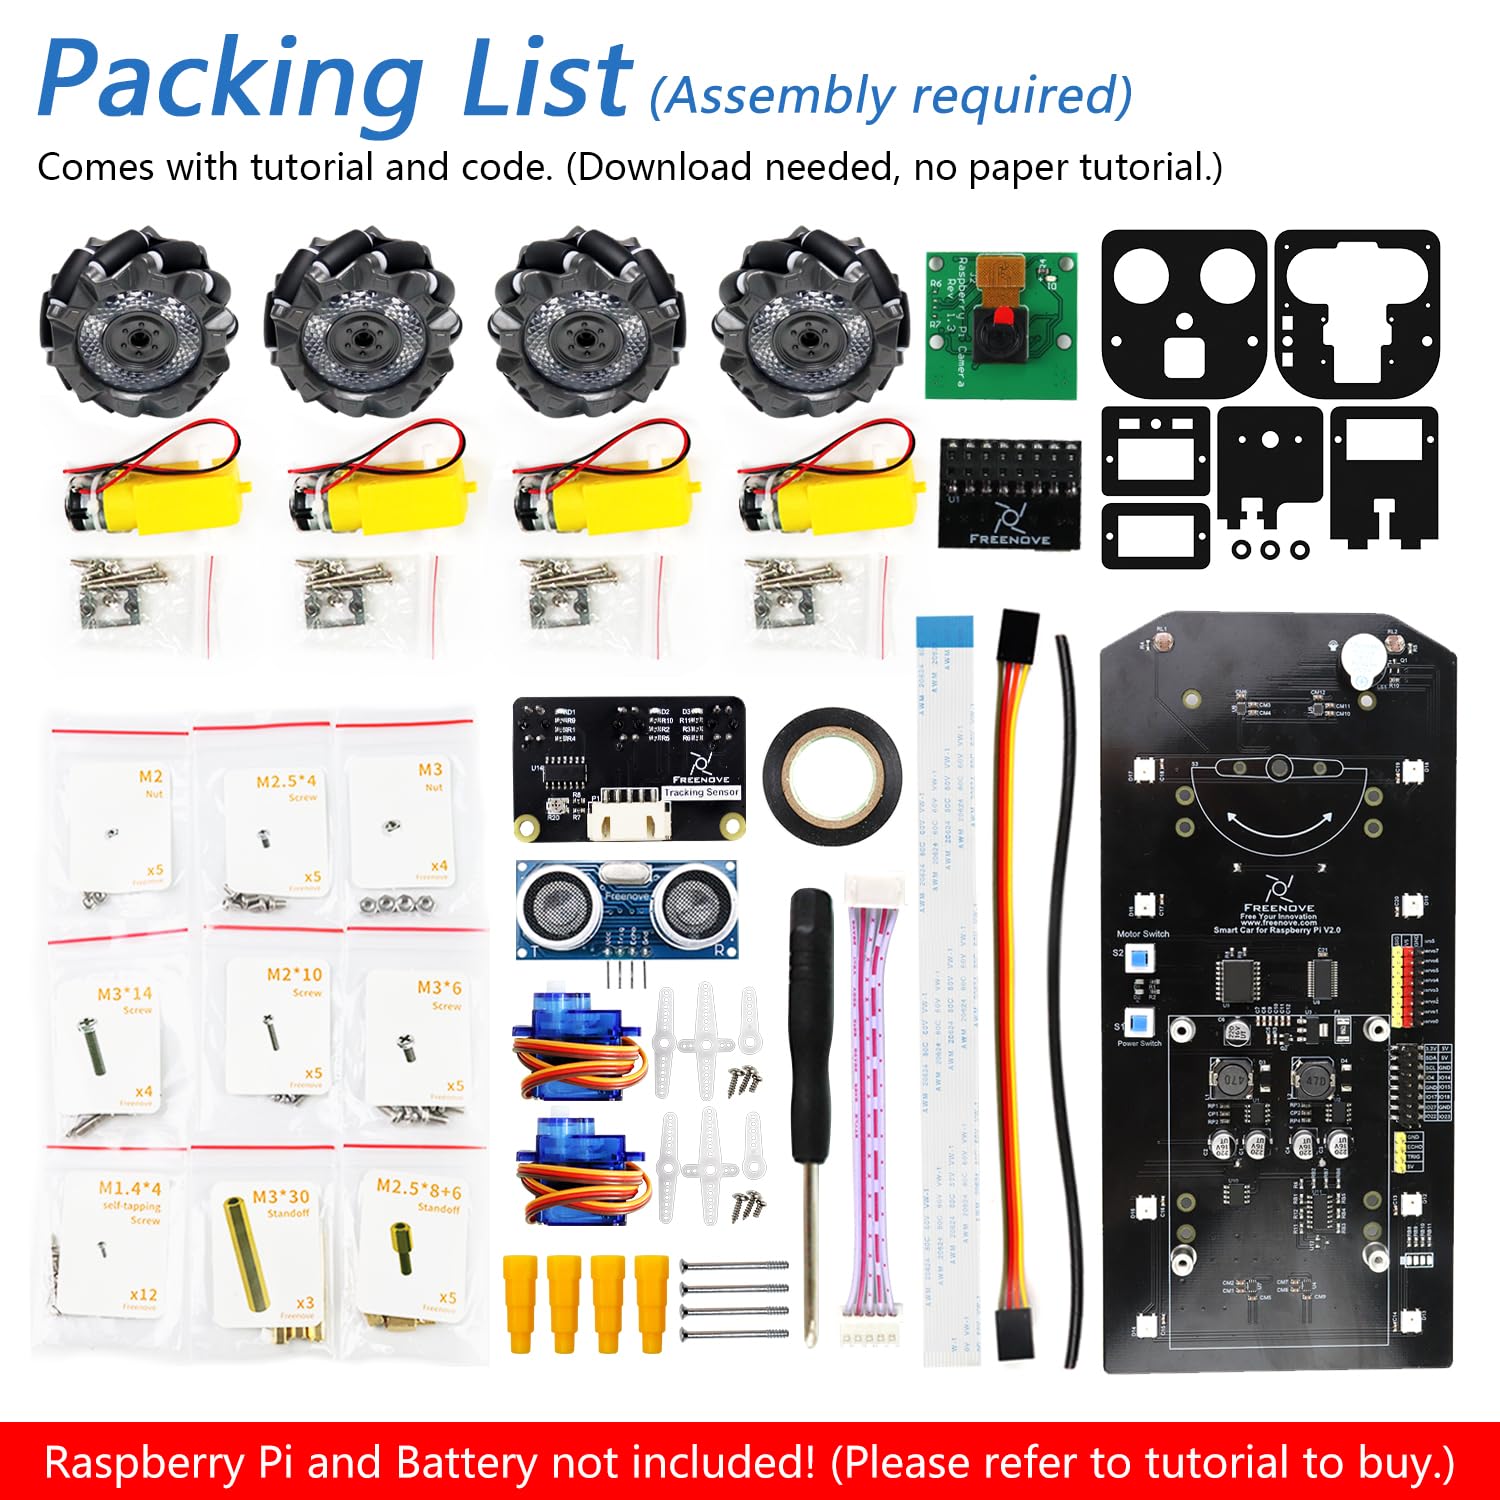
I decided to build the car with a Pi Zero W H because of the low battery drain. I needed to get a special cable as indicated in the instructions. It ends up very neat as you can see in the photos. All functions work in this configuration but I think things like face tracking might be slicker with the recommended pi 3 or 4.When first building the car I used a couple of batteries that I had lying around. The advice from Freenove is to use batteries that can sustain a high discharge rate. This is good advice. Using poor quality batteries results in the low battery warning buzzer sounding after only a fairly short use. Good batteries cure the problem! One point is that you need to remove the batteries to charge them. I found that making loops out of cable ties makes the process of removal much simpler but anything thick might interfere with the battery fitting properly.The kit is quick to assemble since much of the building is securing parts to the baseboard which contains the control components. The instructions are generally very good but can be a bit repetitive, e.g. VNC player and the assembly of the pan/tilt module which is covered twice. Best to read the instructions before you start so you know which bits to pay attention to and go straight to VNC viewer if you can.The car is a genuine four-wheel drive which means that each wheel can be controlled separately. This allows the car to be steered by having wheels go at different speeds (compared to rotating the wheels). On soft carpets the grip of the tyres is not as good so the steering is not as precise.Freenove emphasise the support they give, encouraging you to ask for help. When I first put the kit together, I could not get the buzzer to work nor the ultrasonic ranging. They are based in China so the reply came back on the following morning. It started off "Thank you for choosing Freenove. We are fully responsible for any concerns." which is a clear indication that they will do their best to sort out any problems that you have. My problem turned out to be that when I fitted the bridge between the pi and the baseboard, I had managed to bend three of the connectors to the side of the plug so they did not connect. Re-fitted and all was well.If you are anything like me you look at other kits after you buy one. There are a surprising number of car kits out there. Some have more features than this one, but are more expensive. Some have a sturdier sturdy chassis, but are more expensive. Some kits are cheaper, but do less. One of the significant differences between kits is whether the wheels are fixed or whether they turn to steer. On this kit they are fixed but Freenove do have another kit with steerable wheels.I came to the 5 star rating by weighing up price, features and support.The amazon review site seems a bit weird asking for ratings on Thickness and Sheerness. Perhaps artificial intelligence is not as intelligent as one might hope!
J**N
Nice to play and plenty of opportunities to grow and learn to program!
The remote Android app works out of the box and makes this a full-featured remote controllable car to a fair price but actually much more: With all the options, it is a platform that stimulates learning of programming and to develop own projects.My child liked the easy start (to play with the car and the colorful LEDs) and is curious to learn more about programming. I'm sure he will be doing some projects with it as he grows. Otherwise, I will for sure do some fun projects with it. Being open-source, extensions of existing code (in Python) are easily possible.Out of the box, there are several programs included, like the tracking of black lines and obstacle detection. I think these are nice demonstrations of it that show the potential and that ask to be expanded by the users.The vehicle is rather easy to manufacture as there are just 2 Servos to install, took about 1 hour to get it working.Notes: Be careful when attaching the camera head onto the car as the pieces are a bit thin and not very robust.The initial setup of the Raspberry Pi (I used the 3B model) is well described in the tutorial PDF but you should have some technology affinity or interest to learn.I would therefore not classify it as a toy that can be used out of the box but rather a development platform.You can set up the Raspberry Pi such that it automatically runs the server software upon startup.I actually use the same Raspberry Pi for multiple projects as it is not too much effort to unmount/remount it here.The only drawback of the car is that the battery needs to be removed to be charged.However, during development, you can connect the power supply of the Raspberry to reduce the need to charge it.In the robot dog, the charger is embedded which has its advantages.To sum up: I'm very pleased with the experience of this kit, its quality, and potential.The price for it feels more than fair given what you get.I hope FreeNove will continue to make more of such high-quality kits.
C**S
Good start for learning robotics
The car is easily assembled clear diagrams and instructions. Programming set up is clear and car performs well. Programming is by using Python 2.7 I had a raspberry pi4 and did not realise 2.7 is actually included but needed activating.(support informed me Python 3 programs are being developed). The main control program does not work with remote desktop so need to use VCN. My car had commands round the wrong way but programs are clear and it was easy to amend. I had to contact support and received prompt reply. All in all a good starting model for learning robotics.
M**L
FREENOVE 4W SMART CAR KIT SIMPLE Y PRÁCTICO
Hace tiempo que quería compartir con otros usuarios de Amazon mi opinión sobre el pequeño coche FREENOVE 4W SMART CAR KIT, lo he comparado con el modelo Picar X de SunFounder y Picar B Mars Rover de Adeep.En general es este un producto que me gusta mucho veamos puntos a favor y en contra:Puntos a favor:1 - Es considerablemente más económico y tiene las mismas funcionalidades, es cierto que el modelo Picar B de Adeep incluye baterías y micrófono USB, pero por la diferencia de precio puedes comprar ambas cosas.2 - Es considerablemente más fácil y rápido de montar. Incorpora una pieza central que ya lleva unido el porta-baterías y el circuito entre la Raspberry y los motores y servo motores se encuentran integrados en el chasis, para mí esto es una genialidad, no solo es más ecónimo, sino que simplifica el proceso de montaje, lo que para personas que piensan en comprar varios de ellos es muy importante. 3 - Solo tiene 2 servo motores y tiene 4 motores que le proporcionan tracción a las 4 ruedas de modo que no tiene ruedas delanteras que giren. Esto puede parecer un inconveniente, pero yo lo veo como una ventaja. El coche puede hacer girar sus ruedas izquierdas hacia adelante y sus ruedas derechas hacia atrás y viceversa a toda velocidad, lo que permite un giro sobre si mismo muy divertido. Además, al no tener ruedas que giren a los lados, esto implica que no tiene todas las piezas necesarias para que un servomotor mueva las ruedas, lo que de nuevo simplifica enormemente el proceso de montaje lo cual es de agradecer.4 - Tiene dos interruptores, uno general y otro para todo lo que no es propiamente la Raspberry como su circuito y los servomotores, lo cual es de agradecer, porque tener un interruptor general es normal, pero un segundo interruptor permite ahorrar batería cuando estás realizando labores de configuración de la Raspberry que no implican a los motores o servomotores.5 - Cuenta con un medidor de batería con 4 leds, cuando están encendidas las 4 las baterías están a tope de carga, cuando solo hay 3 hay menos carga, pero aun funciona bien, el correo de soporte me ha aconsejado que las cambie cuando llega a dos luces. Esto es especialmente importante cuando está haciendo pruebas porque hay estadios intermedios entre funcionar y no funcionar bien por culpa de falta de energía, y si estás programando en Python deseas antes que nada eliminar posibles variable.6 - Te proporcionan una clase motor otra clase servo y una más para el sensor de ultrasonidos razonablemente usables, aunque se pueden mejorar. Otros coches como Picar-B Mars Rover de Adeep te dan un software muy difícil de reutilizar.7 - Tienen un total de 8 salidas para conectar servomotores, lo cual es especialmente útil si como a mí se te rompe una, hay que decir al respecto que, si bien la competencia no tenía 8 salidas, tampoco se me rompió ninguna de ellas.8 - Usa tornillos relativamente grandes, si nos fijamos en la “cabeza” en el modelo Picar B de Adeep, los tornillos de la cabeza eran verdadero infierno, además, tuve que romper una parte del metacrilato para hacer que encajaran.En un orden tanto de facilidad de montaje como de uso del software Python el mejor es FREENOVE 4W SMART CAR KIT, en segundo lugar, Picar X de SunFounder y en tercer lugar Picar-B Mars Rover de Adeep, sin duda el más complicado.Puntos en contra:1 - Se me ha roto una de las salidas para servomotores, pero me han dado una solución con la cual no he necesitado desmontar el cochecito.Dos puntualizaciones:Por algún motivo que desconozco la salida cero para servomotor tenía en la clase servo un tratamiento diferente al resto, yo estoy usando las salidas 2 y 3 por igual y tuve que cambiar los movimientos hacia la izquierda por los de la derecha y viceversa, en cualquier caso, en última instancia uso la siguiente clase para usar las salidas 2 y 3:from PCA9685 import PCA9685class Servo: def __init__(self): self.PwmServo = PCA9685(0x40, debug=True) self.PwmServo.setPWMFreq(50) self.PwmServo.setServoPulse(10, 1500) self.PwmServo.setServoPulse(11, 1500) def setServoPwm(self, channel, angle, error=10): angle = int(angle) if channel == '0': self.PwmServo.setServoPulse(10, 500 + int((angle + error) / 0.09)) elif channel == '1': self.PwmServo.setServoPulse(11, 500 + int((angle + error) / 0.09))#En segundo lugar, he realizado algunos cambios en la clase para medir la distancia a un objeto por parte del sensor por ultrasonidos, ya que tal y como estaba muchas veces me empezaba dando el valor cero reiteradamente. Empecé por buscar en el array de salida en vez la posición centra cualquier posición empezando por el centro que fuera distinta de cero, finalmente hago una media de los valores distintos de cero, lo que disminuye el efecto de posibles errores puntuales.Pose la clase en un fichero aparte para poder reutilizar en diversos proyectos, y tengo un pequeño programa para probar la clase.Ultrasonic.py:import timeimport asyncioimport RPi.GPIO as GPIOclass Ultrasonic: def __init__(self): GPIO.setwarnings(False) self.trigger_pin = 27 self.echo_pin = 22 self.MAX_DISTANCE = 300 # define the maximum measuring distance, unit: cm self.timeOut = self.MAX_DISTANCE * 60 # calculate timeout according to the maximum measuring distance GPIO.setmode(GPIO.BCM) GPIO.setup(self.trigger_pin, GPIO.OUT) GPIO.setup(self.echo_pin, GPIO.IN) def pulseIn(self, pin, level, timeOut): t0 = time.time() while (GPIO.input(pin) != level): if ((time.time() - t0) > timeOut * 0.000001): return 0 t0 = time.time() while (GPIO.input(pin) == level): if ((time.time() - t0) > timeOut * 0.000001): return 0 pulseTime = (time.time() - t0) * 1000000 return pulseTime async def get_distance(self): distance_cm = [0, 0, 0, 0, 0] for i in range(5): GPIO.output(self.trigger_pin, GPIO.HIGH) await asyncio.sleep(0.00001) GPIO.output(self.trigger_pin, GPIO.LOW) pingTime = self.pulseIn(self.echo_pin, GPIO.HIGH, self.timeOut) distance_cm[i] = pingTime * 340.0 / 2.0 / 10000.0 # Filter out zero values non_zero_distances = [d for d in distance_cm if d != 0] if not non_zero_distances: return 0 else: # Calcular la media manualmente sin usar statistics return int(sum(non_zero_distances) / len(non_zero_distances))prueba_Ultrasonic.py:import asynciofrom Ultrasonic import Ultrasonic# Crear instancia de Ultrasonicultrasonic_sensor = Ultrasonic()async def main(): while True: distance = await ultrasonic_sensor.get_distance() print(f"La distancia es: {distance} cm") await asyncio.sleep(1) # Espera un segundo antes de la próxima medición# Ejecutar la función main dentro del event loop de asyncioasyncio.run(main())
S**A
Etwas für Fortgeschrittene und bedingt für Anfänger
Ich nutze den Freenove Bot als Basis für eigene Programmierungen. Da ich selber seit längerem programmiere stellt das Gerät keine Herausforderung für mich dar. Für Menschen ohne oder wenig Programmiererfahrung wird das schon schwieriger. Hier würde ich eher auf deine Bot auf Arduino Basis verweisen. In der Arduino Umgebung findet man sich schneller zurecht und kann einfacher lernen.Bei dem Raspberry muss man erst diesen einrichten, Software installieren, einen PC / Laptop für den Remote Zugriff einrichten etc. Mit den vorgegebenen Funktionen kommt man schnell an das Ende des Spaßes an. Das Teil ist gut geeignet wenn man selber programmieren möchte und schon ein Stück weit weiß was man tut.Zu FREENOVE selber.In der Anleitung wird versprochen, dass man immer support bekommt und sich das Unternehmen auch über den Verkauf hinaus verantwortlich für seine Produkte sieht.Ich kann das aus eigener Erfahrung nur bestätigen. Ich hatte bereits mehrmals Kontakt zum support um auch tief gehende Fragen zur Elektronik zu stellen und bekam stets innerhalb kurzer Zeit Antwort.Ich bin begeistert. Deshalb auch 5 Sterne Gesamtbewertung
J**H
SAV répond rapidement
Service SAV performant. Tutoriel pas à pas. Adapté pour débuter sur raspberry pi. Toutes les fonctionalités proposées sont opérationelles.
L**G
A great car kit if you can meet some challenges
The media could not be loaded. First, the product works if you assemble it correctly (see my video). My kid and I really enjoyed the features such as auto-driving, obstacle avoidance and etc. The kit really deserves five-star for its functionalities.However, there are a few issues. One issue is that the car kit doesn't come with rechargeable 18650 batteries. I ended up spending some time on Amazon doing research and buying a bundle of these expensive batteries and charger. I wish the car kit can include batteries and charge a little extra.My second major issue is that the manual is poorly written. There are duplicated sections all over and it can confuse people. Most importantly, some key installation steps should be emphasized. For example, my kid was stuck between Step 9-11 on Page 51 (duplicated on Page 72) when attaching camera module to servo package. After quite a while of watching the video of assembled car like a detective to gather clues, I realized that one needed to attach a white rocker arm on Step 9. Then Page 73 says there are two ways to fix the servo 0. I don't think the second way works. Another example is when wiring the ribbon for camera (Page 54). A kid would simply insert a ribbon into the slot. Step 1 on Page 54 should emphasize that one needs to pull the lever out first, insert the ribbon and then push the lever in.In retrospect, the car worked great. I am surprised that the installation of software is very smooth. The assembling process was frustrating sometimes and there is a lot of room for improvement and simplification.
S**N
Fun kit, and super for a beginner.
Liked the kit, but the instructions has some holes and the mobile apps required to control the model leavs a bit to wish for.But over all it has potential and I will most definitely have fun with this one.All the parts are there, well packed and easy to follow instructions, but a bit un clear at some parts.Will get more kits.And I'm planning to upgrade this one.
Trustpilot
2 weeks ago
1 day ago