🚪 Slide into seamless style with Prime-Line’s sleek track cover!
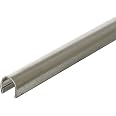
The Prime-Line D 1579-1 Sliding Door Repair Track is a durable, stainless steel cover designed to restore worn or damaged aluminum sliding door and window tracks. Measuring 1/4 inch thick and 8 feet long, it can be easily cut to size and installed without assembly, providing a rust-resistant, long-lasting solution backed by a 1-year warranty.
Brand | PRIME-LINE |
Color | Stainless Steel |
Material | Stainless Steel |
Style | Patio |
Item Weight | 1.46 Pounds |
Assembly Required | No |
UPC | 049793915795 |
Global Trade Identification Number | 10049793915792, 00049793915795 |
Manufacturer | Prime-Line Products |
Part Number | D 1579-1 |
Item Weight | 1.46 pounds |
Product Dimensions | 72 x 0.19 x 0.25 inches |
Item model number | D 1579-1 |
Is Discontinued By Manufacturer | No |
Size | 1/4 Inch |
Item Package Quantity | 1 |
Included Components | Repair track |
Batteries Included? | No |
Batteries Required? | No |
Warranty Description | Goods are warranted against manufacturing defects for 1 year. In no case is Prime-Line responsible for user related damage or damage incurred during installation. Warranty is void if products are subjected to abnormal conditions, misapplication or abuse. |
S**F
An amazing product but not a magic wand
This is an amazing product, especially if your alternative is replacing a large, heavy, expensive door, or continuing to live with a barely-functioning one. This product is not a brand new door, nor is it advertised as such. If you have other door issues, resolve them also. This simply repairs the existing damaged track. This is designed for minor damage. If you have severe damage or missing sections of old track, you may need to consider a more substantial product like CRL Aluminum 96" Sliding Glass Door Replacement Rail by CR Laurence.If you are not handy, you should not attempt to do this project on your own and then write a negative review on Amazon because you didn't know what you were doing. If you are not going to do it the right way, you probably should just hire a contractor to install a new door.Be careful with this repair track, it can have sharp edges.This is not a complicated project but you should at least have some concept of DIY projects. You must completely remove the sliding door (possibly both) from the track - this may be a task for 2 people depending on your situation.You should also replace the door rollers at the same time. They are usually inexpensive and you have to take the door out anyway to do this repair, at which point you can easily change the wheels. If your track was damaged, the wheels are probably damaged. If you reuse them on the new track cover, they will damage it. It's really pointless to repair the track and not replace the wheels. If you don't know what type you need, you will have to remove them to match them at the store. Before I started, I purchased 1 set of each type they had at Home Depot instead of leaving the door open to go to the store. I returned the ones I didn't need when I was finished.If the slot at on the bottom of the door has buildup or debris in it, clean it out with compressed air or a stiff brush.Clean your old track with a strong degreaser and a scrub brush. Make sure all the old grease, wax, dirt, etc. is removed before installing the new track cover. Make sure the track is dry. If you have severely damaged track, try your best to straighten it out - this can usually be done with visegrips or other strong pliers. If there are jagged edges or irregularities, use a file to clean them up. The purpose of doing this is to prevent the door from hammering the new track cover over the existing damage and replicating it.The repair track is stamped stainless steel. It has a thin coating of oil on it from the manufacturing process. Make sure to clean the underside with degreaser so the epoxy will adhere effectively. I wiped the underside of the repair track and the floor track with rubbing alcohol just to ensure they were clean and dry.Do not use silicone or caulking. Use this Loctite 2-part epoxy: Loctite Epoxy Five Minute Instant Mix 0.47-Fluid Ounce Syringe (1365868). This is designed for metal surfaces and works very well for this project. Not only does it ensure a strong bond between the repair cap and the track, it also helps to fill in and harden low spots where the original track was damaged, providing support to prevent damage to the new cap. You will have about 5 minutes to work with this epoxy before it begins to harden. If you are prepared and organized, it should take you about 1-2 minutes to put the repair track in place. Wear rubber gloves in case the glue gets on your hands. The nozzle of the epoxy syringe is slightly wider than the repair track. I used pliers to slightly "squish" it and make it narrow so it fits right inside.Measure the repair track to ensure that it fits your door width. If it needs to be trimmed, you can do this with a Dremel, hacksaw, or cutting wheel. If you can do a dry/test fit, do so to get an idea of how it will go on once you are ready. If you trim a small piece off, temporarily dry install (no glue) this piece on the old track so you can see how it works. If you do this, take this piece off before the final install.When you are ready, apply a generous bead of glue to the inside of the repair track. If you have made the nozzle narrow, you will be able to get the glue directly onto the bottom of the repair track (the surface that will touch the old track). Keep in mind that you need enough to do the entire length and observe how much is in the syringe. I put a generous bead down the entire 8' length and only used 3/4 of the glue.Start on one end and gently press the repair track onto the old track. Depending on the condition of the old track, this may be easy or difficult. If it goes on easy with some room to spare, install the entire thing, then gently crimp it on with pliers. Take care to only crimp it enough to make it tight, not enough to deform the repair track. I crimped mine about every foot.If it goes on snug, you may have to use a rubber mallet or a block of wood and hammer to coax it into place. Be gentle - your goal is to get it on the old track, not deform the new one. Once it's in place, go back over the entire length and make sure it's all even and properly secured. If any epoxy leaked out, clean it up. Make sure none is on the surface of the repair track. I wiped the new track down with alcohol when I was done just to make sure.Install the new rollers in the door, making sure to adjust them low so you can get the door back in. Once the door is in place on the new track, move it back and forth to make sure it's not hanging up anywhere. Adjust the new door rollers. There are several videos on YouTube that show how to do this - it's very simple and will ensure that the door functions properly. Inspect the top guide ("track") - often if the old track was very damaged, the door may have caused damage on the top. If there are burs, gouges, or damage, they can usually be easily smoothed out with a file. Roll the door back and forth a few times in the first 5 minutes. This ensures that the repair track is properly and evenly seated when the epoxy hardens.Don't try to take shortcuts on this project. If you've been fighting with a damaged track for any amount of time, doing this project the right way will be well worth it. I worked alone, took my time, and was very thorough on my 8' sliding door. It took me less than an hour from start to finish.
R**.
If you take your time, and are somewhat handy with tools, you can do it.
I wanted to share my experience with this product. First off, yes, 5 stars. I will explain.I had a real problem with my sliding door, which is a tall 8 foot door, and quite heavy. It takes two of us to remove and reinstall the door on the track. The problem is that the door is really too heavy for the kind of track it was on. The thin blades of aluminum were just not up to the job of holding this door over the years. Over time the top of the aluminum blade begin to crush and formed a mushroom shape at the top. As the door sagged lower and lower, and in primarily just specific spots, the bottom edge of the door started to rub on the track base, and even gouging some out of the metal. A real mess of aluminum grime. I tried to level the track blade by filing it, but this just made it worse. The rollers in the door had been adjusted as high as they would go. The door was a manual force it with your whole body kind of door at this point.I ordered this track in July of 2020 for $37.80 but it sat in my garage until cool but not too cold weather came so extended periods of not having the door installed would be one less worry. One day when my son was available to help, I took the plunge.1: FIrst thing, I had to shave off all the wide mushroom shaped edge areas on the top of the track blade back to its original thickness so the repair track would slide on top of it. I had to use an angle grinder and carefully took off the sides of the track blade where it had been flattened and widened. This was no easy task. I was able to use the track itself as a guide to help me keep the cutter in position as I went. THen followed up with a cleanup with a file and sandpaper.2: Now that the blade was narrow again, there were a bunch of dips in it, which is the problem at hand. You cannot just place this metal repair track on that. It will fail pretty quick. I had to fill in the gaps first. I used some metal pieces (bookcase tracks I had laying around) as guides and placed one on each side of the blade and clamped them into place. This formed a mold into which I could pour something that would bring the track blade back to it's original height and no wider then the existing track. But what to use? I used the loctite epoxy recommended in another review. This brand was easy to use since it mixes automatically as you dispense it. I used about 4 of these to fill in the track from one end to another, keeping the top level. I let that harden and removed the 2 metal mold pieces used to form the mold. Then cleaned it up with a file and sandpaper. The concern was is this strong enough to do this job? I had my doubts.3: Once I had the newly formed track blade hardened and shaped, I installed the repair track piece on top of it. Looked great, but would it hold the door for very long before the epoxy started crushing?4: we reinstalled the door, and it actually slid pretty well. The extra width of this track cover still fit in the groove in the door, and on the roller, barely, but it fit.5: Bets around the house seemed to predict that our expectation would be that this fix would last about 2 weeks before it started failing.6: Surprise! it is now several months later and the door is still all good. Door slides just fine and no sign of the epoxy crushing. I will update in about a year. It just might be that this is now Better than new.
R**R
Our sliding door operates smooth again
The track for our sliding door developed flat spots that prevented the door from opening a closing smoothly. The Prime Line Repair Track took care of the problem. The repair track arrived in a very sturdy tube that prevented any damage or bending during shipping. Of course the hardest part of the project is removing the old door and fixed panel. The video oversimplifies the repair track installation process a bit. It's important to make sure the repair track properly covers the damaged portions of the old track so a little technique may be required when using the hammer and wood block.
Trustpilot
2 months ago
1 month ago