🔩 Elevate Your Tool Game with Precision!
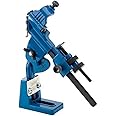
The Draper44351 Drill Grinding Attachment transforms your standard bench grinder into a precision sharpening tool, allowing for fast and accurate sharpening of twist drills ranging from 3 mm to 19 mm in diameter. Made from high-speed steel, this durable attachment is designed for efficiency and ease of use, making it a must-have for any professional workshop.


| Manufacturer | Draper |
| Part Number | 44351 |
| Product Dimensions | 16.8 x 5.3 x 27.7 cm; 630 g |
| Item model number | 44351 |
| Colour | Blue |
| Finish | Finish |
| Material | High Speed Steel |
| Item Package Quantity | 1 |
| Number of Pieces | 1 |
| Included Components | Draper Drill Grinding Attachment |
| Batteries included? | No |
| Batteries Required? | No |
| Item Weight | 630 g |
P**H
Quite good once you learn it
Quite good for hss drill bits, bit of a faff setting up to face of the grinder, just got to get distance right, instructions lack of, went on you tube. Works well in big drills say 10mm or more, smaller ones not so good, there's a guide that sits in the drill flute, hard to get right in small drills.
A**R
Works well after beefing it up a bit. More consistent than hand sharpening.
I tried hand sharpening bits on a grinding wheel with limited success. This works more consistently but it's only easy for 5mm plus bits. The handscrews are hard to tighten properly so I replaced them with 6mm versions after tapping new holes. The angle gauge is a bit off. I use mine successfully on the perimeter of the grinding wheel as the edge use is discouraged on safety grounds. Does a nice relief angle on the bit. Build quality reasonable. A useful tool if you go through bits regularly particularly >5 mm which are the expensive ones. Also sharpens my cobalt steel bits. Don't try to remove too much metal with a single pass - I use 3 lighter passes usually then you get a better centred web.
T**R
Excellent results with some practice
I first tried this using a standard bench grinder with a coarse wheel.I had previously watched videos and reviews on YouTube so knew what to expect. At first results were poor and resulted in grinding too much away. The key to getting it right I found was to ensure that you have the drill projection from the end marker exactly right – then things started to work much better. I did find a coarse wheel to be a bit too much of it though. My bench grinder has side protection on it which covers most of the wheel and this had to be removed as it was not possible to get the jig close enough to the wheel with it in place - which was not ideal from a safety point of view.I then tried to use the jig on my Robert Sorby Pro-edge system. There was no way using the platforms that come with the system to do this as they are too high. I thus spent time making a hardwood platform (see photo) that was crafted to slide over the lower round post, and carved to lock over the side casing of the system and be at 90 degrees to the belt.This has been a great success and sharpening was then much easier and the amount of metal removed was generally less than with the grinder and a consistent grind achieved on both cutting faces.It is fair to say that I found the standard instructions to work best on larger drills – 5mm and above – but with more practice, and being very gentle, it is possible to do 3 – 5 mm drills.I have now sharpened every drill I have and am very happy with the results.So it is certainly worth spending the time to get the set up right and practice on an old drill or two, and then the results will be good – which is excellent for such a sensibly-priced jig.
M**N
If you like a challenge
I read many reviews of this device. A few said it worked well, more said it was rubbish, so I expected a challenge. It is a puzzle. The basic design is capable of doing a good job, but poor instructions and indifferent workmanship, make it more or less impossible to achieve this. Do the manufacturers want you to fail?The idea of a drill sharpener is to hold the drill and apply it to the grinding wheel to sharpen it properly. To do this the sharpener must be in the right position relative to the wheel. The instructions say this, but don't say what the correct position is! There is a diagram, but it is too simple and unclear to give much help. There is a serious difficulty that the sharpener was designed to sharpen the drill on the side of the wheel, but now for safety reasons this is not recommended so the instructions suggest that the drill is sharpened on the face. They don't mention that to do this the tip of the drill must be exactly at the centre height of the wheel. If not it won't work. This is not so easy as the sharpener holds the drill tip well above the height of the centre of a standard 6" bench grinder, so the grinder must be lifted up somehow. The instructions mention this possibility, but don't explain that the height adjustment may have to be changed to suit each drill! All in all it sounds like too much trouble, so I stuck to the original intent and set up the sharpener to grind on the side of the wheel.Once set up I found that even with the sharpener tightened up properly, the drill tip wobbled around. The wing nut did not hold the parts together securely, but this was easily fixed by putting a washer under the wing nut. The drill clamp pivot was very stiff, so although I could rotate it I had to apply so much force that the position of the drill on the wheel was affected. Oiling the pivot and working it back and forward until it was "run in" sorted that out. The instructions suggest placing the drill with the lip stop engaging the flute and an overhang of about 1/2 the drill diameter, but I could never get this to work properly. I found that reducing the overhang to about 1/3 diameter, and adjusting the drill so that the cutting edge was parallel to the wheel side (ie vertical) worked well.Even so, setting up the sharpener so that the drill just touched the wheel was quite tricky. Setting it just short of the wheel and using the drill feed screw to advance until it touches it is a serious mistake as this messes up the overhang. I made a baseplate for the sharpener with a "pusher screw" which allowed the sharpener base to be advanced very precisely, which works well.In conclusion, if you have engineering skills, and know how a correctly sharpened drill should look, and have LOTS of time to play, you can sharpen drills pretty well with this device. If you just want to sharpen some drills, and want the sharpener to work "out of the box", then forget it, you will waste your time and ruin your drills.
C**G
Good
Really good once set up right
G**T
Good tool
Took a little while to get working (had to raise my grinder on wooden blocks). You've got to screw it down to the bench to get it to work. Only works on drills above 3mm dia. But produces excellent results on all the drills I have sharpened. Have sharpened all my drills (I have quite a few) - now a delight to have all my drills sharp.
J**N
PRACTICE MAKES PERFECT.
POOR INSTRUCTIONS WILL PUT SOME PEOPLE OFF. THE TIP OF THE DRILL SHOULD BE POSITIONEDON THE CENTRE LINE OF THE GRINDER AND THIS WILL INEVITABLY REQUIRE LIFTING UP THE MACHINE,ONCE DONE YOUR READY TO GO. IF YOU HAVE EXPERIENCE WITH DRILL SHARPENING IT WONT TAKELONG TO GET GOOD RESULTS, IF NOT IT WILL TAKE A LOT OF TRIAL AND ERROR.
Trustpilot
Hace 3 semanas
Hace 2 meses