Deliver to Paraguay
IFor best experience Get the App
🚽 Flush Away Your Worries with Style!
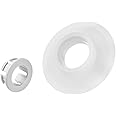
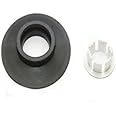
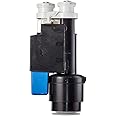
The Ideal Standard SV01967 Dual Flush Valve Seal & Clip is a high-quality, stainless steel component designed for compatibility with most Ideal Standard flush valves. Weighing just 19.99 g and measuring 5 x 5 x 5 cm, this CE-certified product includes a base sealing washer and securing clip, ensuring a secure and efficient installation. Perfect for eco-conscious consumers looking to enhance their bathroom's functionality.
Manufacturer | Unbranded |
Part Number | SV01967 |
Product Dimensions | 5 x 5 x 5 cm; 19.99 g |
Item model number | SV01967 |
Colour | No Finish |
Finish | No finish |
Material | Metall |
Item Package Quantity | 1 |
Number of Pieces | 1 |
Measurement System | Metric |
Certification | CE |
Included Components | Flush Valve Seal |
Batteries included? | No |
Batteries Required? | No |
Item Weight | 20 g |
M**S
Fixed my issue easily.
Great price and sorted out the issue right away. This is the second purchase of these I’ve made for different toilets and would recommend. Much cheaper than other sellers and easier to identify what was needed for my toilet with their description! Definitely recommend this company as the seals are good quality, at a good price and quick delivery.Toilet overflow was constantly refilling and leaking into pan so the cycle was endless. Also cistern would not fill up or stay full. Quick and easy replacement of this deal did the job!
M**H
Perfect fit... quality better than original
Perfect fit. This translucent rubber material seems better than the previous black rubber material.. time will tell
A**R
Ideal valve seal
I haven't fitted these yet but hoping the silicon type seal will last longer than the usual rubber seal which I need to replace every couple of years.
G**D
Did what it’s meant too
Did what it was meant too.
S**A
Immediately fixed leak. Cheap, easy solution.
My toilet was constantly leaking/running water from cistern into bowl, wasting water. It was clear on inspection/rummaging around in the cistern that my flush valve seal was perished/was in pieces. Had no idea what make of toilet/flush valve i had (but in case it helps others, the style can be seen in fotos 1-3). Found this seal on Amazon, very cheap, seemed roughly the right size: thought it was worth a punt. Comes with instructions on how to change the seal. I have zero plumbing experience. Basically, fotos 4, 5 & 6 show the wee lugs that attach the valve shaft to the bottom casing. Grab the shaft (so to speak) and turn it counterclockwise (to the left) to separate the parts. This left me with the bottom casing (foto 7, u can see bigs lumps of rubber from the old, perished seal) and the valve/shaft with what was left of the old seal still attached (foto 8). Remove the seal clip & the seal, give everything a clean and the new seal pops in effortlessly. Turned the water back on and problem completely sorted! Was quoted £300 for a plumber to do this. Cost me £4 to diy! Awesome!
A**R
Exactly right
Exact replacement for the seal and clip in my cistern. Easy to fit and does the job, no more leaky trickle!
P**N
Easy to fit
I used to spend a three figure sum every couple of years getting a plumber in to chenge over the fluch valve seals on our 3 loos when one or other - often more than one - was leaking. Not any more! These are easy to fit - not much more difficult than changing a light bulb - and work every time. I just replace them every year, the loos never leak from the cistern now!
G**M
Stop your toilet constantly running - very easy
Purchased to replace the valve seal on an Ideal Standard Pneumatic Dual Flushvalve (SV93467). The old seal was slightly worn and let water run slowly but constantly into the toilet bowl.It’s almost impossible to remove the old clip without breaking it, so it’s good that a new clip is supplied. However, it’s fairly easy to stretch and pull the old rubber seal over the clip - lift at the edge and bend it back.The new seal supplied was easily stretched over the clip and into place. You need to pull it around the edges to make sure it’s seated properly and the rubber disk shoul be as flat as possible. On my first attempt I didn’t ensure it was completely flat and it leaked worse than before. Once rectified, it works perfectly. A very simple, cheap and effective fix for my leaking loo! Wish I’d done it sooner.If you’re not familiar with this flush system, it can be a bit daunting because it’s mostly plastic and you don’t want to break it.My tips:The pneumatic pipes from the push button are pushed onto two round discs on the top. Those discs can be removed easily by twisting anti-clockwise (may be a bit stiff as there’s a rubber disk underneath - it will move slowly). Doing this means the pneumatics are out of the way and you can flush simply by pressing the rubber disc, or the plastic disc underneath if the rubber disc it lifted out. Don’t lose the rubber disc though!The entire flush column is secured by two plastic lugs, one on either side - it’s a bayonet fit (like a light bulb). Carefully twist anti-clockwise and once it’s released the whole unit will lift up and out.Lift it up wards and keep it vertical, as it will contain some water. Tip upside down to remove the water.The rubber seal to be replaced is at the base of the unit.Also worth checking there is no damage to the plastic rim that the seal sits on, and remove any limescale deposits or other debris in the tank while you have the flush unit removed.If you haven’t done it before or DIY doesn’t come naturally, fixing your loo may be a daunting task. Believe me, this is easy and no tools required.It’s easy once you know how!
Trustpilot
Hace 3 semanas
Hace 5 días