Deliver to Paraguay
IFor best experience Get the App
⚙️ Elevate your 3D printing game with unstoppable dual gear power!
The Redrex Dual Gear Ender 3 Extruder kit features a robust dual drive mechanism and upgraded idler gear with protective washers, ensuring firm filament grip and reduced jams. Powered by a high torque Nema 17 stepper motor delivering 40Ncm holding torque, it guarantees stable and precise filament feeding. Compatible with a broad range of Creality Ender and CR series 3D printers, this all-metal extruder kit is designed for enhanced durability and print quality, with easy calibration and maintenance guidance included.
A**S
So far so good--try this one first!
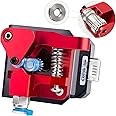
Bought this extruder for my 2020 model CR-10 after I had inconsistent extrusion and skipping on my prints from my aluminum single gear extruder and tried everything else I could think of to fix it. A few things off the top of my head:-As other reviews have pointed out, this version of the low-cost dual gear design includes washers to prevent the gears from grinding off the aluminum as they turn--this is the only one I've seen on Amazon that acknowledges that design flaw!-An issue that I HAVEN'T seen in reviews (probably because it's such an obscure upgrade) is that, while it IS compatible with the CR-10, it's not perfectly compatible with the PrinterMods direct drive upgrade right out of the box. This extruder is substantially thicker than the stock Creality one the PrinterMods upgrade is designed for, so the M3x25 screws included with that upgrade are /just/ too short to mount the motor + extruder to the printhead, and the screws you get with this package DEFINITELY aren't long enough to do the job. I'll update this review later to see how it works in action, but PrinterMods users--you WILL need to replace the two M3x25 screws you used to mount the motor to the printhead with M3x35, and I recommend adding a matching nut to ensure you can screw it all the way in. (It's overkill, but I ordered the iexcell M3 screw variety pack with the 50 nuts and five different lengths of screws--it's only ~$9 on Amazon though, so unless you found a cheaper M3x35 nut and bolt pack, that's what I can personally recommend.)-Definitely recalibrate your e-steps after you install this--in my case the included suggestion of 139 steps/mm was spot on, but it doesn't hurt to use this as a starting point for your calibration, since either way you're going to need to bump up your e-steps from stock for this kind of extruder.-If you're confused on how to install this, check out CHEP's video specifically about installing them. The included instructions are pretty vague if you haven't done extruder upgrades before, but I think that video is super easy to follow for beginners.Like I said, so far so good--after calibrating e-steps this extruder consistently extrudes the amount of filament you tell it to, has a firm grip on the filament without grinding it down or biting into it too deeply (at least with PLA--I'll see about PETG and other filaments one of these days), and shows no sign of slippage. Again, since I need to get longer screws to mount it on my particular setup, I'll update this review later to see how it works extruding hot filament proper, but if you need a solid dual gear extruder and don't want to break the bank, get THIS one!UPDATE 9/14/22: So I managed to finally get this thing mounted and tested extruding hot filament and it works beautifully! I won't knock off a star for this, but I WILL note that, for my extruder, I had to chamfer the second hole that fed the filament through the PTFE tubing a bunch since the gears didn't perfectly line up with that hole, making it so not only did I have difficulty feeding filament through, but it shaved off the filament as the extruder worked. This extruder is solid in every other aspect but this one, and while I would still certainly recommend it over other dual gear models on Amazon, I would advise having a needle file on hand just in case your hole(s) are misaligned/undersized. You get what you pay for, as they say.UPDATE: 9/23/22: After some fairly light but solid use, I can safely say that this is very likely your best budget dual gear option on Amazon right now. My only gripe that still remains is that it's finicky to actually get the filament through the gears AND to the hotend, but I imagine that's just because of my own weird setup, and I've heard that people have issues feeding filament through their stock/single-extruder setups anyways. If you're like me and you're patient (and desperate) enough to stick with it once you buy it, I still recommend getting a needle file just in case you need to widen the feed hole--after adding extra clearance it works just fine and no longer shaves away the filament.
L**.
Great little all metal extruder for a great price
Its got dual gears, its made entirely out of metal, it goes together easily and it pushes filament excellently.Not much else to say about this other than it does its job and does it well. I modified mine for a lower filament path as I printed the wrong direct drive mod and didn't want to print another but the fact that this is so cheap kept me from being hesitant about it, and it turned out great!Just remember to re-calibrate your E-steps as other reviewers have said, but you already do that any time you modify the gearing in the motion system, right? :) .
M**S
Does not fit creality direct drive setup, but good as a bowden.
As the title implies, it don't fit a creality direct drive kit, so I went back to a bowden setup. The filament path is farther from the motor to accommodate the gears. You can likely make/print an adapter plate, but I'm not worried about it for now. It works great after swapping back to bowden. You will need to RE-CALIBRATE ESTEPS! On the standard 100mm test, I was pulling only 69.7mm. No biggie, but know you need to do that immediately. The instructions are weak, but it's no big deal. It also looks like it's short a motor screw, but in the instructions they skip a hole, so there you go. You can always add one from the extruder you are replacing if you'd like.
S**E
This was an easy, solid upgrade to my Ender3.
This all-metal feeder is a great upgrade to my old Ender3 v2. After I figured out that my stock feeder was slipping I found this. I am very happy with this product.The frame and lever are solid aluminum and have a nice red anodized finish. I had one or two imperfections but they were in hidden areas and did not affect performance.The dual gear seems rock solid and I should never have feed/retraction issues again. Remember to update the E step to 139. My through-hole alignments were perfect and I did not see my filament getting sliced.The kit included everything I needed to swap out my stock v1 feeder (system upgraded to v2). I took my old assembly apart and measured it to ensure I had the correct Z-axis stepper 22mm shaft. There are illustrated instructions that I referred to when my intuition failed me. The spring with spring sleeve was hard to get in - I used the metal spatula to help slip/leverage it in, then turned the screw and found the hole.Disregard the reviews that state/show you that the screws are short and the whole unit is loose - I believe they are 'dry-fitting' the housing directly onto their stepper, without the bracket in between...This simple upgrade revitalized my old, humble, Ender3. It's working great and I recommend it.
T**B
Works well but some may need these installation tips
Works great. I was having trouble with the original extruder feed slipping and causing gaps in my prints. This one seems to solve the problem. I want to point out a couple of installation tips. One is that the instructions indicate increasing the Estep from 100 to 139. The original value on my Ender 3 Pro was 93 so I wondered if I needed to set it lower. It is a large number of rotations of the knob to get from 93 to 139. I was able to confirm 139 as the correct number by disconnecting the print head end of the bowden tube, feeding the filament through the opening, clipping it flush with the tube and then using the prepare z axis to advance the filament 100mm. I then clipped that off and measured it and sure enough, it was 100mm. The other tip has to do with how high on the shaft to set the gear so that the part that engages with the filament is lined up correctly. The trick here is to put the gear on, snug it down and then loosen it slightly to allow the gear to move up and down the shaft. Then put a piece of filament in and use that a as a guide to get both sides aligned before snugging it down with the set screw.
Trustpilot
Hace 3 días
Hace 3 semanas