🚀 Elevate Your Printing Game!
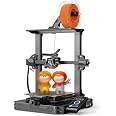
The 2024 New Version Creality Ender 3 S1 Pro is a cutting-edge 3D printer that boasts a remarkable 200mm/s printing speed, an all-metal direct drive extruder with 80N of force, and a high-temperature nozzle capable of reaching 300℃. With advanced CR-Touch auto-leveling technology, dual Z-axis screws, and a user-friendly interface, this printer is designed for both speed and precision, making it perfect for professionals and enthusiasts alike.


K**S
AMAZING 3D printer for CRAZY cheap - see review for details regarding set-up
This is my first 3D printer and let met tell you, I am absolutely blown away. I got great results on my first test print. Since then I've printed several things and needed to make minor adjustments but this product allows for easy adjustment and fine-tuning.The packaging is great (tools and extra parts provided), but on to the elephant in the room: assembly and initial calibration/parameter setting. It took me approximately 4 to 4.5 hours from opening the box to my first successful print. Here is what I can tell you about that process:1) TAKE YOUR TIME - The more careful and meticulous you are in this process, the better things go later. I think the reason I had such great success on my first attempt using the printer was due to me taking so long during the set up. I had some moments of frustration, but it really isn't that bad. This is a ~$200 3d printer with the quality and build size of printers that cost 2-3x+. The long initial setup and calibration is well worth it.2) Use multiple sources during set-up - I used the 1 page instructions included, the instruction booklet which can be downloaded here (https://www.creality3d.cn/download/product-file_c0002), and, MOST IMPORTANTLY, this awesome guy's youtube video for the assembly (https://youtu.be/me8Qrwh907Q) and bed leveling (https://youtu.be/5eqTmb01cBk). A little over halfway through the assembly process I gave up on the manual and just carefully watched and re-watched the youtube video steps, cross-referencing with the manual once major steps were completed. LISTEN to this guy when he tells you to take your time! Examples include: ensuring the two main z-direction aluminum posts are equidistant at the top and bottom (bolt tightening trick), tuning the eccentric nuts on the 3-wheel rail sliding assemblies, bed leveling, and more. These small tuning steps during the assembly fix most all problems people have.3) RELAX and realize this isn't an out-of-the-box ready to go 3d printer. It, like all 3d printers, need some tuning and a bit of experimentation/experience to achieve the printer's full potential. For example, the included test print was a smashing success, but my next, custom print didn't turn out as well. It didn't adhere to the bed after several layers and also was a tiny bit stringy in sections. I fixed the adhesion by telling it to print the object with a brim (layer under the object) and also turning on "Z hop when retracted" in case the nozzle was bumping something while it was moving between print areas (this option is in Cura, the slicing software - more about that below). I fixed the stringiness by turning down the nozzle temp about 8-10 degrees.4) If you're having an issue, it's likely that 10 other people have asked about it online. Do some google-fu. This may be the most important part of successful 3d printing. There are SO many great sources and communities out there to help fix issues and speed up your progress.What software does this thing use!? Ok, well I didn't know jack crap about any of this a week ago, but here is what I've learned since. This printer uses g-code files when printing. G-code is a file that tells it where to go (x,y,z), what layer height to use, what printing speed to use, etc. G-code is generated by slicing software from a 3d model (usually a STL file). You can download Ultimaker Cura for FREE here (https://ultimaker.com/en/products/ultimaker-cura-software). In Cura, you can change all the parameters for your 3d printer easily (layer height, wall thickness, infill density, nozzle temperature, build plate temperature, support and adhesion structures, etc). Cura now has the Ender 3 as a printer option.The easiest way to get to 3d printing some cool stuff is to go over to a free 3d model website such as thingiverse (https://www.thingiverse.com/). Download the files for whatever you want to print. Open Cura. Drag and drop the stl file(s) of the object(s) you want to print into Cura. Adjust the aforementioned settings (layer height, speed, etc). Click the "slice" button at the bottom right. At this point I like to hit the "preview" button and drag the slider on the right up and down to look at how the printer will print the object. Once you're satisfied, select "save to file", save it on the micro-sd card, put the card in the printer, and you're ready to go.If you want to customize objects (outside of simple scaling and such) or make your own from scratch, god speed to you. It's a helluva learning curve, but that's what I'm working on now. I've heard Blender is a pretty good, free 3d modeling software (https://www.blender.org/). Most any 3d modeling software allows exporting to a .stl fileOverall, I have to say that my expectations for this product were greatly exceeded. If you have a bit of patience and a willingness or ability to use google-fu to figure some things out, this 3d printer is amazing in both build quality and ease of use (once it's set up). If you don't, well I guess you'll need to shell out 5x+ the price
J**R
High quality, simplicity of use, and competitive pricing: the perfect combination!
This unit (ENDER 3 S1) represents a step up from a previous, entry-levl 3D printer for me. As others have stated, the setup instructions could be improved, particularly guiding the electrical connections and the ridiculously small font choice. Fortunately ENDER has prepared an excellent series of videos that simplify the setup and operation of the printer. They will continue to serve as an excellent resource for the eventual questions that arise. Setup is not complicated, contrary to a few previous reviewers, and took me approximately one hour. A test print was perfect on the first try.There are several features to this model that are particularly valuable. The AUTO BED LEVELING is a welcome advance. It is so simple that I routinely reset for each new project. This is probably not necessary, but since it is so easy to accomplish, it makes sense to verify a level platform (bed) to ensure a quality print. The DIRECT DRIVE is terrific for advancing the filament and makes it relatively easy to change filaments. The digital display is excellent and fairly intuitive. It gives fine control over bed (platform) temp, nozzle temp, movement of the extruder assembly, etc. The MAGNETIC platform cover that attaches to the platform is a nice addition. It is flexible and allows for an easier removal of the finished print, always an issue requiring putty knives and all manner of razor blade accessories and chain saws.One caution for new users (and a reminder to veteran users): verfify "Z-offset" (the distance between the tip of the nozzle and the platform surface; controlled from the digital display) before each new project. Removing the magnetic plate (or glass, or whatever surface you print to) can change that distance (supposed to be one sheet of paper between the tip and the platform). Failing to do this can influence whether the first layers of the print adhere properly to the platform and could result in the print pulling away from the platform as printing progresses. That will require some cleanup and restaring the job.For new users: 3D printing takes time; it is not a process that results in instant gratification. The rate of plastic deposition is necessarily slow so each layer properly sets before a new layer is added. It is not uncommon for projects to take hous or even days for large prints. Don't be too quick to blame the machine for slow printing!SUMMARY: ease of use, good resources for setup and operation, advanced features, and competitive pricing make this unit great for new users and accomplihed users as well.
Trustpilot
Hace 2 meses
Hace 2 semanas