Sobre nosotros
Servicios al cliente
Atención al cliente
Acceso Regional
Legales y políticas
Obtén la aplicación

Apunta tu cámara para descargar la aplicación
Copyright © 2024 Desertcart Holdings Limited


🎨 Elevate Your Game: Where Style Meets Functionality!
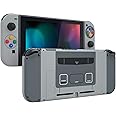
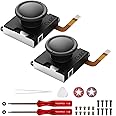
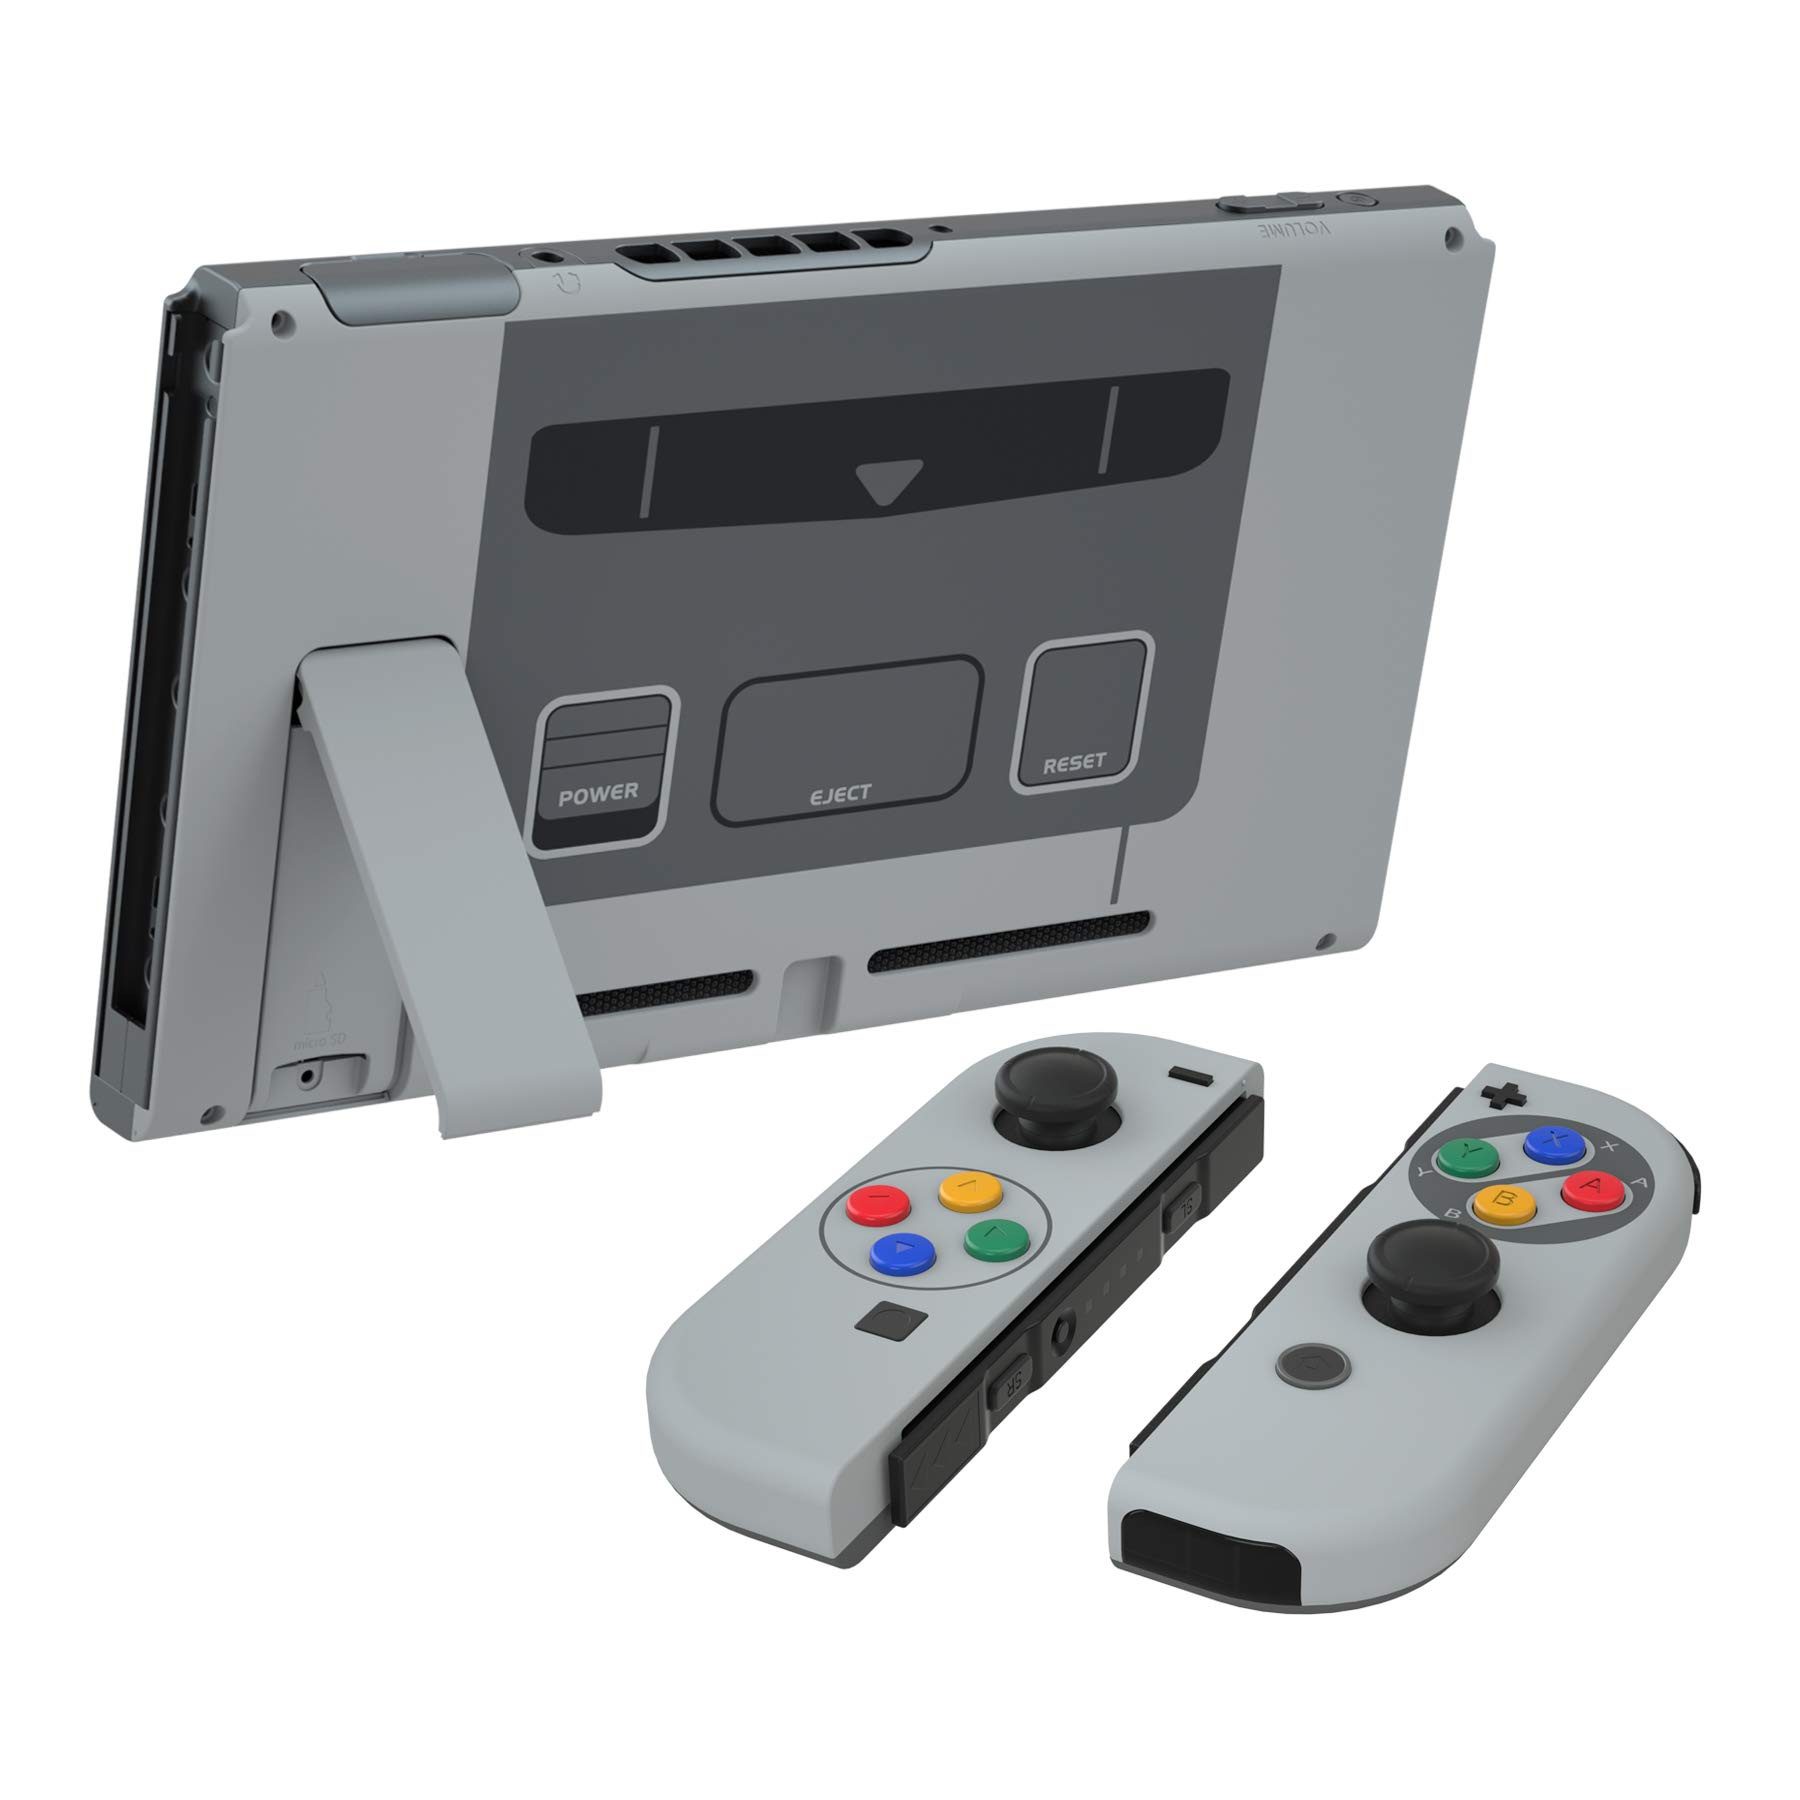
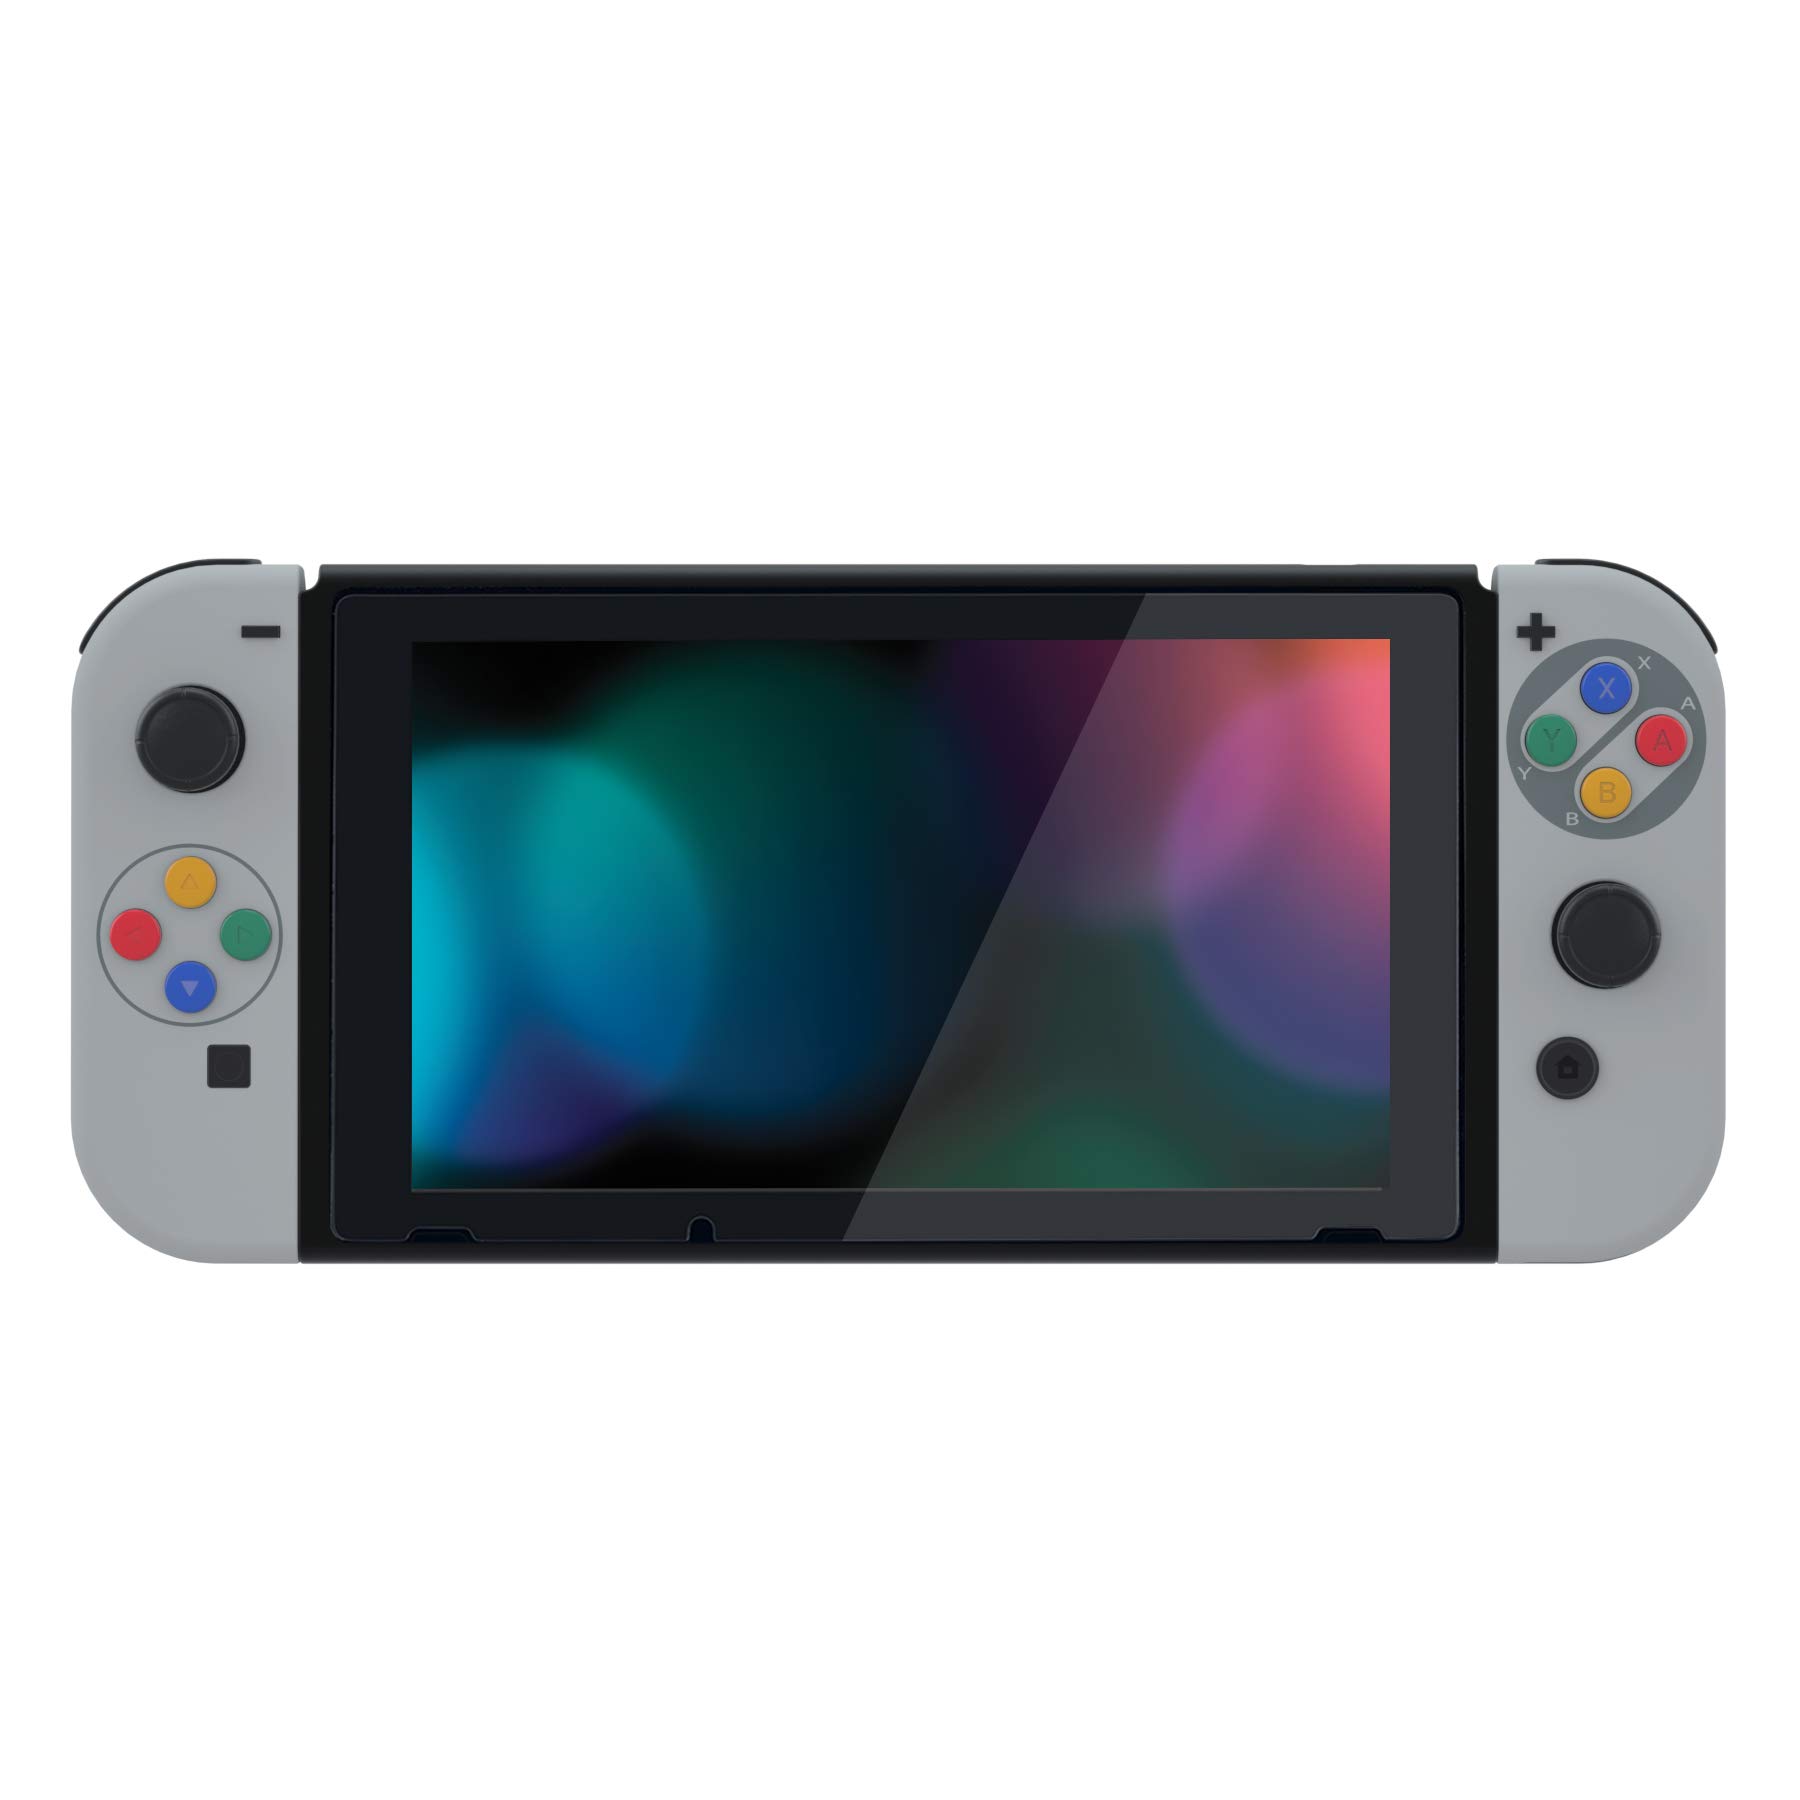
The eXtremeRate DIY Replacement Shell Buttons for Nintendo Switch offers a custom-designed housing that perfectly fits your console and JoyCon controllers. With a nostalgic SFC SNES Classic EU style, this replacement shell not only enhances the aesthetic appeal but also provides a comfortable grip for extended gaming sessions. The package includes all necessary components for installation, making it a perfect choice for gamers looking to personalize their setup.
| Item Dimensions W x H | 3.94"W x 0.59"H |
| Color | Classic SFC SNES EU Style |
| Hardware Platform | Nintendo Switch |
| Finish Types | Glossy or Matte |
| Material Type | Plastic |
S**T
Difficult to Install, but high quality product!!
This took me about 3.5 hours to put on my switch, but the end result was worth it. The kit comes with new hardware, but you can use the old hardware if it helps you stay organized. Overall, very happy with the look and the smooth feel.
T**G
looks great, install was time consuming but easy enough.
just a warning, there's a bunch of tiny springs and pivots in your controllers, obviously, this is a fiddly job that requires a bit of dex to complete, but beyond that it's a straight forward and simple job to do and very rewarding once you have the final product.i will say that doing this sort of work probably isn't for everyone but if you have a steady hand and some patience you will be able to complete it and should be an enjoyable process if you like tinkering.as for the fit,finish and materials here, it's all great, looks like a factory option, the materials have held up for about 6 months for me so far and looks new, which is great considering i carry this things everywhere...mostly camping which means it's often exposed to dirt and sticky stuff like pine sap, what ever camp slop ends up on picnic tables after a meal and my 3 year olds greasy mitts....i really wish it came with a sticker to do the controller mount or whatever the thing that the joycons slip into is called, it just doesn't feel complete when i'm using my joycons in one of those but when it's being used as a handheld the thing looks great and i always get a lot of questions and compliments from fellow epic gamers when they check out my switch.well worth the money and would not hesitate to do it again.
D**
Looks awesome
This skin looks wonderful on my switch. As with other reviews be careful with the screws as not to strip out the factory ones when removing them. If you have any mechanical abilities you will know when the screw is going to strip and maybe you need to try another size bit. I used my own screwdriver and bit set for removing the factory screws but used the tools supplied when reinstalling them. The back cover is extremely easy to Install and took all of about 10 minutes from start to completion. The joycons on the other hand took a considerable more amount of time because there is more moving parts and ribbons Involved. If you have no knowledge of electronics I probably wouldn't attempt this for my first project. Find someone with some knowledge to help you or if you must attempt it watch and follow YouTube videos closely. Take pictures or notes of how you disassembled things and which way the ribbons were Inserted into their sockets and don't rush it.
B**N
Old School and New School combined.
First of all, the materials they use feel really nice! They are definitely soft feeling and I prefer them over the original plastic Nintendo uses. I love the design and been wanting to do something like this ever since the product first came out, but there are a few things I don’t like. Firstly, the buttons are all the darker shade of purple. Why are there no lavender buttons? I bought the pro controller shell from eXtremeRate as well and as you can see in the photo, it comes with lavender buttons. I don’t know, but I wish it did. Second thing you should know is that the plastic is black and painted grey. Will it wear? I don’t know, but I know that maybe a turn off for some people.Now, as far as assembling, the right joy con is a pain in my butt. The left one is much easier. I would definitely start with that one then move on to the right one. The right one has added components under the board with multiple ribbon cables needed to attach as well as the components on top of the board with ribbon cables. My suggestion attach the ribbon cables of the stuff underneath, then install the underneath components and then the board. But all in all, it was a fun project and I’ve been getting tons of compliments on it.
K**E
Time consuming, but rewarding.
I got the NES version which I thought looked the best, and I don't regret it. Replacing the back plate was the easiest of the bunch, taking me like 30 minutes when the right joycon alone took me 2 hours, the left joycon taking me about 40 minutes due to me understanding the joycons internals at that point. The replacements have a bit of a different feel to it, feels like a smooth, soft frosted plastic, it doesn't feel bad, just different from regular joycons. Replacing the joycons, you are going to need some tweezers to get things around, the internals are too small to handle with fingers. The new buttons feel great, no complaints. Make sure to take things slow, if you strip even one screw, you're in for a bad time. 👍
Z**Y
Another quality product from eXtremeRate
Absolutely love the way this shell feels and looks. I was very happy with the SNES Pro controller shell, so much so I decided to buy the SNES shell for my Switch itself and in all honesty the only thing I can fault on it is that they didn't include some lighter colored buttons for the X and Y on my Joycon. All they include is the darker purple. That is a bit of a bummer, but only minor gripe. Overall the shell feels good, just like the pro controller it has a sort of soft-touch to it. It's not rubber, but whatever they've used, I like the way it feels to the touch. Quality overall seems to be very good.I would call this a Medium difficulty install. The back shell of the tablet portion of the Switch is very easy but the Joycons are a little more intensive. If you've never done something like this before, I highly recommend finding a Youtube video showing you how to install something like this and following it step by step and really taking your time. Be very careful with the small ribbon cables in the joycons as they are very small and fragile and be sure to keep track of all of your screws.All in all and awesome product that really does the job that Nintendo should've done. I wish Nintendo would release more throwback special edition systems like this themselves, though I enjoyed modifying my Switch on my own. Highly recommend.
A**R
Awesome..
The shell is sturdy, lined up perfectly, great material, one of the best shell I've used.
J**R
La Mejor Opción Para Rediseñar Tu Nintendo Switch
Después de mucho tiempo pude adquirir este kit de carcasa para joycon con la tapa trasera para el Nintendo Switch. De manera general daré una opinión detallada para quienes estén interesados en adquirir este producto:Lo bueno: Los materiales de las carcasas y tapa trasera son muy buenos, los botones también se sienten de muy buena calidad y te incluye rejillas nuevas para la ventilación y tornillos de repuesto (que solo se utilizarían si llegas a extraviar los originales) Te incluye un desarmador y dos puntas (una de cruz y una de tres alas), que será lo necesario para todo el proceso de armado; si has trabajado antes la electrónica y no eres muy exigente, el desarmador y las puntas son adecuadas para trabajar, aunque puedes usar tus propias herramientas si las tienes y son de mejor calidad.Lo malo:La caja no contiene un manual que detalle el proceso cambio de carcasa, el fabricante ofrece un video tutorial en su página de YouTube pero es un canal en ingles. En Youtube hay tutoriales en español de terceros, yo tuve que apoyarme con uno de esos.Puntos a tener en cuenta:Definitivamente el trabajo de cambio de carcasa es complicado, laboreoso y requiere alta precisión y cuidados. Si nunca has trabajado con electrónica o similar, no tomes estes proyecto a la ligera, particularmente el tema de los joycon es bastante complejo y delicado, los flexores y demás componentes son piezas que, de no manejarse adecuadamente, podrían dejar inutilizable el joycon en cuestión. También te recomiendo que elijas el diseño/color de manera conciente. En mi caso elegí el diseño SNES y el acabado es mate, y la superficie susceptible a manchas dactilares; no me preocupa demasiado porque limpio habitualmente mi nintendo switch y la uso poco en modo portátil, sin embargo creo que hay carcasas como las traslúcidas que pueden disimular mejor las manchas.Finalmente:Si tu Nintendo Switch ya tiene años contigo y, sobre todo, si tu garantía ya expiró, te recomiendo ampliamente éste kit si quieres darle una nueva imagen a tu consola, queda genial y al final sientes que todo el trabajo valió la pena.
C**S
Super slick shell replacement!
Looks incredible once installed. TAKE YOUR TIME and do not force the screws. The tools provided are more than adequate to do the job, but you need to be patient and not rush anything. The tutorials they have on youtube showing you how to install this is pretty great, just be sure to flip the right joycon's ZR cable the correct way (gold connector facing down) and you'll be good (they mention this in the video description).
M**.
Sehr hochwertig
Die Teile sind sehr hochwertig bearbeitet und haben eine leicht matte Struktur. Der Umbau der Switch erfordert etwas Geduld aber das Resultat lohnt sich auf jeden Fall! Sehr schöne Hülle!
I**L
No protege, solo cambia el diseño
No protege, solo que cambia el aspecto, hay que desmontar los plásticos existentes y montar estos
Trustpilot
Hace 4 días
Hace 5 días