🚀 Build Your Legacy with Gundam!
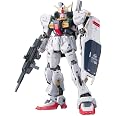
The Bandai Hobby #08 RX-178 Gundam MK II (AEUG) 1/144 Real Grade model is a meticulously designed snap-together kit that requires no paint or glue. With a highly detailed internal skeleton and advanced articulation, this model is perfect for both collectors and hobbyists. Its compact size and vibrant colors make it an ideal addition to any workspace, while the included LED components and weapons enhance its appeal for anime fans.


| Paint Type | NA or NO |
| Material Type | Plastic |
| Size | Small |
| Number of Pieces | 1 |
| Item Weight | 0.75 Ounces |
| Item Dimensions | 1 x 2 x 5.5 inches |
| Additional Features | Highly detailed internal skeleton, LED powered components, advanced articulation, opening hatches and swiveling components, and included weapons |
| Scale | 1/144 |
| Subject Character | Gundam |
| Style | Snap |
| Seasons | Winter |
| Theme | Anime |
| Color | Multi_color |
R**N
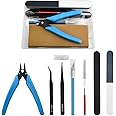
First kit in 14 years! (My complete tool list will be at the end of review)
So this build has been a long time coming. I loved Gundam Wing back in the Toonami days and ended up buying a HG kit of Wing Zero at a local comic shop and my 14 year old self was very... disappointed. HG Wing Zero was not even sturdy enough to even hold his own weapons and I wrote off all Gunpla as being a cheap and lazy way for companies to sell kids assembled overpriced toys... Now fast forward 14 years later, and many other Gundam anime under my belt, and I decided to jump back into Gunpla full force.Around Christmas time I received this kit (MK II AEUG) and one other kit (GP01 FB) for Christmas but I lacked the funds to buy the proper tools. Over the next few months of saving up (and staring at the beautiful boxes these kits come in) I slowly ordered the high quality tools I would need to do this kit the justice it deserved.With Tamiya nib cutters, files, sand paper, hobby knife, tweezers, (lets not forget the Google translate app that can take a picture of Japanese text and will give you a pretty good translation) and an assortment of other tools in hands... I went to work. The inner frame came first and I was blown away by, not only the detail, but the intricacy of the moving parts. It no longer seemed like I was reading an instruction manual but rather a blueprint. Everything seemed plausible. The first real detail that blew my mind was the piping. While somewhat challenging to assemble (and I ended up using some glue and a lighter for this part) it ended up looking so flipping cool and realistic. By this point I was getting in a good groove of cutting, smoothing and assembling and before long the MK II was assembled!Now one would assume this is the end of the story... no no no. Not in Gunpla. At this point you could call it quits (I have a picture uploaded of this point of my journey) but I decided I would go for the decals. Now I don't know if it was specific to this kit (the GP01 certainly has a lot less) but this one has an INSANE amount of decals and they are tiny. This was probably the most frustrating and rewarding aspect of the whole building process. It really makes the kit go from looking like a toy to a model (more on that later). Now I did lose about one or two decals in the process. I went to grab them with tweezers and they bent at the wrong angle and sprung themselves on the floor (gone for good I assure you). Kit still looked amazing without them. There are a few larger decals that I would say are not as forgiving if you were to damage or lose them but alas they are bigger and much easier to work with. The decals ended up taking as much time, if not more time, than everything up to that point in time... Did I quit there? I did not. While working on the decals I was looking up ways to make it even better looking.I decided that I would not paint this kit (I will on the GP01) but I wold attempt some panel lining using the marker that came with the paint set I had ordered. Unfortunately it was a very low quality marker and did not work like it should have. I made it work and in the final build you really can't tell unless you looked for it. So what else could I do to bring this kit some more life? Top coat it.Probably the easiest aspect, yet one of the most dramatic things I did on this kit. I used the Testors Dullcote Lacquer spray, "Dullcote" meaning "Matte." This greatly reduced the plastic look of the kit and gave it sort of a worn textured look while also reducing the visibility of decal bumps and plastic defects and scratches. I have a few before and after shots of the effect. It is subtle on a part by part basis, but in the end it GREATLY improves the look, especially if you decide not to paint like I did. It even makes the joints a bit more rigid, prevents any future smearing of panel lines, and helps seal decals on. You will have to spray this stuff outside and I would recommend and face mask of some sort because it is terrible smelling and even has a warning label that says California pretty much says this will give you cancer. I would also let it dry in a ventilated area, outside, or (like I did) in a laundry room. Alligator clips on sticks and a Styrofoam block also helped out immensely.At this point I built a stand and decided on a pose and now my little MK II is all complete. It was worth every penny by a long shot, in fact I would say it is a great deal for the kit itself even for the RG kits approaching $40. The proper tools ARE expensive tools but long lasting (based on other reviews) and worthwhile for the ease of effort they offer so I would not skimp in this department. I am hoping to paint my next kit so the experience will be different and more difficult but I am sure it will be worth it all the same.Good luck on your first and future Gunpla builds!My complete tool kit. Order early and completely as most of these come from Japan and you don't want to have to wait 25 days to get one tool you forgot to order (Guilty!).Bandai Hobby Action Base 2 Display Stand (1/144 Scale), Black-Lacks weight IMO but all stands might be this way and can be solved with... well, weights I suppose.Tamiya Craft Tools Disign -Knife for Gundam model kitI would recommend the file set and sandpaper before this (for cleaning up nib marks) but this has its specific uses as well.Tamiya 74003 Angled Tweezers-Pretty much required for decal work.Alvin Professional Cutting Mats Green/Black Size - 12L x 8.5W inches-Great working surface!Xuron 410T Tapered Tip Shear-These worked great for me, though they do offer even higher quality onesTAM74104 Tamiya Tools - Basic File Set - Smooth Double-CutTAMIYA Finishing Abrasives 2-type Sets [Fine and Ultra-fine]-Using the files before the sandpaper will save you money long term.Testors Aerosol Enamel Paint 3oz-Dullcote Lacquer-SOOOOO WORTH IT.Bluecell 25 pcs Alligator Clip Stick for Airbrush Hobby Model Parts-Perfect for holding parts that need sprayingStyrofoam Block 2"X3"X10" 1/Pkg-Green-Stick the alligator clips in this for drying. This was a little narrow but I made it work.Tamiya 87038 Extra Thin Cement Glue Fine Tip 40ml-Only had to use it once as I broke a piece in half. Works better than super glue and is meant for these types of plastics. Also smells terrible.GSI Creos Gundam Marker Basic Set (6 Markers)-The Panel line marker in this set is terrible (a lot of the reviews agree on this point) but I will update with the actual paint review when I use it on my next kit.Any questions? ;D
S**N
The best action figure kids should never play with
****Before I start talking about my experience of a grown man playing with a toy, let me make it clear:This product is NOT for children. If your child is going through their, "I should put this in my mouth," phase, keep this as far away as possible.Do NOT buy this with the intent of putting it together for your kids to play with. These things are not built for roughing around with. Sorry to say, but their purpose is to simply get built and put it on a shelf to look at for the rest of your life.****I never liked the Gundam cartoons growing up. Not because I thought it was bad, I just couldn't get into the series no matter how hard I tried, but I was always fascinated by the titular mechs that would go at it, which led me to the models. When I was a kid, I bought the cheaper, simpler models and even if I didn't care for the design of the final piece or something got screwed up along the way, the process of building the model always excited me.I'm now in college, and I haven't touched a Gundam kit in years, but for one reason or another my interest was rekindled, and I started looking around for another model to restore some nostalgia. Unfortunately, my knowledge on this stuff is lacking. I had no idea what was so much better about this brand versus that one, so I decided to see for myself and compare one of the simpler kits (Gundam Seed - Aegis Gundam 1/144 Scale Model Kit #03) with this pages model kit.First off, avoid the Gundam Seed model. You can hardly pose the thing, it's cheaply made, and just... lacks any kind of challenge... but hey, you get what you pay for.Now, Gundam RX-178 Gundam Mk-II Ver 2.0 MG 1/100 Scale (you can understand how easy it is for a casual modeler like myself to get confused with titles like that).This is easily the best kit I've ever worked with.The model is made of two sections, the skeleton and the outer armor. While the instructions are a little lengthy as well as in Japanese, it has detailed illustrations that will help you each step of the way.The skeleton... wow. Just wow. As I was putting it together, I was amazed at how much thought went into this. I actually stopped for a little bit when I finished the first leg. There was so much articulation in it, the knee, the ankle, the heel... it was completely functional, with sections that would pump up and down or move in some way, like a machine actually moving. Extremely well designed, and that was just one leg. Once the whole body was made, I was amazed at just how small and light something as detailed and incredible looking as this could be. The interior alone is impressive enough to be a model in itself... but this is just the first half.The outer shell, while not as complicated as the first half, is just as well crafted and creative. Of course, sections like the limbs and bust require quite a few steps to get the armor on, but it doesn't stop there. Simple parts like the shoulder pads, the flaps on the front and back of the waist, and even the weapons and shield could have easily been single pieces, but instead these parts have to be put together themselves, which makes them look even more complex and detailed while at at the same time giving the modeler a greater sense of satisfaction. Throw in some of the smallest decoration stickers you'll ever see in your life, and you have your miniature Gundam.So your model is complete, what next? Remember the incredible articulation I was talking about with the skeleton? Even with all the additional armor, there model has so much movement, it's crazy. They even give you alternate hands for certain poses like gripping, open palm, holding the weapon, and even have a set of hands with movable fingers.... Just... wow.I did have a few pieces pop off here and there, but their easy enough to snap back in and are hardly a problem. The only real trouble I had with the figure was just how clumsily big my fingers are. Snapped off a piece of armor here, lost a sticker there. It's annoying, but really keeps you on the alert and makes things all the more rewarding when your done with it.For modelers, this is highly recommend. It's a little more complex than what some may be used to, and the price, while not to expensive, is more than what some might be used to paying. But I can honestly say it's worth extra money, and I can't wait to check out the more advanced stuff in the future.
Trustpilot
Hace 1 mes
Hace 1 mes