🔧 Upgrade Your Setup with Ease!
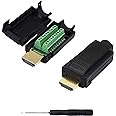
The SinLoon HDMI Solderless Adapter is a versatile and user-friendly solution for extending HDMI connections. With a maximum cable diameter of 11mm, it supports HDMI 2.0, 1.4, and 1.3 standards, making it ideal for various devices. The package includes two adapters and an assembly screwdriver, ensuring you have everything you need for a seamless installation.


| Unit Count | 2.0 Count |
| Package Quantity | 1 |
| Finish Types | Gold |
| Color | Black2 |
| Warranty Type | - |
| Input Voltage | 12 Volts |
| Connector Type Used on Cable | HDMI |
| Number of Ports | 19 |
| Compatible Devices | HDMI-compatible devices such as televisions, projectors, computers |
M**R
Works great!
Was a great purchase. I was able to repair an HDMI cable between my TV and the DishTV satellite box (in a different wall mounted cabinet) where the end had started to come off. Ran inside the walls of my RV, running a replacement cable was not really an option. To figure out the correct wires to connect to which terminal I had to cut my cable and trace each wire back one by one to the broken on the original. Color coded diagrams mean almost nothing as each HDMI manufacturer does their own thing.My Plan B option was a wireles HDMI transmitter/receiver pair.
B**R
did what it claimed to be!
Actually worked well. Saved me a lot of time and potentially money. I was told my cable was not repairable, till I found this adapt their online. Came with the necessary tools to install it.
R**N
Confusing install
It would seem that it would be easy to just match wiring colors but it isn't. No instructions or wiring schematic came with this HDMI connector. I contacted the seller who advised they could not help and for me to use a multimeter. That doesn't help.
D**D
Not sure if it works or not
I spent hours wiring up an existing cable and the end result was still a useless cable. It still could be a broken wire deep in the cable, and because I did not test the continuity of every wire I can't say it wasn't. When the assembly of the wires was complete, I could not get the plastic packaging back together. I guess my existing HDMI cable was just too think.
J**Y
Decently easy replacement head for HDMI cable
I have about two decades of professional and DIY/self-taught repair, installation, troubleshooting experience in basically everything from plumbing, residential and industrial commercial electric, diesel engines including diesel electric generators, small electrical repair like soldering components, industrial HVAC install and repair… list goes on.I’d rate this repair kit as a 6/10 or 4/5 stars.Pros: it works!Fairly easy to work with replacement connector head. The plastic housing for the connector is, like many consumer electronics for the past 30 years, plastic injection molded BUT it seems like they used heavy-grade plastic unlikely to break from simple usage. So that’s fineCons:-no instructions came with the unit. The pin out shown on this sales page was not correct for my cable! (25ft in-wall HDMI that I snapped the original head on (oops))In order to successfully complete this repair without going insane you will absolutely need a multimeter capable of reading resistance. No way out of that. Do not buy this if you don’t have a multimeter. I assure you it will be a waste of your time and money with the one exception of you have access to accurate and correct schematics from the manufacturer showing the correct pin outs. I wouldn’t trust that though! Just get a multimeter or don’t bother. Seriously.Few notes for people to help someone hopefully:Once you strip the wires on the replacement end (so you’ll need real electrical wire strippers. A sharp knife and steady hand will also work, but, if you value your time and sanity get strippers) you’ll have a variety of bundles of 3 wires (I assume these are send/receive data lines with a bare ground wire. It’s not that important to know what they do as long as you just know where to connect them) and some loose wires. 19 wires seems to be the standard for HDMI. The replacement board has 20 terminals for wires, obviously the 20th goes unused.Strip those 19 wires carefully. Take your time. They’re probably made from super cheap supply and annoying to strip. Just go slow.Spread the wires out. Take a female-female HDMI connector (meant to connect 2 cables to create one long cable). Plug your replacement new HDMI end into one end and the good old end of your cable into the other. See picture.Now you have a super easy way to poke down onto the underside of the replacement end board. Use alligator clips to snuggly hold the exposed wiring, poke the board, and write down the pin numbers and associated color in a way you’ll understand. Do all 19. That’s the longest most tedious part. Then you just stick the stripped wires in the terminals, tighten down, double check for loose or shorted wires, and test it out. Overall, first time for me messing with a HDMI cable internally, it took me about an hour or so. Not that hard, slightly annoying. If you have a setup and the tools you’ll be done quickly.Btw, if you’re buying this for an open easy to replacement cable (so not like in a wall or ceiling), don’t bother imo. If the cable is $15 well this replacement is $10 + time from your life which you probably value more highly. This is for expensive (long) cables or cables that were cut to fit through a floor or something.Pictures are: 1 and 2: the easiest setup for pin testing (replacement board -> female to female connection -> original unbroken HDMI end. The other end of the cable is stripped wires. Test continuity between the pin 1-19 and wires 1-19) 3: finished repaired working end
S**O
Takes a lot of patience but it works!
Had the connector from an HDMI cable that ran behind a wall break. Replacing the cable was not an option, so I got this adapter instead. Took me a couple of tries but managed to get it to work. The inside of an HDMI cable has 19 individual cables, so it takes a lot of patience! What other reviewers here are saying is absolutely true, don't even attempt to do this without a multi-meter, you will not be able to get it to work!!
C**P
Unable to use
I had hopes for this as we have an HDMI cable fed through the wall that broke so was hoping to just fix the end. Wasn't able to use as HDMI cables have no standard for colors used. Without changing both ends to be sure they matched, there was no way to know which wire needed to go in each spot. But if you knew for sure, then I feel it would have been easier. I even looked up to try to find more color options but it just wasn't readily available since no standard & consistency across the board for these cables.
E**H
Sometimes ya just gotta fix it versus replace it.
As many with motorhomes know, pulling a new wire through the insulated walls of a motorhome is next to impossible. Some time you just have to fix a cable.. These hdmi repair connectors are perfect for doing a solid and professional looking job of replacing a broken hdmi connector. There are many youtube vids on hmdi pinouts and similar repairs so I won't describe that, but it's easy. Note: The set screws need to be first backed off, meaning turn them all counter-clockwise as far as they will go before you get started, then when you insert each wire you can properly tighten them down (clockwise)... not sure why the mfg'r didn't do this for installers (probably to save cost)... Despite this trivial additional work, these connectors are very good quality. Thank you.
Trustpilot
Hace 3 días
Hace 2 semanas