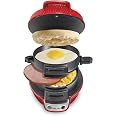
🥪 Elevate your breakfast game with the ultimate sandwich maker!
The Hamilton Beach Breakfast Sandwich Maker is a versatile kitchen appliance designed to create delicious breakfast sandwiches in just 5 minutes. With customizable ingredients and easy cleanup, it's perfect for busy professionals and food enthusiasts alike. Ideal for gifting on various occasions, this compact and stylish red sandwich maker ensures you enjoy fresh, homemade meals without the hassle.
Cable Length | 5.25 Inches |
Item Weight | 3 Pounds |
Item Dimensions D x W x H | 8"D x 8"W x 10"H |
Style | Sandwich Maker |
Color | Red |
Material Type Free | PFOA Free, PFAS Free, Lead Free |
Material Type | Plastic |
Warranty Type | full warranty |
Voltage | 1.2E+2 Volts |
Number of settings | 1 |
Wattage | 6.5E+2 |
Additional Features | Manual |
K**T
So good I have two!
About six months ago I purchased my first sandwich maker as an impulse buy. I'm a bit of a gadget guy so i succumbed to the impulse. My usual weekly routine was to stop by the McD's on my way to work and buy a McMuffin with egg or sausage each day. The coffee comes with me from home, so its a single purchase stop.My first attempt at making a sausage sandwich at home was mediocre at best when compared to my drive through experience. The issues were;1. The muffin was too small and did not contain the egg and sausage properly.2. The egg stuck to the maker leaving a mess to clean up.3. The egg leaked a bit around the sliding plate making a small mess.4. The precooked sausage and Canadian bacon was not heated properly.5. The egg was tough from over cooking.After a bit of experimenting all the issues were solved and I have been enjoying breakfast sandwiches each morning, and know whats in them. Here is what I learned.The first problem of too small a muffin was solved by carefully selecting which brand you buy. From my experience, the cheaper the muffin, the smaller it is. You want a full size muffin that will fill the makers cooking chamber. Since I live down the street from a restaurant supply company, I buy my muffins there. They are full size and come in 10 packs. Surprisingly, they are cheaper per muffin than my local grocery store.The next problem was solved by giving the egg cooking chamber a spritz of cooking spray after preheating the maker. This means the sliding plate as well as the sides of the ring. I use an olive oil based spray I get at the local Wally World. No more sticking and torn eggs.The leaking was solved by first preheating the maker a little longer. I plug it in first and then go get my ingredients. The extra minute or two of preheat after the green light turns on makes a difference. Another thing that helped was the cooking spray. I apply it when the maker is hot. This seems to make a seal between the plate and ring.The sausage not being hot enough was solved by not using a frozen patty or bacon slice. I now keep the ingredients in the refrigerator so they are cold, but not frozen. This change eliminated the issue completely. Again I have found the best deal on the ingredients at my local restaurant supply, but the Wally World sometimes beats them. If you buy a big package, just take a weeks worth and put them a plastic bag in the refrigerator and keep the rest in the freezer.Finally the tough egg. This issue was a show stopper for me. I hate tough eggs and not solving the problem meant the maker was getting returned. It turns out the solution was rather simple. Preheat the maker a bit longer as mentioned earlier and shorten the cooking time to 3 minutes. The result is a perfect egg (for me) with the rest of the sandwich thoroughly heated.Clean up was a breeze after using the cooking spray. I remove the cooking rings and wipe down with a damp cloth or place in the dishwasher. The maker body gets a quick wipe down and that it.If you are a bit adventurous, try making lunch or dinner sandwiches by substituting the breakfast meat with corned beef or pastrami from the deli. In the egg chamber place a thin slice of onion and a bit of swiss cheese.After six months, I am thoroughly satisfied. In fact I have bought a second so I have one at home and one to take with me for my regular extended hotel stays required by my job. The cost savings was amazing. This product paid for itself after two weeks just in drive through savings.Good Job Hamilton Beach.Since my initial review, I have found one more trick to using this product. If you load the maker as recommended, you will have the cheese against the egg. This makes the egg want to slide around on the meat especially just after cooking. I now place the cheese between the bottom muffin and meat. Problem solved.Another tip for those using it in a hotel room or at work, I have found that Wally World sells small bags of pre diced onions, bell Peppers and jalapenos. I keep some in my hotel room fridge and instead of a plain egg, I will scramble and add some veggies. Either zap the veggies for a moment to defrost first or just not keep them in the freezer.To mix things up a bit, I have been using sour dough, wheat, and cinnamon raisin breads instead of English muffins. The rings make a great "cookie cutter" when pressed into the bread slice. After shaping the bread I spread a small amount of butter on the side of the bread contacting the heating surfaces. The result is a nice crunch! Try spreading a bit of pesto on the other side for a savory treat. Use little to no butter when using pesto otherwise it gets a bit soggy. My favorite is sour dough, pesto, havarti cheese, sliced roast beef, and shaved onions. Heavenly lunch/dinner sandwich!Have had a few questions on my comment regarding the size differences in english muffins. In my experience the ones I buy at a restaurant supply are larger and usually cost less per muffin than those I get at the grocery. To compare, I have uploaded a photo of each loaded into the maker. Note how differently they fill the cooking chamber. Hope this helps.Made an interesting discovery during my last trip to the restaurant supply for English muffins. Garlic flavored cooking spray. Another simple way to easily bring flavor to the sandwich maker. Made by Vegalene, it brings a lot of flavor to my more savory creations. It is available on Amazon if you search on the name. The price per can before shipping is identical to our local restaurant supply house.Another discovery which was obvious after thinking about it, was to vary the size of the egg. My local grocery stocks small through extra large eggs. Having tried them all, I vary between small and medium. Mostly to cut calories, but also have found the smaller the egg the shorter the cooking time.Did a bit of an experiment recently which I want to share. While at our local Wally World I noticed some real bacon bits. Not the hard crunchy imitation kind, but the real thing. Bought a bag and gave them a try this week. On the bottom muffin, I sprinkled on a layer before putting on the cheese. The egg and top muffin was as usual. The result was excellent! A great change from my usual turkey sausage patty. Also a lot easier than fitting in strips of bacon. Have also tried them on the slide plate prior to adding the egg. Used a medium egg because of space. The bacon cooks into the egg which is actually better from a structural standpoint. Also added about 30 seconds to the cook time for best results. Have found the bits at very reasonable large package price at the restaurant supply. Just break down the lot into smaller bags and freeze. Keep just enough in the fridge for daily use.Hello again, the sandwich makers are faithfully doing their jobs with no breakdowns or complaints after almost a year of use. I recently found myself with a bunch of bbq'd Italian sausages in the fridge. The idea arrived to cut them into rounds about 1/4 inch thick and use them in lunch and dinner sandwiches. They worked great!! Just layer them on the bottom muffin and sprinkle with some grated mozzarella cheese. For an extra kick, I threw in a few fresh basil leaves. Depending on your mood, the egg is optional. A real treat for a light dinner. One variation I really like is to first spread some spaghetti or pizza sauce on the lower muffin before adding the sausage and cheese. Cook for a bit longer to warm thoroughly before dropping the top muffin. The result reminds you of a meatball sandwich from the Italian deli.Good morning. Ended up last weekend with a couple of extra hamburger patties from Sundays BBQ. While packing for Mondays road trip for work, I decided to do a bit of an experiment by putting them in the cooler along with a few slices of onion. That night in the hotel I broke out the sandwich maker and warmed it up thoroughly. In the upper chamber went the hamburger patty. I hand form mine for the BBQ so it was smaller in diameter and about twice as thick. It fully fills the upper chamber nicely. About three minutes in I placed both parts of the muffin along with a folded slice of American cheese in the lower chamber. After around six minutes, the muffin was removed, separated and burger and onion installed. Excellent in room meal. Repeated again the next night by eliminating the muffin heating time and putting the assembled cold muffin, cheese, and heated meat into the heating chamber with the plate slid out. I actually liked it better this way, and seemed the overall time was shorter.An update on the hamburger post. One of my complaints has been that the outside of the muffin gets toasted excessively hard. Think I have found a way around this. After first thoroughly heating the machine, I split the muffin in half and reverse the slices so the cut sides form the top and bottom surfaces. They both then go into the bottom chamber minus any cheese. The meat goes into the top chamber and the lid closed. After about 1 to 2 minutes, or when you flip the meat, open the lid and lift the entire ring assembly out leaving the muffin exposed. Now flip the muffin over. You will see the surface that was resting on the heating plate is a toasty golden brown. Return the ring assembly and close the lid. After another 1 to 2 minutes, assemble your hamburger adding the cheese if desired. Note the bread is soft on the outside and toasted on the inside. An added benefit is that the moisture driven from the muffin during toasting is contained in the chamber making the muffin soft beyond the toasted surfaces.I think this is a technique that can be extended beyond hamburgers with a bit of experimentation. Will keep you posted.Was able to try this technique with some precooked Italian sausages for lunch today. Had a few left over from yesterday's BBQ, so here is what I did. Starting with a hot sandwich maker, I split and reversed the muffin as previously described. In the top chamber, I layered in about a half a sausages worth of slices straight from the fridge. Next the maker was plugged in. About thetime the green light cam on, the sausage just began to sizzle. Then as described above I removed the entire ring assembly and flipped the toasted muffin also removing the upper muffin. After replacing the rings, a whole slice of provolone went on top of the sausages along with the un-toasted muffin. The lid would not close fully, but did after the cheese melted. Alter the green light turned on again, I opened the slide allowing the sausage, provolone, and top muffin to drop down. Heating for another minute or two resulted in a cheesy, sausage sandwich. The cheese melts down into the lower muffin tying the whole thing together. Next time I plan on adding some thin onion slices. Very hot and tastyDiscovered how to make a quick hot pastrami sandwich today. Using the removable rings like a cookie cutter, I cut two circles of rye bread from a single large slice. Placed them both in the bottom compartment and turned on the sandwich maker. When the green light came on, the bread rounds were flipped to toast the other side. The top compartment was loaded with a bunch of slices of pastrami and a slice of provolone. Once the meat was hot and cheese melted, the slide plate was opened and the rings removed. Placing the now toasted round on the top completed the assembly.Another variation on the breakfast sandwich without any meat. Using the previously described toasting method, the maker was loaded with an English muffin. After preheating and flipping the bread, two small eggs were placed in the upper compartment along with some garlic salt and a few dashes of hot sauce. Surprisingly they both fit and don't overflow the space. Cooking time is a bit longer but the combination of egg, salt garlic and heat makes for a great sandwich.There are times when I want just an egg. I like mine as an omelette so I mix in some crumbled bacon and diced onions. They are tho ones previously described in this review. Normally I use two small eggs and they fill the upper chamber nicely. After about three minutes, just take out the rings by the handle and open the slide over your plate. Delicious!One comment on the durability of the device. In my experience it is good. Over a year of everyday use, and nothing has gone wrong. Even the nonstick coating is in good shape. Will keep you posted.Good morning! Did a bit of an experiment this morning. Having a bunch of thinly sliced pastrami in the fridge along with equally thin sliced onions, I tried a pastrami breakfast sandwich. In the bottom chamber went the lower muffin half, some thinly sliced onions and finally enough thin pastrami to fill up the remaining space. In the upper chamber went my usual egg, garlic salt, and muffin top. Three minutes later out came a bit of heaven. The egg was just a little bit soft bordering on runny. The soft egg with the hot pastrami was a tremendous combo and made me glad there was no cheese to get in the way of the flavor. This may become one of my regulars it was so good.A quick note on durability, it's excellent. After almost daily use for a few years, it's still going strong. There is a slight bit of wear of the nonstick coating where the slide plate contact the rings, but that's it. Normally I wipe clean with a damp cloth and the rings into the dishwasher twice a week.When I thought that I had tried all possible combinations, another was found. A can of corned beef was opened in our house by accident a few days ago. It was one of the rectangular cans similarly sized to a Spam can. By slicing the corned beef lengthwise with a sharp knife, I ended up with three slices, just slightly larger than an English muffin. After trimming off the corners they fit perfectly in the Sandwich Maker.After thoroughly warming up the maker, a slice went into the bottom chamber and the whole English muffin went into the upper. In a few minutes, of sizzling one of the corned beef was nicely browned and crispy. Next the corned beef was flipped over and an egg went into the upper chamber after removing the now warmed muffin. By the time the egg was done, the other side of the corned beef was browned. Assembling the muffin, egg & corned beef made for a unique very tasty sandwich loaded with protein.Merry Christmas all. Our sandwich maker is turning three and still operates perfectly. Zero problems, zero complaints, and that's with almost daily use.Will keep posting as discoveries are made.Good morning again! Over three years in and no problems whatsoever. Even the nonstick coating is perfect. Have changed up my technique a bit. Instead of the using the maker to toast the muffins, I let it cook the egg and sausage, and toast the muffin seprately. Starting with a cold maker, i put a frozen sausage patty in the bottom compartment and plug it in. At the same time i pop the muffin in the toaster. In around a minute, you hear the sausage sizzle. Flip it and crack an egg in the top compartment. About the time the toaster pops, the egg will be done. Open the slider and let the egg fall onto the sausage, then put them onto the muffin. Cheese optional. The crispy muffin is great. The overall time is really no longer than using the maker alone.Hello all. The sandwich makers are still going strong. I had expected that they would have failed by now considering their 2013 purchase. Still love the product and use it almost every day.Its July 2017 and the sandwitch maker is still going strong after being used almost every day. Nothing to complain about.It's a month later and I made another twist to my technique. There are mornings, like Saturday's that I want something more than just the sandwich. My favorite paring is hashbrowns. So is it possible to do hashbrowns in the Sandwich Maker and not dirty up a fry pan? Yes it is.So I start with a cold maker and load a pre-cooked sausage patty in the bottom compartment. In the upper goes mini tater tots, I use enough to just make one even layer. Plug it in and let the magic happen. When you hear the sausage sizzling, lift the lid and upper compartment, then flip the sausage and close it up. The potatos are ready for the lower compartment now so slide the plate and let them drop. You may have to do some rearranging with a fork to get one layer then slide the plate closed.Now crack the egg into the upper. You may or may not have to use cooking spray depending on your desires. Put the muffins in the toaster. About the time the muffin is done, the egg will be also. Now just assemble the sandwitch, put the potatoes on a plate and your done!The only things to clean beyond the sandwich maker is a plate and fork should you choose to use them.
C**L
I wonder if my local McDonald's thinks I'm dead
So it all started a while back with the McDonald's app offering me 50 cent Egg McMuffins, so every morning I'd find myself in the drive through getting one. Then they had me and changed the offer to $1 Egg McMuffins and I was still in, every day stopping there, the workers calling me by name and telling me to have a great day....it was all part of the routine.But then my husband challenged the idea. Even at 75% savings, there was still the time in the drive-through, the vehicle idling, there had to be a better way, right?So we looked at reviews, we watched videos on Youtube, I was skeptical, but try to be a team player. We ordered it and I made my first sandwich. I didn't exactly follow the instructions, but it was pretty good. Like comparable to McDonald's. And my prep time was under five minutes, and the ingredients (purchased on sale) came in at around 83 cents. (Note - currently egg prices are high so they're a little more now, but definitely cheaper than a full price Egg McMuffin)Second time I made one I followed the instructions more, but found it wasn't quite as good as the first one I made, so I started experimenting.I now have it down to a science - a new routine. I wait for the unit to heat up, the put the bottom of the muffin with the Canadian bacon on, then for the next layer a tiny squirt of cooking spray before cracking the egg. It's important that the unit be heated for this as then the egg cooks at the edges quickly to seal up where the parts come together. Once the egg is in, I poke the yolk with a fork and close the top.I do NOT put the top of the muffin on at this point - the top seems to need less cooking, so I wait. I give it about five minutes, add the top piece then cook for another minute. At that point, I pull the whole thing off and put it on a plate. If I add the cheese at that point, it gets a little goey, as the American cheese melts super fast on the hot egg and is very runny. If you wait a few minutes for it to cool down, then it's closer to McDonald's. So I go back and forth on this, depending on my mood.But here's the cool part - you don't have to just make Egg McMuffins on this thing. There's lots of other sandwiches, and sometimes I'll substitute sliced bacon for the Canadian bacon, but know what's even better? Making gooey cookies on it. Yeah, it's awesome. I take a small piece of parchment paper (you can buy individual squares that fit ok, you just have to round them up since you're putting it on a circular spot. Then you dump some cookie dough in there, monster cookie dough is pretty good, as is oatmeal chocolate chip - and the oatmeal makes it healthy, right? Of course! I cook for 5-7 minutes and it's super gooey still.When I'm feeling even more decadent, I'll throw a couple scoops of ice cream or frozen yogurt in a cup and then stick the gooey cookie stuff on top of it. What a way to start the day!Admittedly the design could be a little better - there are a few spots where egg goo can get in and it's hard to clean it out, like neat the hinges/screws, but overall it's a game changer and I was pleasantly surprised at how well it works.Ironically I found one of these sandwich makers at a garage sale for $3 the day after my Amazon one came in the mail. I was already so enamored with mine though that I bought that one as a back-up - I just don't want to go a day without my Egg McMuffin! And now when I drive past McDonald's on my way to work, I wonder if they wonder what happened to me.
E**E
Positive Revised Review
Revision to earlier post: I am embarrassed to say there was nothing wrong with the sandwich maker. I kept fiddling with it and i got the two halves to join finally! I have used the maker a few times and discovered i had to come up with a method, thanks to other reviews, that worked for me. My only caution is to clean any egg or cheese overflow right away. Much easier to clean. It really is a great little machine thst cooks great sandwiches.Old:The HB sandwich maker turns out a tasty egg, bacon, cheese and English muffin sandwich. (I used pre-made bacon.)I have experimented 2 times and came to the conclusion that my maker, unfortunately, is defective. I thought I might have been doing something wrong.You see, there are 2 small slots on either side of the hinge that a round silver bar fits into. That bar allows you to open and close the maker's lid and rings, as needed.There are several videos on YouTube with some excellent hints about using these makers.The videos showed me that my silver bar does not fit correctly. One side of the bar slips into place but the other does not. It is a tad too long. I have 4 days left of Amazon's return window so I will return it. I am hoping the problem was just a fluke, so i will ask for another.
Trustpilot
Hace 1 mes
Hace 2 meses